background image

12

3.1  Version Information   Psgver.exe ........................................................................... 3-11

3.2  Auto Start   AutoRun.exe ...................................................................................... 3-11

3.3  Terminal Services Connection Wizard   TsConWiz.exe ......................................... 3-12

3.4  Applications for Pro-Designer Runtime Installation   PDLoad.exe/PortChanger.exe .. 3-14

4  Shut Down ....................................................................................................... 3-14

Chapter4  Maintenance and Inspection

1  Regular Cleaning ............................................................................................... 4-2

2  Periodic Check Points ........................................................................................ 4-2

3  Replacing Consumable Items ............................................................................ 4-3

3.1  Replacing the Installation Gasket ........................................................................... 4-3

3.2  Replacing the Backlight .......................................................................................... 4-4

Chapter5  Troubleshooting

1  Troubleshooting Checklists ................................................................................ 5-2

1.1  No display (Windows CE does not start) ................................................................ 5-3

1.2  Touch panel does not respond ................................................................................ 5-3

1.3  Connected devices cannot be used ........................................................................ 5-4

Appendices

1  Specifications ..................................................................................................... A-2

1.1  Electrical ................................................................................................................. A-2

1.2  Environmental .........................................................................................................A-2

1.3  Structural ................................................................................................................A-3

1.4  Performance ........................................................................................................... A-4

1.5  Display .................................................................................................................... A-4

1.6  Touch Panel ............................................................................................................ A-5

2  RAS Function ..................................................................................................... A-6

2.1  Overview ................................................................................................................ A-6

2.2  RAS Function - Details ........................................................................................... A-7

2.3  RAS Function Diagram ......................................................................................... A-11

3  Accessories ..................................................................................................... A-12

Index

Summary of Contents for PS-400G Series

Page 1: ...User Manual PS 400G Series...

Page 2: ...ng or distribution of this equipment or its manual either in whole or in part without written permission fromDigital Electronics Corporation is prohibited 2 The information provided in this manual is...

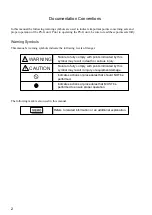
Page 3: ...e following levels of danger The following mark is also used in this manual WARNING CAUTION Failure to fully comply with points indicated by this symbol may result in death or serious injury Failure t...

Page 4: ...ter and crime prevention devices various types of safety equipment non life support related medical devices etc redundant and or failsafe system designs should be used to ensure the proper degree of r...

Page 5: ...ge shocks or excessive vibration can occur Do not store or use the PS G unit in environments subject to chemical evaporation such as that of organic solvents or where there are chemicals and acids pre...

Page 6: ...is turned OFF prior to connecting the power cord terminals Failure to do so may result in an electric shock Since the PS G is not equipped with a power switch be sure to connect a breaker type power s...

Page 7: ...developed applications For information concerning application software development environments and software integration methods please refer to PS Series Type G Application Development Kit ADK Develo...

Page 8: ...es or other equipment If these requirements are not met the heat generated by the PS G unit s internal components may cause the unit to fail to meet UL and C UL CSA standard requirements UL 1604 Compl...

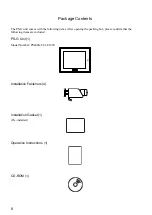
Page 9: ...h the following items After opening the packing box please confirm that the following items are included PS G Unit 1 Model Number PS400G T41 E124V Installation Fasteners 4 Installation Gasket 1 Pre in...

Page 10: ...tents The following items are included in the CD ROM Product Name Description PS 400G Series User Manual PS 400G Series User Manual PDF file Acrobat Reader 5 0 Required for viewing PDF files Self extr...

Page 11: ...r more information concerning other PS G specifications please contact your local Pro face sales representative Backlight Burnout Precautions After the PS G unit s backlight burns out the screen will...

Page 12: ...n 1 System Design 1 2 2 Part Names and Functions 1 4 3 Dimensions 1 7 Chapter2 Installation 1 Installation Procedures 2 2 2 Connecting the Power Cord 2 7 3 Interface Specifications 2 9 3 1 Serial Inte...

Page 13: ...umable Items 4 3 3 1 Replacing the Installation Gasket 4 3 3 2 Replacing the Backlight 4 4 Chapter5 Troubleshooting 1 Troubleshooting Checklists 5 2 1 1 No display Windows CE does not start 5 3 1 2 To...

Page 14: ...1 1 System Design 2 Part Names and Functions 3 Dimensions Introduction...

Page 15: ...cannot be used at the same time PS400G T41 E124V Expansion unit interface 2 Expansion unit interface 1 RAS interface Sound output terminal block Printer interface Rear of PS G unit Connector panel Pri...

Page 16: ...01 COM1 COM2 Computer RS 232C cable Commercial type PS Series Type G Application Development Kit ADK PSG DK01 Microsoft eMbedded Visual Tools For more information refer to PS Series Type G Application...

Page 17: ...S G unit screen data B Touch Panel Provides mouse less screen control C Status LED Indicates the PS G unit s status Green Power ON Normal operation At Start Up the LED lamp changes from Red to Green O...

Page 18: ...CF Card Cover Protects the CF Card slot H CF Card Slot Accepts a standard CF Card I Printer Interface PIO Connect your printer cable here Parallel J K Serial Interfaces COM1 COM2 Connect RS 232C cabl...

Page 19: ...PS 400G Series User Manual N Ethernet Interface 10BASE T Connect a 10BASE T Ethernet cable here O USB Interfaces 1 USB1 Connect a USB USB ver 1 0 compliant device keyboard mouse etc here Side Left N O...

Page 20: ...1 7 1 Introduction 3 Dimensions PS 400G Installation Fasteners 11 0 43 16 0 63 19 5 0 77 31 1 22 10 0 39 M5 Unit mm in 204 8 03 215 8 46 60 2 36 8 0 31 170 6 69 159 6 26 Unit mm in...

Page 21: ...1 8 PS 400G Series User Manual...

Page 22: ...res 2 Connecting the Power Cord 3 Interface Specifications 3 1 Serial Interface 3 2 Printer Interface 3 3 USB Interface 3 4 Ethernet Interface 3 5 RAS Interface 3 6 Sound Output 3 7 CF Card Insertion...

Page 23: ...nd better ventilation the space between the PS G unit and adjacent structures or equipment should be at least 100mm Check the installation conditions Check the installation gasket Prepare the panel In...

Page 24: ...s in a vertical panel If the PS G unit is to be installed in a slanted panel the panel should not incline more than 30 from the vertical If the PS G panel is to be installed in a slanted panel that in...

Page 25: ...et Panel Cut Dimensions Installation Gasket The PS G unit should always be installed using the pre fitted installation gasket even at locations where water resistance is not required The installation...

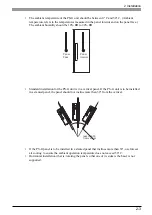
Page 26: ...Insert the PS G unit into the cutout section of the panel with the touch screen facing outward 2 Insert the installation fastener hooks into the four 4 insertion slots 2 on the top and 2 on the bottom...

Page 27: ...all fasteners are evenly and securely tightened The proper torque for tightening an attachment screw is 0 5N m CAUTIONS Fastener attachment screws must be perpendicular to the panel If they are not t...

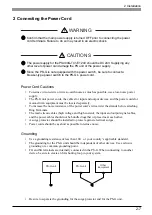
Page 28: ...located separately To increase the noise resistance of the power cord s wires twist the strands before attaching Ring Terminals The main circuit cables high voltage and high current the input and outp...

Page 29: ...o Ltd Connection Procedure 1 Confirm that the main power is OFF 2 Remove the terminal block cover s attachment screws 3 Remove the terminal block cover 4 Remove the screws from the three 3 middle term...

Page 30: ...2 RD RXD Receive Data Input 3 SD TXD Send Data Output 4 ER DTR Data Terminal Ready Output 5 SG Signal Ground 6 DR DSR Data Set Ready Input 7 RS RTS Request Send Output 8 CS CTS Clear Send Input 9 CI...

Page 31: ...essary Omron jack screws XM2Z 0073 can also be used Recommended cable CO MA VV 5B5P 28AWG Hitachi Connect the FG line to the connector s shell Use inch type attachment screws 4 40UNC The current ratin...

Page 32: ...iption Direction 1 GND Ground 2 ACK Acknowledge Input 3 PDB5 Data signal Input Output 4 PDB4 Data signal Input Output 5 PDB3 Data signal Input Output 6 GND Ground 7 SLCT Select Status Input 8 PDB0 Dat...

Page 33: ...erface may fail to operate correctly Therefore prior to using this type keyboard be sure to check that it operates correctly Microsoft Corporation Natural keyboard Pro However the Microsoft Corporatio...

Page 34: ...ack screws XM2Z 0073 can also be used Connect the FG cable to the shell Use inch type attachment screws 4 40UNC 1 General purpose Input will latch Input Information 8 1 15 9 Pin Number Signal name Des...

Page 35: ...lectronics Corporation pin jack cable GP077 SDAD10 The procedure for connecting a Line Output cable is the same however a separate amplifier will be required Connection Procedure 1 Check that the PS G...

Page 36: ...2 15 2 Installation 3 Loosen the set screw of each terminal outlet to be used as shown below 4 Insert each pin jack cable pin into its corresponding outlet 5 Re tighten each set screw...

Page 37: ...F Card CAUTIONS While the CF Card is being accessed do not turn OFF the power to the PS G unit perform remote reset input or remove the CF Card Prior to inserting the CF Card carefully check the orien...

Page 38: ...the and lift it open 2 Check the orientation of the CF Card before inserting it into the CF Card slot Insert the CF Card until the Eject Button pops forward 3 Close the CF Card cover then push it in...

Page 39: ...Card 1 Push the cover in the direction indicated by the and lift it open 2 Push the Eject Button until the CF Card pops forward 3 Close the CF Card cover then push it in the direction shown by the un...

Page 40: ...nel Settings 3 Internal Application 3 1 Version Information Psgver exe 3 2 Auto Start AutoRun exe 3 3 Terminal Services Connection Wizard TsConWiz exe 3 4 Applications for Pro Designer Runtime Install...

Page 41: ...t about 5 seconds then turn the power ON again Occasionally the PS G unit will not start up correctly When data has been backed up to a CF Card on a PS G unit running the new OS ROM Ver 1 04 that CF C...

Page 42: ...p Switch Settings The Dip Switches are located inside the CF Card cover The PS G unit s factory settings are Dip switch No 1 ON Dip switches No 2 to 4 OFF Normally these settings should not be changed...

Page 43: ...dure 1 Click on the Start button 2 From the Start menu that appears select Settings 3 From the Settings menu select Control Panel The Control Panel contains the following icons Backup Communications D...

Page 44: ...ngs revert to factory settings when the PS G unit s power cord is disconnected If you want to save any settings use the Control Panel s Backup feature to save them on the CF card Stylus This program c...

Page 45: ...is because backlight burnout is detected by monitoring the PS G unit s power consumption When backlight burnout is occurs the panel s status LED lamp will turn orange Then a dialog box indicating tha...

Page 46: ...automatically at Start Up and the Object Store will be restored Backup Procedure 1 Double click the Backup icon on the Control Panel 2 Insert the CF Card 3 Click the Backup button and the Object Stor...

Page 47: ...unters should be designed in accordance with API DLL specifications For more information refer to the PS Series Type G Application Development Kit ADK Developer Manual The following settings are avail...

Page 48: ...pecify the actions required after a timeout 3 Select the Din 0 tab and the Din 1 tab to enable or disable standard signal input If you enable standard signal input you will also have to specify the ac...

Page 49: ...r OFF Network When connecting your PS unit to a network via an Ethernet cable the following settings are required 1 Double click on the Control Panel s Network icon 2 In the Network Configuration dial...

Page 50: ...unit s version information It is located in the Windows folder 3 2 Auto Start AutoRun exe The application saved in the CF card can be automatically started when the PS G unit is turned ON The followi...

Page 51: ...tered in the Windows Startup folder 3 3 Terminal Services Connection Wizard TsConWiz exe This application is used to connect the PS G unit with a terminal service The steps to connect the PS G are as...

Page 52: ...he desktop 6 Double click this shortcut and confirm that the Terminal Service connection process is successful 7 Perform a backup and save the data to the CF Card When connecting for the first time li...

Page 53: ...tions for Pro Designer Runtime Installation PDLoad exe PortChanger exe Pro Designer Runtime Installer PDLoad exe This application is required when installing Pro Designer Ver 3 0 1 or earlier in the P...

Page 54: ...4 1 Regular Cleaning 2 Periodic Check Points 3 Replacing Consumable Items 3 1 Replacing the Installation Gasket 3 2 Replacing the Backlight Maintenance and Inspection...

Page 55: ...dic Check Points To keep your PS G unit in the best possible condition periodically check the following points Operation Environment Is the ambient operating temperature within specifications 0 C to 5...

Page 56: ...once a year or when scratches or dirt become visible Do not stretch the gasket The gasket is not elastic and may tear istretched Replacement Procedure 1 Place the PS G unit on a flat surface with the...

Page 57: ...nstalling the PS G unit 3 2 Replacing the Backlight The backlight is a long life product The average life of the backlight the time for brightness to fall to half its normal level is 50 000 hours in a...

Page 58: ...5 1 Troubleshooting Checklists 1 1 No display Windows CE does not start 1 2 Touch panel does not respond 1 3 Connected devices cannot be used Troubleshooting...

Page 59: ...manual The main problems that occur during use of the PS G unit are 1 The panel display is blank Windows CE does not start 2 The touch panel does not respond 3 Connected devices cannot be used 1 Troub...

Page 60: ...e within specifications Refer to Appendix 1 Specifications 4 Is the first Dip Switch inside the CF card set to ON and the second through fourth Dip Switches to OFF Set the first Dip Switch to ON and t...

Page 61: ...ower cord correctly Refer to Chapter 2 2 Connecting the Power Cord 3 Are the peripheral devices connected correctly Following the instructions described in the respective manual 4 5 Does this device r...

Page 62: ...cifications 1 1 Electrical 1 2 Environmental 1 3 Structural 1 4 Performance 1 5 Display 1 6 Touch Panel 2 RAS Function 2 1 Overview 2 2 RAS Function Details 2 3 RAS Function Diagram 3 Accessories Appe...

Page 63: ...erating altitude 800 hPa to 1114 hPa 2000 meters or lower Vibration Resistance IEC61131 2 JIS B 3501 compliant When vibration is NOT continuous 10Hz to 57Hz 0 075 mm 57Hz to 150Hz 9 8m s2 When vibrati...

Page 64: ...res are suggested Also if non approved oils are present it may cause deformation or corrosion of the front panel s plastic cover Therefore prior to installing the PS G be sure to confirm the type of c...

Page 65: ...on 32MB Backup 512KB Application data VGA 640 X 480 pixels 64 000 colors 2MB Serial Serial interface COM1 COM2 Dsub 9 pin plug type connector Printer Complies with Centronics Standards Narrow pitch 20...

Page 66: ...A 5 Appendices 1 6 Touch Panel Resolution 1024 1024 Type Resistive Film analog...

Page 67: ...bled or perform a variety of alarm processing using the RAS Control on the PS G unit s Control Panel Refer to Chapter 3 2 2 Control Panel Settings There is also an Application Interface Library API DL...

Page 68: ...programmable timer and then periodically clears them which provides a means of monitoring the CPU s performance If the clearing of this count value is stopped the timer will overflow and an alarm wil...

Page 69: ...circuit s ON state OFF is not monitored Remote Reset Input This is the reset signal sent from an external device to the PS G unit When this signal is enabled a forced reset of the PS G unit is perform...

Page 70: ...single lamp This general purpose digital output signal provides system condition information to external devices The Control Panel s RAS Control or an API DLL can be used to control this signal Extern...

Page 71: ...ssage feature to indicate that an alarm has occurred Use the Control Panel s RAS Control or an API DLL to enable or disable this feature Buzzer Output This feature uses the PS G unit s internal speake...

Page 72: ...Purpose Signal Input 1 Remote Reset Input 2 bit User Applications OS Reboot Pop up Messages Buzzer Output General Purpose Signal Output Alarm Output Hardware Reset Power ON Output Settings Enable Dis...

Page 73: ...Pin jack cable for sound output terminal block Printer cable PSM PRCB00 To connect the PS G unit to the printer DIO Unit PSG XY08 External I O Unit providing 8 digital input and 8 digital output point...

Page 74: ...Status LED 1 4 Structural A 3 Stylus 3 5 System Design 1 2 T Terminal Services Connection Wizard TsConWiz exe 3 12 Touch Panel A 5 Troubleshooting Checklists 5 2 A Accessories A 12 Auto Start AutoRun...

Page 75: ...Index 2 U UL c UL CSA Approval 7 USB Interfaces 1 6 V Version Information Psgver exe 3 11 Volume and Sounds 3 10...

Page 76: ...7892 http www proface com tw proface proface com tw North South America Pro face America Inc Xycom 750 North Maple Road Saline ML 48176 U S A Tel 1 734 429 4971 Fax 1 734 429 1010 http www profaceamer...

Reviews: