


16
13
HOW TO USE PERSONAL TRAINER PROGRAMS
Insert the key fully into the console.
See HOW TO TURN ON THE POWER on page
11.
Select one of the personal trainer programs.
When the key is
inserted, the
manual mode
will be selected.
To select one of
the personal
trainer pro-
grams, press the mode button repeatedly until one
of the four personal trainer program indicators
lights.
When a personal trainer program is selected, the
time/incline display will flash the maximum incline
setting for the program for six seconds, and the
speed/pace display will flash the maximum speed
setting. After a few seconds, the time/incline dis-
play will show how long the selected program will
last.
The four profiles on the right side of the console
show how the speed and incline of the treadmill
will change during the programs. The numbers
beside the profiles show the maximum speed and
incline settings for the programs.
Press the start button or the speed
▲
▲
button to
start the program.
A moment after the button is pressed, the tread-
mill will automatically adjust to the first speed and
incline settings for the program. Hold the handrails
and begin walking.
Each program is divided into several time seg-
ments of different lengths. The time/incline display
will show both the time remaining in the program
and the time remaining in the current segment of
the program. One speed setting and one incline
setting are programmed for each segment. (The
same speed setting and/or incline setting may be
programmed for consecutive segments.)
When only three seconds remain in the first seg-
ment of the program, a series of tones will sound.
In addition, if the speed and/or incline of the tread-
mill is about to change, the speed/pace display
and/or the time/incline display will flash to alert
you. When the first segment is completed, the
treadmill will automatically adjust to the speed and
incline settings for the second segment.
The program will continue in this way until no time
remains in the time/incline display. The walking
belt will then slow to a stop.
If the speed or incline setting for the current
segment is too high or too low, you can manually
override the setting by pressing the speed or in-
cline buttons. However, when the current seg-
ment of the program ends, the treadmill will au-
tomatically adjust to the speed and incline set-
tings for the next segment.
To stop the program temporarily, press the stop
button. The time/incline display will begin to flash.
To restart the program, press the start button or the
speed
▲
▲
button. To end the program, press the
stop button, remove the key, and then reinsert the
key.
Follow your progress with the LED track and
the four displays.
Refer to step 5 on page 11.
When the program is completed, remove the
key.
When the program is completed, make sure that
the treadmill is at the lowest incline level. Next,
remove the key from the console and put it in a
secure place. Note: If the displays and indica-
tors on the console remain lit after the key is
removed, the console is in the “demo” mode.
Refer to page 14 and turn off the demo mode.
When you are finished using the treadmill, move
the on/off switch near the power cord to the off
position.
5
4
3
2
1
HOW TO CONNECT THE TREADMILL TO YOUR
CD PLAYER, VCR, OR COMPUTER
To use iFIT.com CDs, the treadmill must be con-
nected to your portable CD player, portable stereo,
home stereo, or computer with CD player. See pages
16 and 17 for connecting instructions. To use
iFIT.com videocassettes, the treadmill must be con-
nected to your VCR. See page 18 for connecting in-
structions. To use iFIT.com programs directly from
our internet site, the treadmill must be connected to
your home computer. See page 17 for connecting in-
structions.
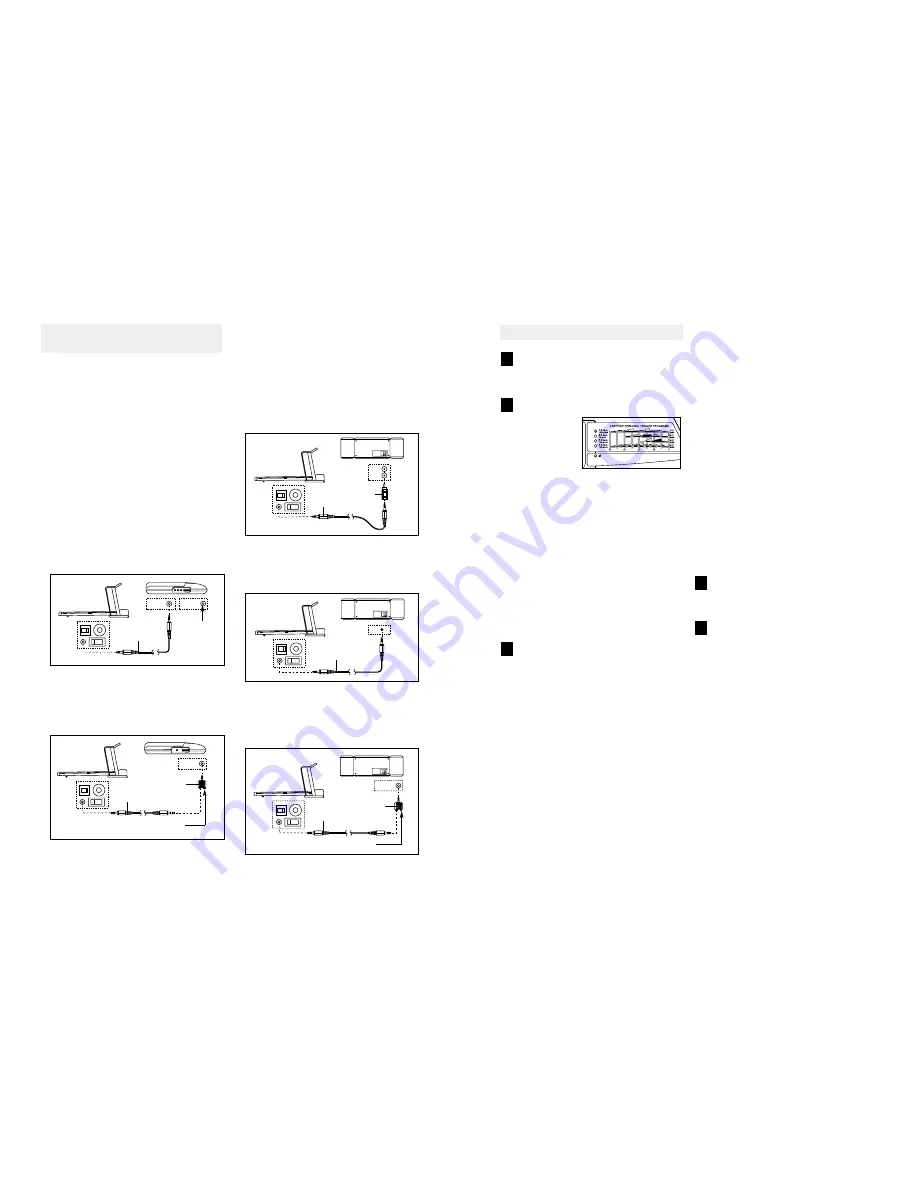
HOW TO CONNECT YOUR PORTABLE CD PLAYER
Note: If your CD player has separate LINE OUT and
PHONES jacks, see instruction A below. If your CD
player has only one jack, see instruction B.
A. Plug one end of the audio cable into the jack on the
front of the treadmill near the power cord. Plug the
other end of the cable into the LINE OUT jack on
your CD player. Plug your headphones into the
PHONES jack.
B. Plug one end of the audio cable into the jack on the
front of the treadmill near the power cord. Plug the
other end of the cable into the splitter. Plug the split-
ter into the PHONES jack on your CD player. Plug
your headphones into the other side of the splitter.
HOW TO CONNECT YOUR PORTABLE STEREO
Note: If your stereo has an RCA-type AUDIO OUT
jack, see instruction A below. If your stereo has a
3.5mm LINE OUT jack, see instruction B. If your
stereo has only a PHONES jack, see instruction C.
A. Plug one end of the audio cable into the jack on the
front of the treadmill near the power cord. Plug the
other end of the cable into the adaptor. Plug the
adaptor into an AUDIO OUT jack on your stereo.
B. Plug one end of the audio cable into the jack on the
front of the treadmill near the power cord. Plug the
other end of the cable into the LINE OUT jack on
your stereo.
C. Plug one end of the audio cable into the jack on the
front of the treadmill near the power cord. Plug the
other end of the cable into the splitter. Plug the split-
ter into the PHONES jack on your stereo. Plug your
headphones into the other side of the splitter.
LINE OUT
PHONES LINE OUT
PHONES
Audio
Cable
Head-
phones
A
AUDIO OUT
RIGHT
LEFT
Audio
Cable
Adaptor
A
LINE OUT
Audio
Cable
B
PHONES
Audio
Cable
C
PHONES
PHONES
Audio
Cable
Splitter
Headphones
B
Splitter
Headphones


