background image

15

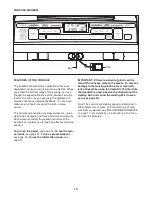
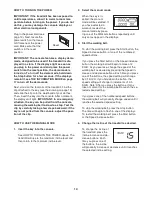
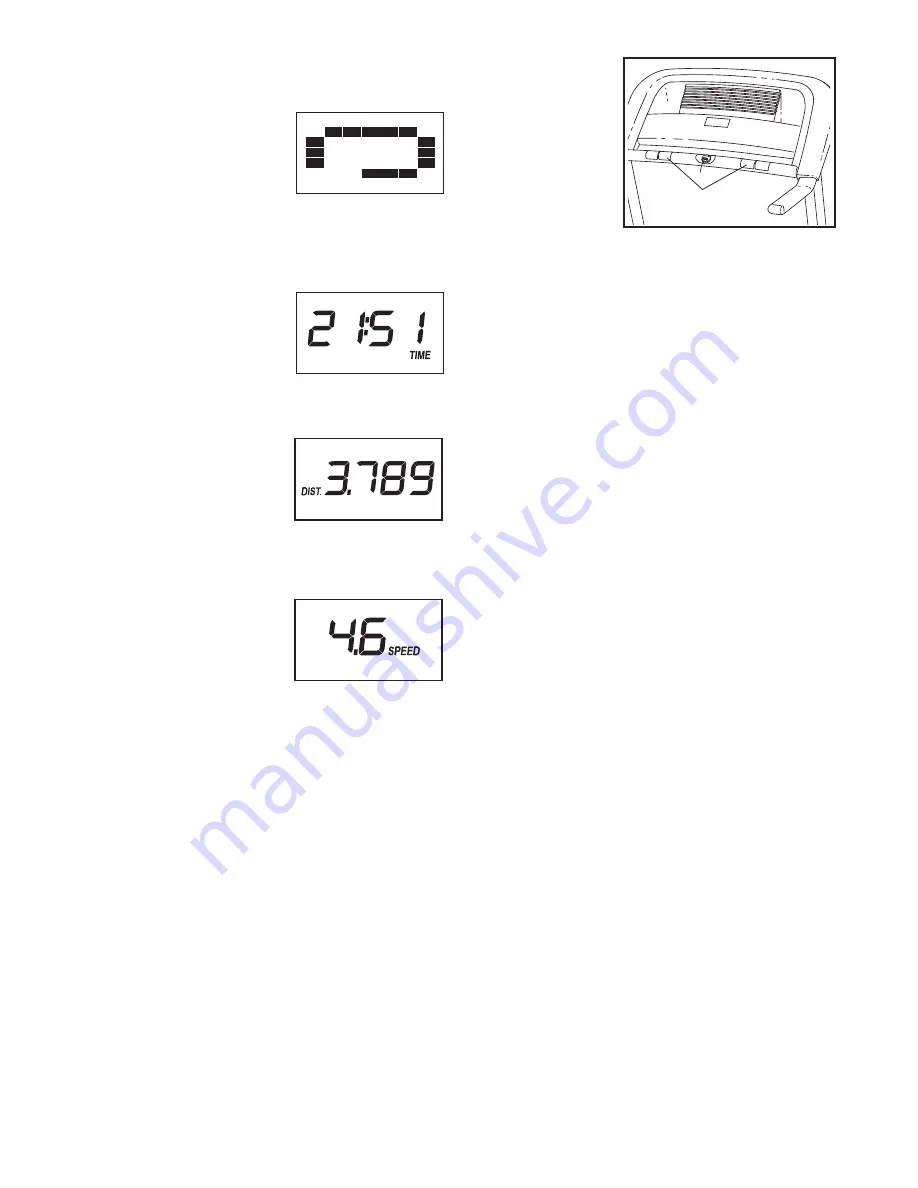
5. Follow your progress with the track and the

displays.

The track

—The track

represents a distance of

1/4 mile (400 meters).

As you walk or run on

the treadmill, the indica-

tors around the track

will appear in succession until the entire track ap-

pears. The track will then disappear and the indica-

tors will again begin to appear in succession.

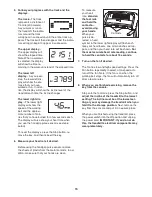
The upper display

The upper display will

show the elapsed time.

Note: When a workout

is selected, the display

will show the time re-

maining in the workout instead of the elapsed time.

The lower left

display

—As you exer-

cise, the lower left dis-

play will show the dis-

tance that you have

walked or run. In addi-

tion, the display will show the incline level of the

treadmill each time the incline changes.

The lower right dis-

play

—The lower right

display will show the

speed of the walking

belt and the approxi-

mate number of calo-

ries that you have burned for a few seconds each.

The display will also show your heart rate when

you use the handgrip pulse sensor (see step 6

below).

To reset the displays, press the Stop button, re-

move the key, and then reinsert the key.

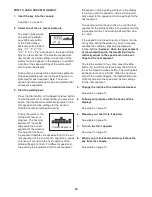
6. Measure your heart rate if desired.

Before using the handgrip pulse sensor, remove

the sheets of plastic from the metal contacts. In ad-

dition, make sure that your hands are clean.

To measure

your heart

rate,

stand on

the foot rails

and hold the

contacts—

avoid moving

your hands.

When your

pulse is de-

tected, a heart

symbol in the lower right display will flash each

time your heart beats, one or two dashes will ap-

pear, and then your heart rate will be shown.

For

the most accurate heart rate reading, continue

to hold the contacts for about 15 seconds.

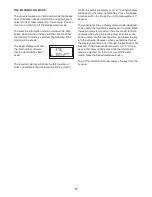
7. Turn on the fan if desired.

The fan has low and high speed settings. Press the

Fan button repeatedly to select a fan speed or to

turn off the fan. Note: If the fan is on when the

walking belt stops, the fan will automatically turn off

after a few minutes.

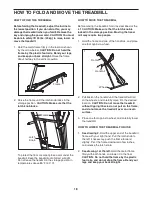
8. When you are finished exercising, remove the

key from the console.

Step onto the foot rails, press the Stop button, and

adjust the incline of the treadmill to the lowest

setting. The incline must be at the lowest set-

ting or you may damage the treadmill when you

fold it to the storage position.

Next, remove the

key from the console and put it in a secure place.

When you are finished using the treadmill, press

the power switch into the off position and unplug

the power cord.

IMPORTANT: If you do not do

this, the treadmillʼs electrical components may

wear prematurely.

Contacts

Summary of Contents for 400 ZLT PETL49910.0

Page 1: ...ture reference Serial Number Decal USER S MANUAL QUESTIONS If you have questions or if there are missing parts please contact us UK Call 08457 089 009 From Ireland 053 92 36102 Website www iconsupport...

Page 2: ...RAWING 24 ORDERING REPLACEMENT PARTS Back Cover RECYCLING INFORMATION Back Cover 2 PROFORM is a registered trademark of ICON IP Inc WARNING DECAL PLACEMENT This drawing shows the locations of the warn...

Page 3: ...ting the power cord see page 12 plug the power cord into an earthed cir cuit No other appliance should be on the same circuit When replacing the fuse in the power cord adapter insert an ASTA approved...

Page 4: ...2 Inspect and properly tighten all parts of the treadmill regularly 23 Never insert any object into any opening on the treadmill 24 DANGER Always unplug the power cord immediately after use before cle...

Page 5: ...e treadmill If you have questions after read ing this manual please see the front cover of this man ual To help us assist you note the product model number and serial number before contacting us The m...

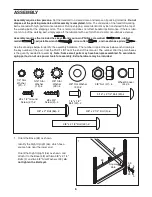
Page 6: ...ow to identify the assembly hardware The number in parentheses below each drawing is the key number of the part from the PART LIST near the end of this manual The number after the parentheses is the q...

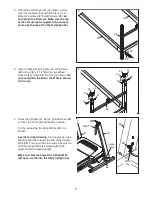
Page 7: ...t Upright is angled in the same di rection as the top of the Right Upright 36 48 31 39 39 5 2 4 Raise the Uprights 31 36 so that the Base 48 is flat on the floor and positioned as shown Cut the tie ho...

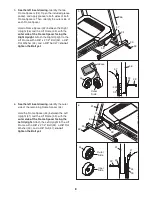
Page 8: ...ame with a 3 8 x 2 1 2 Bolt 32 a 3 8 Flat Washer 33 and a 3 8 Nut 47 do not tighten the Bolt yet 5 36 32 32 34 34 33 47 47 59 33 59 Outer Side 34 36 6 See the left inset drawing Identify the outer sid...

Page 9: ...ght Handrail with a 8 x 1 2 Ground Screw 27 Connect the wire harness on the Console Base 26 to the Upright Wire 28 as shown in the inset drawing If the connectors are oriented correctly they will slid...

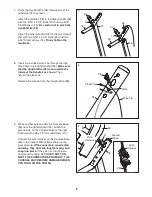
Page 10: ...4 31 View from Above Side View 11 5 10 22 10 Insert the wires into the Console Base 26 as you set the Console Base on the Handrails 18 Be careful not to pinch the wires Next thread two 1 4 x 1 2 Bolts...

Page 11: ...hex keys in a secure place one of the hex keys is used to adjust the walking belt see pages 20 and 21 13 Raise the Frame 74 to the position shown Have a second person hold the Frame until this step is...

Page 12: ...eadmill 2 If you are plugging in the power cord in Australia go to step 3 If you are plugging in the power cord in the UK first press the pins on the power cord into the metal clips in the adapter as...

Page 13: ...ne of the treadmill as it guides you through an effective exercise session To turn on the power see page 14 To use the man ual mode see page 14 To use a preset workout see page 16 To use the informati...

Page 14: ...N ON THE POWER above The treadmill will rise to the maximum incline level and then return to the minimum incline level 2 Select the manual mode When the key is in serted the manual mode will be select...

Page 15: ...Before using the handgrip pulse sensor remove the sheets of plastic from the metal contacts In ad dition make sure that your hands are clean To measure your heart rate stand on the foot rails and hol...

Page 16: ...l sound and the next segment of the profile will begin to flash If a different speed or in cline setting is programmed for the next segment the speed or incline setting will flash in the display to al...

Page 17: ...d An M for metric kilometers or an E for English miles will appear in the lower right display Press the Speed increase button to change the unit of measurement if desired The console features a displa...

Page 18: ...ibed at the left CAUTION Make sure that the latch knob is locked in the storage position Moving the tread mill may require two people 1 Hold the frame and one of the handrails and place one foot again...

Page 19: ...the switch has tripped wait for five minutes and then press the switch back in b Make sure that the power cord is plugged in If the power cord is plugged in unplug it wait for five minutes and then pl...

Page 20: ...eturn to the minimum level This will recalibrate the incline system PROBLEM The walking belt slows when walked on SOLUTION a If an extension cord is needed use only a 3 conductor 14 gauge 1 mm2 cord t...

Page 21: ...lug in the power cord insert the key and run the treadmill for a few minutes Repeat until the walking belt is centered b If the walking belt slips when walked on first remove the key and UNPLUG THE PO...

Page 22: ...our goal is to strengthen your cardiovascular system you must perform aerobic exer cise which is activity that requires large amounts of oxygen for prolonged periods of time For aerobic ex ercise adju...

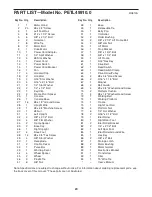
Page 23: ...ic Tie 47 6 3 8 Nut 48 1 Base 49 1 Releasable Tie 50 1 Belly Pan 51 1 Controller 52 2 Roller Bushing 53 2 3 8 x 2 1 4 Lift Frame Bolt 54 4 3 8 Jam Nut 55 1 Lift Motor 56 1 Stop Bracket 57 1 3 8 x 1 3...

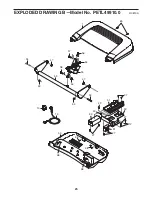
Page 24: ...3 71 68 70 69 4 4 78 78 27 76 83 38 82 85 84 27 82 11 79 80 38 76 4 4 74 75 4 68 4 69 70 63 24 71 76 76 67 43 81 81 60 27 52 52 77 77 77 11 77 27 15 27 12 40 14 27 12 8 89 88 47 86 86 47 87 24 EXPLODE...

Page 25: ...65 1 53 47 59 47 53 58 57 56 54 54 55 33 33 50 38 38 38 38 51 27 91 92 12 27 27 27 29 30 90 13 10 25 EXPLODED DRAWING B Model No PETL49910 0 R0810A...

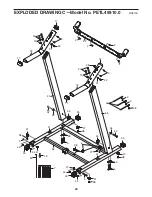
Page 26: ...17 21 22 28 2 21 22 20 19 17 17 18 31 35 34 37 38 33 32 35 34 32 33 48 39 5 39 5 37 38 28 27 37 38 45 5 44 44 47 37 38 47 44 45 44 5 41 41 2 2 2 2 42 49 7 38 2 2 46 93 EXPLODED DRAWING C Model No PET...

Page 27: ...2 2 16 25 23 26 2 2 2 2 2 2 27 27 EXPLODED DRAWING D Model No PETL49910 0 R0810A...

Page 28: ...part s see the PART LIST and the EXPLODED DRAWING near the end of this manual RECYCLING INFORMATION This electronic product must not be disposed of in municipal waste To pre serve the environment this...

Reviews: