background image

9

HOW TO USE THE ELLIPTICAL TRAINER

HOW TO EXERCISE ON THE ELLIPTICAL TRAINER

To mount the elliptical trainer, firmly hold the handle-
bars and carefully step onto the pedal that is in the
lowest position. Next, step onto the other pedal. Push
the pedals until they begin to move with a continuous
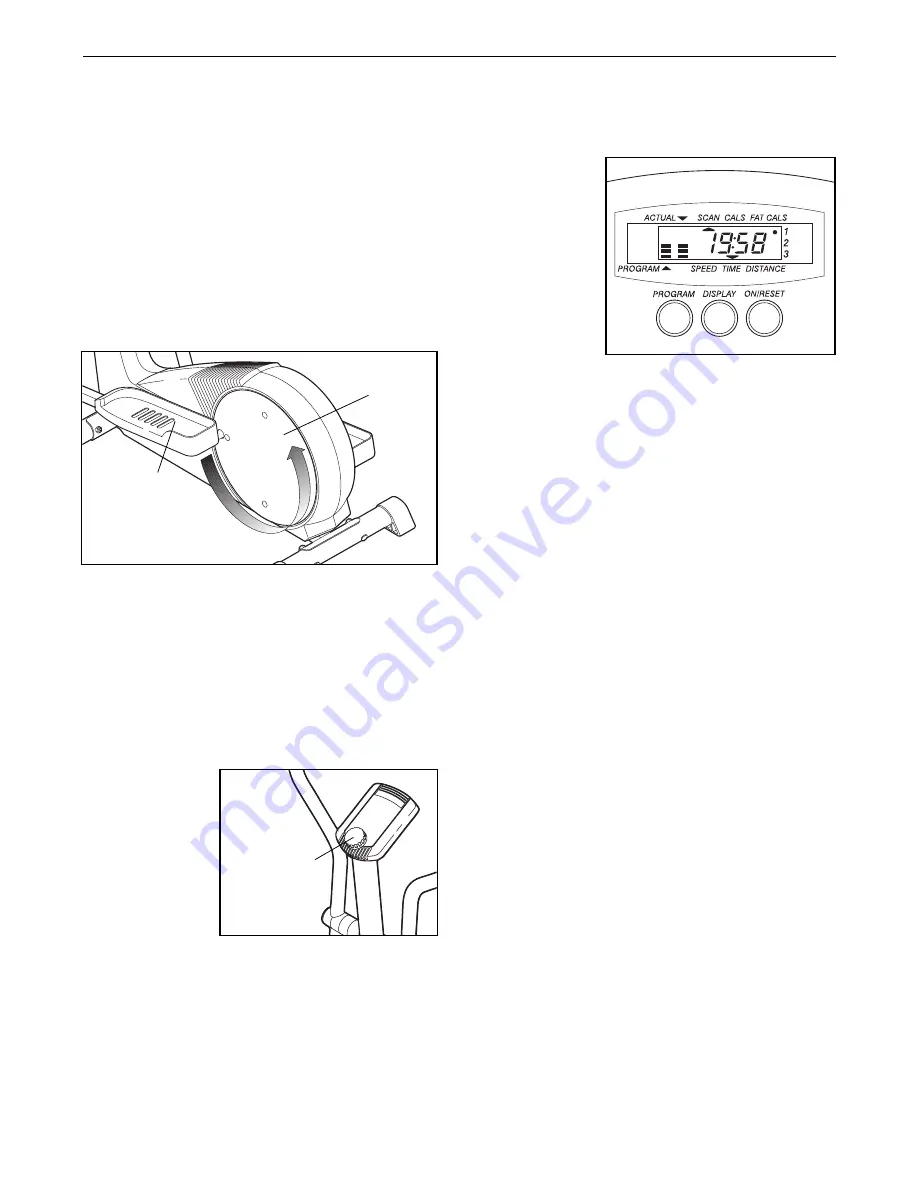
motion. Note: The pedal disks can turn in either
direction. It is recommended that you turn the
pedal disks in the direction shown below; howev-
er, to give variety to your exercise, you may
choose to turn the pedal disks in the opposite
direction. 

To dismount the elliptical trainer, allow the pedals to
come to a complete stop. CAUTION: The elliptical
trainer does not have a free wheel; the pedals will
continue to move until the flywheel stops. 
When
the pedals are stationary, step off the highest pedal
first. Then, step off the lowest pedal.

HOW TO ADJUST THE RESISTANCE OF THE 
PEDALS

As you exercise,
you can adjust
the resistance of
the pedals with
the resistance
knob on the 
console. To
increase the
resistance, 
turn the knob 
clockwise; to
decrease the resistance, turn the knob counterclock-
wise. Important: The knob may not stop turning
when maximum or minimum resistance is reached.
When the knob becomes more difficult to turn,
stop turning it or damage will result.

DESCRIPTION OF THE CONSOLE

The innovative
console offers
a manual mode
and three moti-
vational pacer
programs.
Each pacer
program is
designed to
guide you
through an
effective work-
out by pacing
your exercise. As you exercise, six monitor modes will
provide continuous exercise feedback. The monitor
modes are described below:

Speed—This mode shows your pedaling pace, in miles
per hour or kilometers per hour.

Time—If you select the manual mode, this mode will
show the elapsed time. If you select one of the three
pacer programs, this mode will show the time remain-
ing in the program. 

Distance—This mode shows the distance you have
pedaled, in miles or kilometers.

Fat Calories (FAT CALS)—This mode shows the
approximate number of fat calories you have burned
(see BURNING FAT on page 13).

Calories (CALS)—This mode shows the approximate
number of calories you have burned. 

Scan—This mode displays the Speed, Time, Distance,
Fat Calories, and Calories modes, for five seconds
each, in a repeating cycle.

HOW TO SELECT MILES OR KILOMETERS

When the letters KPH appear in the display, the con-
sole will display speed and distance in kilometers.
When the letters KPH do not appear, the console will
display speed and distance in miles. To change the
unit of measurement, first press the on/reset button.
Next, hold down the program and display buttons for
several seconds until the letters KPH appear or disap-
pear.

Pedal

Pedal

Disk

Resistance

Knob

Summary of Contents for 465S

Page 1: ...here are missing parts we will guarantee complete satisfac tion through direct assistance from our factory TO AVOID DELAYS PLEASE CALL DIRECT TO OUR TOLL FREE CUSTOMER HOT LINE The trained technicians on our customer hot line will provide immediate assistance free of charge CUSTOMER HOT LINE 1 800 999 3756 Mon Fri 6 a m 6 p m MST Patent Pending Visit our website at www proform com new products pri...

Page 2: ...MBLY 5 HOW TO USE THE ELLIPTICAL TRAINER 9 MAINTENANCE AND TROUBLE SHOOTING 11 CONDITIONING GUIDELINES 12 PART LIST 14 EXPLODED DRAWING 15 HOW TO ORDER REPLACEMENT PARTS Back Cover LIMITED WARRANTY Back Cover PROFORM is a registered trademark of ICON Health Fitness Inc ...

Page 3: ...r appropriate clothing when using the elliptical trainer Always wear ath letic shoes for foot protection 9 When mounting or dismounting the elliptical trainer always hold the handlebars and step onto and off the pedal that is in the lowest position 10 Each time you stop exercising on the elliptical trainer allow the pedals to come to a complete stop before dismounting 11 Always keep your back stra...

Page 4: ...ore you use the elliptical trainer If you have questions after reading the manual call our Customer Service Department toll free at 1 800 999 3756 Monday through Friday 6 a m until 6 p m Mountain Time excluding holidays To help us assist you please note the product model number and serial number before calling The model number is PFEL19011 The serial number can be found on a decal attached to the ...

Page 5: ...8 x 25mm Button Screw 56 2 M10 x 75mm Carriage Bolt 34 4 M4 x 19mm Flange Screw 36 6 Pedal Arm Bolt Set 40 2 ASSEMBLY Assembly requires two people Place all parts of the elliptical trainer in a cleared area and remove the packing materials Do not dispose of the packing materials until assembly is completed In addition to the included allen wrench assembly requires a phillips screwdriver two adjust...

Page 6: ...tance Cable 45 and slide it into the metal bracket on the Lower Resistance Cable 65 as shown Refer to drawing C Using pliers squeeze the prongs on the upper end of the metal bracket together Slide the Upright 2 onto the Frame 1 make sure not to pinch the wires or cables Attach the Upright with two M10 x 74mm Button Bolts 67 two M10 Nylon Locknuts 33 and two M10 Split Washers 59 Do not tighten the ...

Page 7: ...e indicated side Attach the Left Handlebar to the Handlebar Leg with two M8 x 45mm Button Bolts 50 and two M8 Nylon Locknuts 38 Make sure that the Nylon Locknuts are inside of the hexagonal holes Do not fully tighten the Button Bolts yet Attach the Right Handlebar to the other Handlebar Arm not shown in the same way 5 6 5 50 38 7 Apply a small amount of grease to the axle on the left Disc Crossbar...

Page 8: ... the Battery Cover 29 as shown Press two batter ies into the battery clip make sure that the negative ends of the batteries are touching the springs in the battery clip Reattach the Battery Cover 9 29 23 Battery Clip Batteries 8 Find the Left Pedal 13 which has a ridge on the right side Attach the Left Pedal to the Left Pedal Arm 11 with three M4 x 19mm Flange Screws 36 as shown Attach the Right P...

Page 9: ...amage will result DESCRIPTION OF THE CONSOLE The innovative console offers a manual mode and three moti vational pacer programs Each pacer program is designed to guide you through an effective work out by pacing your exercise As you exercise six monitor modes will provide continuous exercise feedback The monitor modes are described below Speed This mode shows your pedaling pace in miles per hour o...

Page 10: ...program button until the program indicator disappears The programs will be select ed in the following order program 1 program 2 program 3 manual mode Begin your workout If you select ed the manual mode go to step 4 If you selected one of the pacer programs two columns of bars will appear in the display The left column will show one bar indicating a relatively slow pace The right column will show y...

Page 11: ... 52 64 from the Right Side Shield 4 and remove the Right Side Shield Remove all Screws 52 from the Left Side Shield 3 and remove the Left Side Shield Next refer to the drawing below and locate the Reed Switch 53 Loosen but do not remove the indicated Screw 52 Slide the Reed Switch slightly toward or away from the Magnet 58 on the flywheel Retighten the Screw Turn the left Pedal Disc 15 for a momen...

Page 12: ...en for prolonged periods of time This increases the demand on the heart to pump blood to the muscles and on the lungs to oxygenate the blood For aerobic exercise adjust the intensity of your exercise until your heart rate is near the highest number in your training zone HOW TO MEASURE YOUR HEART RATE To measure your heart rate first exer cise for at least four minutes Then stop exercising and plac...

Page 13: ...ble Hold for 15 counts then relax Repeat 3 times for each leg Stretches Hamstrings lower back and groin 3 Calf Achilles Stretch With one leg in front of the other reach forward and place your hands against a wall Keep your back leg straight and your back foot flat on the floor Bend your front leg lean forward and move your hips toward the wall Hold for 15 counts then relax Repeat 3 times for each ...

Page 14: ...31 2 Large Bearing 32 1 Pedal Axle 33 7 M10 Nylon Locknut 34 4 M10 x 75mm Carriage Bolt 35 2 M8 5 Washer 36 6 M4 x 19mm Flange Screw 37 4 Pedal Arm Bushing 38 7 M8 Nylon Locknut 39 2 M10 Washer 40 2 Pedal Arm Bolt Set 41 2 M6 x 72mm Bolt 42 5 M4 x 12mm Screw 44 1 Extension Wire 45 1 Resistance Control Cable 46 2 Handlebar Cap 47 2 Handlebar Spacer 48 2 Frame Spacer 49 4 Small Handlebar Arm Bushing...

Page 15: ...2 67 33 17 2 41 21 34 66 41 57 10 33 21 39 39 60 60 40 40 14 12 35 37 38 37 36 36 51 51 51 51 15 52 18 19 20 20 34 9 33 33 16 61 61 16 62 1 30 31 31 32 30 27 26 38 28 25 33 51 51 51 15 13 37 36 36 38 35 11 40 40 52 63 65 29 64 52 33 68 27 7 54 42 59 59 58 52 54 52 53 EXPLODED DRAWING Model No PFEL19011 R1201A 15 ...

Page 16: ...st be pre authorized by ICON This warranty does not extend to any product or damage to a product caused by or attributable to freight damage abuse misuse improper or abnormal usage or repairs not provided by an ICON authorized service center to products used for commercial or rental pur poses or to products used as store displays No other warranty beyond that specifically set forth above is author...

Reviews: