background image

5

ASSEMBLY

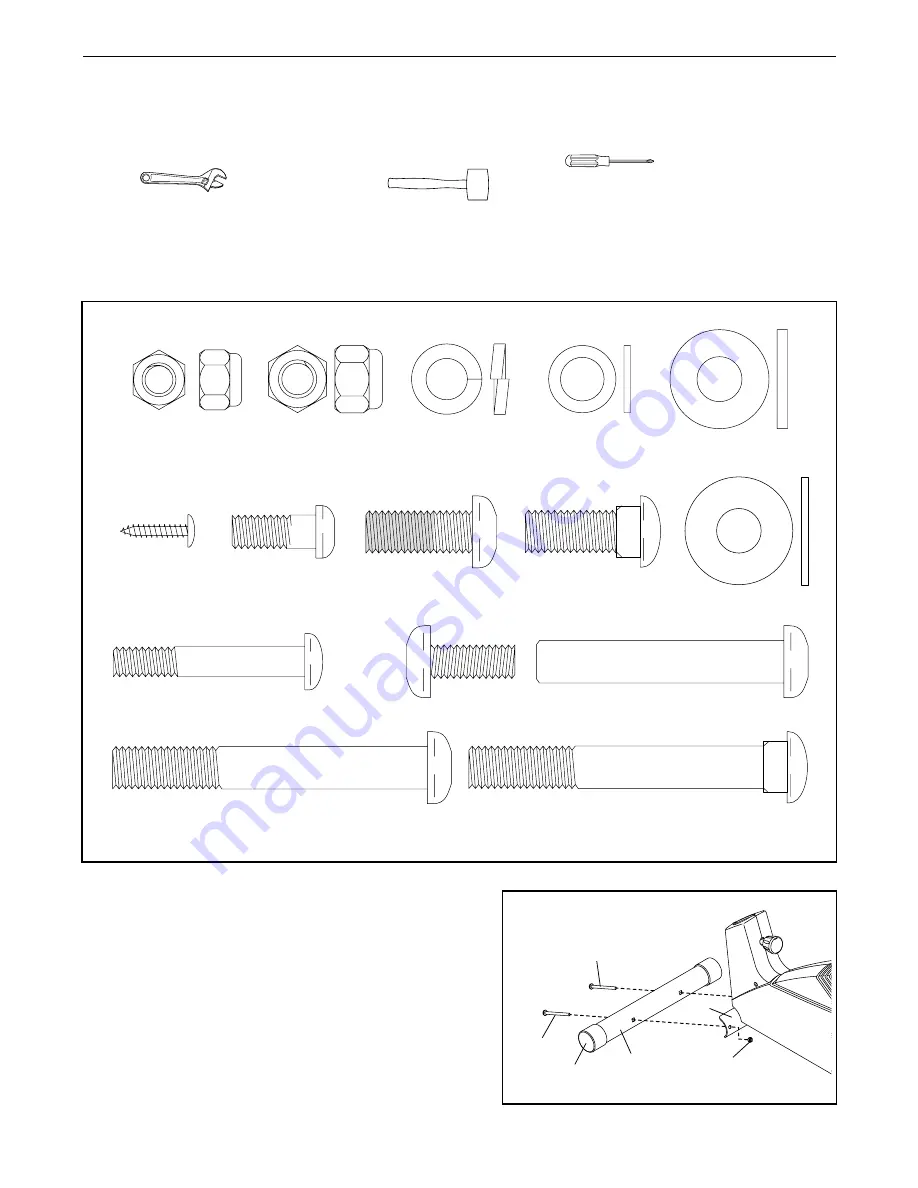
Assembly requires two persons. Place all parts of the elliptical crosstrainer in a cleared area and remove the
packing materials. Do not dispose of the packing materials until assembly is completed. In addition to the
included allen wrenches, assembly requires a phillips screwdriver                      , an adjustable
wrench                     , and a rubber mallet                        .

As you assemble the elliptical crosstrainer, use the drawings below to identify the small parts used in assembly.
The number in parenthesis below each drawing refers to the key number of the part, from the PART LIST on
page 14. The second number refers to the quantity used in assembly. Note: Some small parts may have been
pre-assembled for shipping. If a part is not in the parts bag, check to see if it has been pre-assembled.

Console

Screw (59)–4

M10

Washer (29)–2

M10 Split

Washer (45)–2

M10 Nylon

Locknut (33)–6

M10 x 27mm

Carriage Bolt (27)–2

M10 Bolt Set (25)–2

M8 x 19mm Button

Screw (56)–2

Handlebar

Washer (55)–2

Spring Bracket
Washer (35)–2

M8 Nylon

Locknut (38)–4

M8 x 45mm Button Bolt (50)–4

M10 x 27mm

Patch Screw (40)–2

M10 x 75mm Carriage Bolt (34)–4

M10 x 74mm Bolt (7)–2

1. Identify the Front Stabilizer (10), which has round

Endcaps (21) on it. While another person lifts the front
of the Frame (1), attach the Front Stabilizer to the
Frame with two M10 x 75mm Carriage Bolts (34) and
two M10 Nylon Locknuts (33).

10

33

21

34

34

1

1

Summary of Contents for 650 CARDIO CROSSTRAINER

Page 1: ...ssing parts we will guar antee complete satisfaction through direct assistance from our factory TO AVOID DELAYS PLEASE CALL DIRECT TO OUR TOLL FREE CUSTOMER HOT LINE The trained technicians on our cus...

Page 2: ...5 HOW TO USE THE ELLIPTICAL CROSSTRAINER 9 MAINTENANCE AND TROUBLESHOOTING 12 CONDITIONING GUIDELINES 13 PART LIST 14 EXPLODED DRAWING 15 HOW TO ORDER REPLACEMENT PARTS Back Cover LIMITED WARRANTY Bac...

Page 3: ...ic shoes for foot protection 8 Always hold the console handgrip or the han dlebars when mounting dismounting or using the elliptical crosstrainer 9 The heart rate sensor is not a medical device Variou...

Page 4: ...you have ques tions after reading this manual please call our Customer Service Department toll free at 1 800 999 3756 Monday through Friday 6 a m until 6 p m Mountain Time excluding holidays To help u...

Page 5: ...number refers to the quantity used in assembly Note Some small parts may have been pre assembled for shipping If a part is not in the parts bag check to see if it has been pre assembled Console Screw...

Page 6: ...g to the next step 4 23 2 59 59 42 Control Cable Console Wire Ground Wire 52 5 1 2 33 Make sure the Wires and Cables do not get pinched and damaged during this step Console Wire 53 7 43 Control Cable...

Page 7: ...andlebar 6 Carefully slide an Upright Spacer 48 a Handlebar Spacer 47 the Left Handlebar and a Handlebar Cap 46 onto the left axle on the Upright 2 as shown Slide a Handlebar Washer 55 onto an M8 x 19...

Page 8: ...11 onto the axle Slide a Spring Bracket Washer 35 onto an M10 x 27mm Patch Screw 40 and tighten the Patch Screw into the axle Next hold the lower end of the left Handlebar Leg 5 inside of the Front Sp...

Page 9: ...xer cise push and pull the handlebars to work your arms shoulders and back To exercise only your lower body hold the console handgrip as you exercise HOW TO EXERCISE ON THE ELLIPTICAL CROSSTRAINER To...

Page 10: ...t may be necessary to reselect the desired unit of measurement HOW TO OPERATE THE CONSOLE Make sure that there are batteries in the console see assembly steps 3 and 4 on page 6 If there is a thin shee...

Page 11: ...e heart rate sensor and allow the display to reset Then place your thumb on the heart rate sensor as described above Make sure that you are applying the proper amount of pressure to the heart rate sen...

Page 12: ...he Right Side Shield 4 Remove all Screws 52 from the Left Side Shield 3 and remove the Left Side Shield Next refer to the drawing below and locate the Reed Switch 53 Loosen but do not remove the indic...

Page 13: ...strengthen your cardiovascular sys tem your exercise must be aerobic Aerobic exer cise is activity that requires large amounts of oxygen for prolonged periods of time This increases the demand on the...

Page 14: ...g 32 1 Pedal Axle 33 7 M10 Nylon Locknut 34 4 M10 x 75mm Carriage Bolt 35 2 Spring Bracket Washer 36 12 M6 x 33 5mm Bolt 37 4 Pedal Arm Bushing 38 5 M8 Nylon Locknut 39 1 M10 Washer 40 2 M10 x 27mm Pa...

Page 15: ...43 11 33 51 51 51 15 51 51 34 9 33 33 20 20 16 61 54 52 53 38 68 62 55 56 38 50 48 47 49 24 56 55 57 39 33 58 21 21 37 34 29 29 60 60 60 23 52 52 64 52 41 52 41 64 37 37 49 48 47 49 49 46 11 16 52 35...

Page 16: ...oduct caused by or attributable to freight damage abuse mis use improper or abnormal usage or repairs not provided by an ICON authorized service center products used for commercial or rental purposes...

Reviews: