background image

23

HOW TO FOLD AND MOVE THE TREADMILL

HOW TO FOLD THE TREADMILL FOR STORAGE

Before folding the treadmill, adjust the incline to the

lowest position. If you do not do this, you may damage the

treadmill when you fold it. Remove the key and unplug the

power cord. CAUTION: You must be able to safely lift 45

lbs. (20 kg) to raise, lower, or move the treadmill.

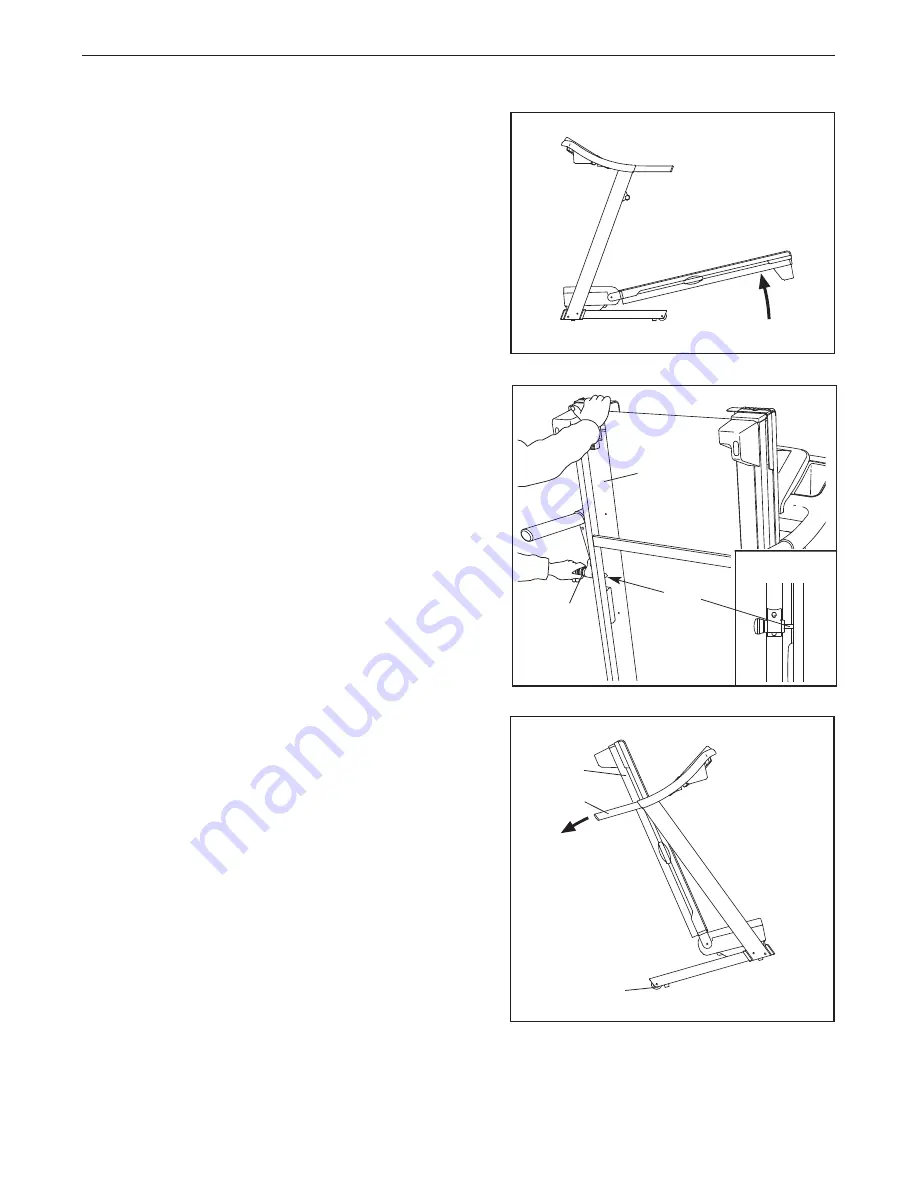
1. Hold the metal frame firmly in the location shown by the

arrow at the right.

CAUTION: To decrease the possibil-

ity of injury, do not lift the frame by the plastic foot

rails. Make sure to bend your legs and keep your

back straight as you raise the frame.

Raise the frame

about halfway to the vertical position.

2. Move your right hand to the position shown and hold the

treadmill firmly. Using your left hand, pull the latch knob

to the left and hold it. Raise the frame until the latch pin is

aligned with the gap between the frame and the walking

platform, and then slowly release the latch knob.

Make

sure that the latch pin is fully inserted into the gap.

To protect the floor or carpet from damage, place a

mat under the treadmill. Keep the treadmill out of di-

rect sunlight. Do not leave the treadmill in the stor-

age position in temperatures above 85° F (30° C).

HOW TO MOVE THE TREADMILL

Before moving the treadmill, convert it to the storage position

as described above.

Make sure that the latch pin is fully

inserted into the gap.

1. Hold a handrail and the frame and place one foot against

one of the wheels.

2. Tilt the treadmill back until it rolls freely on the wheels.

Carefully move the treadmill to the desired location.

Never

move the treadmill without tipping it back. To reduce

the risk of injury, use extreme caution while moving

the treadmill. Do not attempt to move the treadmill

over an uneven surface.

3. Place one foot against a wheel, and carefully lower the

treadmill until it is resting in the storage position.

Handrail

Frame

Wheel

Latch

Knob

Latch

Pin

Frame

Engaged

Summary of Contents for 7.0 PFTL57807.1

Page 1: ...ve questions or if parts are missing PLEASE DO NOT CONTACT THE STORE please contact Customer Care IMPORTANT You must note the product model number and serial number see the drawing above before contac...

Page 2: ...k Cover LIMITED WARRANTY Back Cover 2 This drawing shows the locations of the warning decals If a decal is miss ing or illegible call the telephone number on the front cover of this manual and request...

Page 3: ...e an extension cord 11 Use only a single outlet surge suppressor that meets all of the specifications described on page 13 To purchase a surge suppressor see your local PROFORM dealer or call the tele...

Page 4: ...ure that the storage latch is holding the frame securely in the storage position 22 Never insert any object into any opening on the treadmill 23 Inspect and properly tighten all parts of the treadmill...

Page 5: ...uestions after read ing this manual please see the front cover of this man ual To help us assist you note the product model number and serial number before contacting us The model number and the locat...

Page 6: ...a mild non abrasive cleaner Assembly requires the included hex keys and your own Phillips screwdriver adjustable wrench scissors and needlenose pliers Use the drawings below to identify the assembly h...

Page 7: ...t side Partially fold the Frame 48 so that the treadmill is more stable do not fully fold the Frame yet Remove and discard the two indicated bolts A and the shipping bracket B Cut the tie securing the...

Page 8: ...h your fin gers do not fully tighten the Bolts yet Press a Base Endcap 82 into the Base 85 80 78 77 8 82 79 79 5 4 85 3 Identify the Right Upright 78 and the Right Upright Spacer 80 which are marked w...

Page 9: ...85 86 48 4 33 C 81 2 81 104 2 6 With the help of a second person hold a Bolt Spacer 79 inside the lower end of the Left Upright 73 Insert an M10 x 96mm Bolt 5 with an M10 Star Washer 8 into the Left U...

Page 10: ...not overtighten the Screws Then remove the plastic tie Attach the Left Handrail not shown to the Console 87 in the same way Note There are no wires on the left side of the Console 90 Tie 8 1 1 Large...

Page 11: ...AGED WHEN THE POWER IS TURNED ON Then insert the connectors into the Right Upright 78 Set the console assembly on the Right Upright 78 and the Left Upright not shown Make sure that no wires are pinche...

Page 12: ...Pin into the Latch Housing 71 and tighten the knob back onto the Latch Pin 76 Spring Knob 71 12 73 72 Collar Large Hole If you purchase the optional chest pulse sensor see page 22 follow the steps be...

Page 13: ...c tion or break down grounding provides a path of least resistance for electric current to reduce the risk of elec tric shock This product is equipped with a cord having an equipment grounding conduct...

Page 14: ...stem while you get in shape This product has been designed specifically to work with iPod and has been certified by the developer to meet Apple performance standards To turn on the power see page 15 T...

Page 15: ...pulled from the console adjust the posi tion of the clip HOW TO PERSONALIZE CONSOLE SETTINGS The console has a user mode that allows you to desig nate yourself as User 1 or User 2 enter user informa...

Page 16: ...ion an x will ap pear in the box next to the selected option Note You can also turn on or turn off the welcome screen from this menu If the SHOW WELCOME SCREEN option is selected then a welcome mes sa...

Page 17: ...out has been se lected remove the key and then reinsert it Note To turn on or turn off the welcome screen see step 3 on page 16 3 Start the walking belt To start the walking belt press the Start butto...

Page 18: ...conds each time you change the setting In addition your heart rate will appear in the display each time you use the handgrip pulse sensor or the optional chest pulse sensor To reset the console press...

Page 19: ...ies of tones will sound If a different speed setting and or incline setting is programmed for the second segment the speed setting and or incline setting will flash in the display for a moment to aler...

Page 20: ...e information for 11 different years 5 View exercise information by month After several seconds the view month menu will appear in the display To view exercise information by month press the up and do...

Page 21: ...y to work with iPod and has been certified by the developer to meet Apple performance standards To play music or audio books through the console s stereo speakers you must connect your iPod MP3 player...

Page 22: ...button to change the unit of measurement if desired Note The console features a display demo mode de signed to be used if the treadmill is displayed in a store While the demo mode is turned on the co...

Page 23: ...etween the frame and the walking platform and then slowly release the latch knob Make sure that the latch pin is fully inserted into the gap To protect the floor or carpet from damage place a mat unde...

Page 24: ...hold it Pivot the frame downward until it is past the latch pin Then slowly release the latch knob 2 Hold the metal frame firmly with both hands and lower it to the floor CAUTION Do not grip only the...

Page 25: ...g above If the circuit breaker has tripped wait for five minutes and then press the switch back in b Make sure that the power cord is plugged in If the power cord is plugged in unplug it wait for five...

Page 26: ...ise to the maximum incline level and then return to the minimum level This will recalibrate the incline system PROBLEM The walking belt slows when walked on SOLUTION a Use only a single outlet surge s...

Page 27: ...n the power cord insert the key and run the treadmill for a few minutes Repeat until the walk ing belt is centered b If the walking belt slips when walked on first re move the key and UNPLUG THE POWER...

Page 28: ...goal is to strengthen your cardiovascular system you must perform aerobic exer cise which is activity that requires large amounts of oxygen for prolonged periods of time For aerobic ex ercise adjust t...

Page 29: ...les Stretch With one leg in front of the other reach forward and place your hands against a wall Keep your back leg straight and your back foot flat on the floor Bend your front leg lean forward and m...

Page 30: ...lley 45 1 Walking Belt 46 1 Walking Platform 47 1 Right Foot Rail 48 1 Frame 49 1 Warning Decal 50 2 Rear Roller Bracket Plate 51 1 Left Foot 52 1 Right Foot 53 1 Hood 54 1 Reed Switch 55 1 Reed Switc...

Page 31: ...7 4 Clamp 108 1 Controller Ground Wire 109 1 Pulse Support 110 1 Left Accessory Tray 111 1 Right Accessory Tray 112 2 Handrail Endcap Upper 113 1 Right Bottom Pulse Plate 114 1 Right Top Pulse Plate 1...

Page 32: ...5 42 43 16 14 23 23 41 39 23 23 15 22 17 50 30 30 50 17 100 22 15 9 51 52 1 1 23 23 9 28 47 23 23 41 64 48 28 49 29 29 59 59 105 106 34 103 103 1 1 35 35 64 22 57 32 EXPLODED DRAWING A Model No PFTL57...

Page 33: ...53 37 13 37 13 37 13 1 32 63 26 56 33 31 56 21 55 69 11 11 11 11 62 54 11 22 24 25 25 7 60 61 12 66 65 67 68 108 33 18 31 19 31 58 99 22 12 12 22 102 EXPLODED DRAWING B Model No PFTL57807 1 R0808A 33...

Page 34: ...73 6 10 8 5 83 82 6 10 20 36 20 36 81 2 5 8 78 82 80 81 2 81 2 4 86 33 85 81 2 33 86 4 79 79 77 77 84 84 104 104 6 10 6 10 72 71 76 34 EXPLODED DRAWING C Model No PFTL57807 1 R0808A...

Page 35: ...93 94 95 98 1 38 91 90 1 112 89 91 1 38 1 112 101 101 107 12 92 12 110 111 12 12 12 12 115 88 113 114 96 74 1 1 3 1 3 1 1 1 109 70 70 40 27 12 12 97 75 35 EXPLODED DRAWING D Model No PFTL57807 1 R080...

Page 36: ...be responsible for a minimal handling charge For in home service the customer will be responsible for a minimal trip charge This warranty does not extend to any damage to a product caused by or attrib...

Reviews: