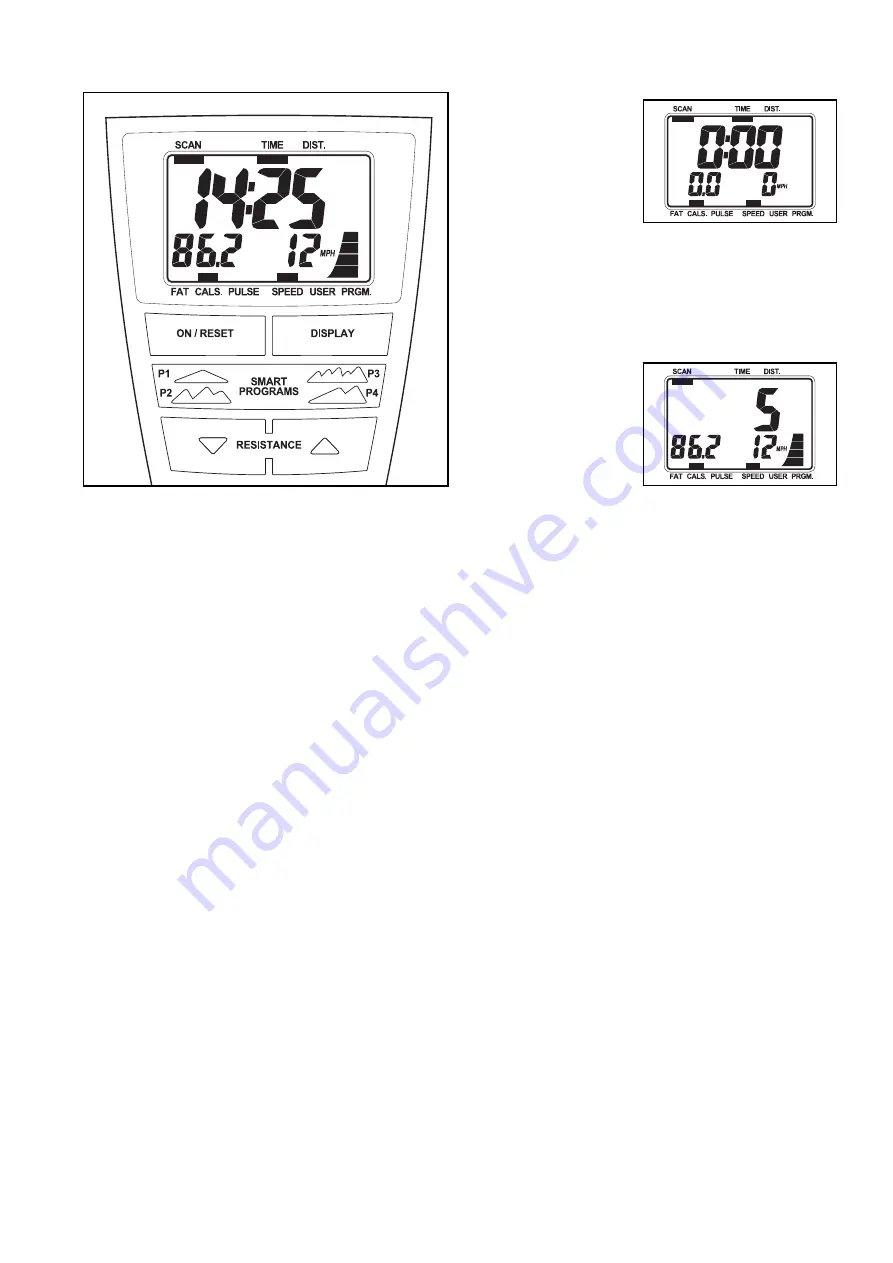
background image

12

CONSOLE DIAGRAM

FEATURES OF THE CONSOLE

The console offers a selection of features designed to

make your workouts more effective. When you use the

manual mode of the console, you can change the

resistance of the pedals with the touch of a button. As

you pedal, the console will provide continuous exer-

cise feedback. You can even measure your heart rate

using the built-in handgrip pulse sensor.

The console also offers four smart programs that auto-

matically change the resistance of the pedals and

prompt you to vary your pedaling pace while guiding

you through an effective exercise session.

Before using the console, make sure that batteries are

installed (see assembly step 7 on page 9). If there is a

sheet of clear plastic on the display, remove the plastic.

HOW TO USE THE MANUAL MODE

1. Turn on the console.

To turn on the console, press the On/Reset button

or begin pedaling. The entire display will light for a

moment; the console will then be ready for use.

2. Select the manual mode.

When you turn on

the console, the

manual mode will

be selected. If you

have selected a

program, reselect

the manual mode

by pressing the

Smart Programs button repeatedly until zeros

appear in the display.

3.

Change the resistance of the pedals as

desired.

As you pedal,

change the resis-

tance of the ped-

als by pressing

the Resistance

increase and

decrease buttons.

There are ten

resistance levels. Note: After you press the but-

tons, it will take a moment for the pedals to reach

the selected resistance level.

4. Follow your progress with the display.

The console has seven displays that show the fol-

lowing workout information:

Speed

—This display shows your pedaling speed,

in miles or kilometers per hour.

Time

—This display shows the elapsed time.

Note: When a smart program is selected, the dis-

play shows the time remaining in the program

instead of the elapsed time.

Distance

—This display shows the distance you

have pedaled, in miles or kilometers.

Calories

—This display shows the approximate

number of calories you have burned.

Fat Calories

—This display shows the approxi-

mate number of fat calories you have burned (see

Burning Fat on page 16).

Pulse

—This display shows your heart rate when

you use the handgrip pulse sensor.

Scan

—When you select this display option, the

upper section of the display will show both time

and distance information, and the lower left sec-

tion of the display will show calories and fat calo-

ries information.

All manuals and user guides at all-guides.com

Summary of Contents for 700 Cardio CrossTrainer

Page 1: ...S As a manufacturer we are commit ted to providing complete customer satisfaction If you have questions or if there are missing parts please contact us at the numbers or addresses listed below Call 08...

Page 2: ...missing or illegible call the telephone number on the front cover of this manual and request a free replacement decal Apply the decal in the location shown Note The decal s may not be shown at actual...

Page 3: ...smount and use it 5 Inspect and properly tighten all parts regular ly Replace any worn parts immediately 6 Keep children under age 12 and pets away from the exercise cycle at all times 7 The exercise...

Page 4: ...you use the exercise cycle If you have questions after reading this manual please see the front cover of this manual To help us assist you note the product model number and serial number before conta...

Page 5: ...als until assembly is completed In addition to the included tools assembly requires an adjustable wrench and a Phillips screwdriver Use the part drawings below to identify the small parts used in asse...

Page 6: ...t Stabilizer 2 so that the large holes are facing the Frame 1 Attach the Front Stabilizer 2 to the Frame 1 with two M8 x 73mm Button Screws 33 1 1 2 33 2 Large Holes To make assembly easier read the i...

Page 7: ...our M8 Split Washers 42 and four M8 Locknuts 10 Note The Split Washers and the Locknuts may be preattached to the underside of the Seat Set the Seat Carriage 29 in the bracket on the Seat Post 5 Next...

Page 8: ...ashers 42 Avoid pinching the wires 34 39 42 34 23 13 1 42 5 Loosen and remove the Seat Post Knob 9 from the Frame 1 Insert the Seat Post 5 into the Frame 1 Adjust the Seat Post to the desired height a...

Page 9: ...Handle 55 functions like a ratchet Turn the Pivot Handle clockwise pull it away from the Upright 13 turn it counterclock wise push it toward the Upright and then turn it clockwise again Repeat this pr...

Page 10: ...nto the left arm of the Crank 21 Tighten the Right Pedal not shown clockwise into the right arm of the Crank not shown IMPORTANT Tighten both pedals as firmly as possible After using the exercise cycl...

Page 11: ...on your floor during use turn one or both of the leveling caps until the rocking motion is eliminat ed HOW TO ADJUST THE SEAT To adjust the hori zontal position of the seat loosen the seat knob on th...

Page 12: ...grams button repeatedly until zeros appear in the display 3 Change the resistance of the pedals as desired As you pedal change the resis tance of the ped als by pressing the Resistance increase and de...

Page 13: ...eset button for several seconds until the desired unit of measurement appears in the display To reset the display press the On Reset button To pause the console stop pedaling When the con sole is paus...

Page 14: ...rget pace settings for the program will be shown by the target pace meter in the display The pace meter will show your actual pedaling pace As the target pace meter changes in height during the pro gr...

Page 15: ...but do not remove the M5 x 15mm Screw 47 Slide the Reed Switch slightly closer to or away from the Magnet and then retighten the Screw Turn the Crank for a moment Repeat until the console dis plays c...

Page 16: ...ovascular system you must perform aerobic exercise which is activity that requires large amounts of oxygen for prolonged periods of time For aerobic exercise adjust the intensity of your exercise unti...

Page 17: ...g in front of the other reach forward and place your hands against a wall Keep your back leg straight and your back foot flat on the floor Bend your front leg lean forward and move your hips toward th...

Page 18: ...8 1 Magnet 39 1 Reed Switch Wire 40 1 M8 x 20mm Bolt 41 10 M4 x 25mm Round Head Screw 42 7 M8 Split Washer 43 2 Flywheel Nut 44 1 Seat Block 45 1 M8 Washer 46 4 M6 x 15mm Button Screw 47 1 M5 x 15mm S...

Page 19: ...39 20 5 12 21 24 26 36 34 42 46 8 27 6 14 41 43 63 47 41 41 41 41 41 4 8 41 43 27 45 25 49 40 48 48 10 10 42 42 42 10 50 51 52 53 54 55 56 44 29 59 58 59 59 59 19 3 57 58 60 61 62 23 64 57 EXPLODED DR...

Page 20: ...pared to provide the following information when contacting us the model number and serial number of the product see the front cover of this manual the name of the product see the front cover of this m...

Reviews: