background image

15

right bar graph changes, increase or decrease
your pace so that the same number of bars
appear on both bar graphs. If your pace is slower
than the current pace setting, the increase arrow
will appear in the display; if your pace is faster
than the pace setting, the decrease arrow will
appear. Important: The pace settings for the
program are intended only to provide a goal.
Your actual pace may be slower than the pace
settings, especially during the first few
months of your exercise program. Make sure
to exercise at a pace that is comfortable for
you.

During the program, the display will show the
time remaining in the program. When no time
remains, the program will be completed. If you
continue exercising after the program is complet-
ed, the display will continue to show your exer-
cise feedback.

Follow your progress with the feedback
modes.

Refer to step 4 on page 12.

When you are finished exercising, the console
will automatically turn off after five minutes.

Refer to step 6 on page 12.

HOW TO CONNECT YOUR CD PLAYER, VCR,
OR COMPUTER

To use iFIT.com CD’s, the elliptical crosstrainer must
be connected to your portable CD player, portable
stereo, home stereo, or computer with CD player. See
pages 15 to 17 for connecting instructions. To use
iFIT.com videocassettes
, the elliptical crosstrainer
must be connected to your VCR. See page 17 for con-
necting instructions. To use iFIT.com programs
directly from our Web site
, the elliptical crosstrainer
must be connected to your home computer. See page
17 for connecting instructions.

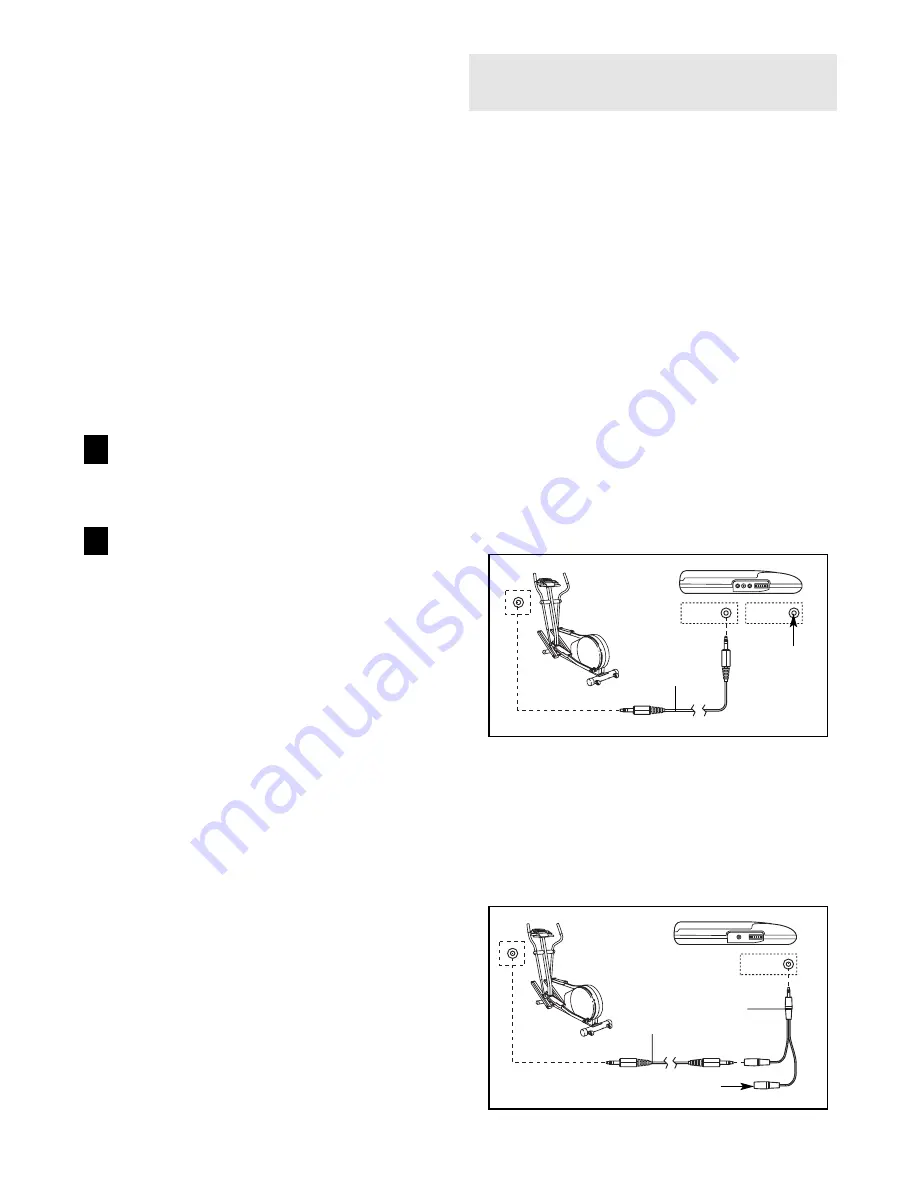
HOW TO CONNECT YOUR PORTABLE CD PLAYER

Note: If your CD player has separate LINE OUT
and PHONES jacks, see instruction A below. If
your CD player has only one jack, see instruction B.

A. Plug one end of a 1/8” to 1/8” stereo audio cable

(available at electronics stores) into the jack
beneath the console. Plug the other end of the
cable into the LINE OUT jack on your CD player.
Plug your headphones into the PHONES jack. 

B. Plug one end of a 1/8” to 1/8” stereo audio cable

(available at electronics stores) into the jack
beneath the console. Plug the other end of the
cable into a 1/8” Y-adapter (available at electronics
stores). Plug the Y-adapter into the PHONES jack
on your CD player. Plug your headphones into the
other side of the Y-adapter. 

7

6

LINE OUT

PHONES LINE OUT

PHONES

Audio

Cable

Head-

phones

A

PHONES

PHONES

Audio

Cable

1/8” 

Y-adapter

Headphones

B

Summary of Contents for 700 S

Page 1: ...parts we will guar antee complete satisfaction through direct assistance from our factory TO AVOID UNNECESSARY DELAYS PLEASE CALL DIRECT TO OUR TOLL FREE CUSTOMER HOT LINE The trained techni cians on...

Page 2: ...5 HOW TO USE THE ELLIPTICAL CROSSTRAINER 9 MAINTENANCE AND TROUBLESHOOTING 20 CONDITIONING GUIDELINES 21 PART LIST 22 EXPLODED DRAWING 23 HOW TO ORDER REPLACEMENT PARTS Back Cover LIMITED WARRANTY Bac...

Page 3: ...letic shoes for foot protection 8 Always hold the handgrip pulse sensor or the handlebars when mounting dismounting or using the elliptical crosstrainer 9 The pulse sensor is not a medical device Vari...

Page 4: ...RM 700 S If you have addition al questions please call our Customer Service Department toll free at 1 800 999 3756 Monday through Friday 6 a m until 6 p m Mountain Time excluding holidays To help us a...

Page 5: ...assembly The number in parenthesis below each drawing refers to the key number of the part from the PART LIST on page 22 The second number refers to the quantity used in assembly Note Some small part...

Page 6: ...the Wire Harnesses Insert the Upright 2 into the front of the Frame 1 as shown Be careful to avoid pinching the Wire Harnesses 86 87 Slide an M10 Split Washer 70 and a Frame Spacer 83 onto the M10 x 8...

Page 7: ...hers 70 Be careful to avoid pinching the wire harnesses 6 5 86 71 71 7 Apply a small amount of the included grease to the left and right axles on the Upright 2 Identify the Left Handlebar 9 refer to t...

Page 8: ...in the indicated location Refer to step 1 above Reattach the front of the Console 5 with the four screws Make sure that no wires are pinched 8 10 Make sure that all parts of the elliptical crosstraine...

Page 9: ...e elliptical crosstrainer wait until the pedals come to a complete stop Note The elliptical crosstrainer does not have a free wheel the ped als will continue to move until the flywheel stops When the...

Page 10: ...iner right in your home Using a stereo audio cable available at electronics stores you can connect the elliptical crosstrainer to your home stereo portable stereo or computer and play special iFIT com...

Page 11: ...indicators show which feedback mode scan speed time distance resistance level calories watts or heart rate is currently shown Note When the distance is shown the word Miles or the letters Kms will ap...

Page 12: ...le will show the resistance level for six seconds In addition when a Smart program or a Heart Rate program is selected the display will show the time remaining in the pro gram instead of the elapsed t...

Page 13: ...ompleted the resistance level will automatically change if a different resistance setting is programmed for the next period The pace set tings for the pro gram will be shown by the right bar graph in...

Page 14: ...r to step 5 on page 12 or the optional chest pulse sensor refer to page 20 If you use the handgrip pulse sensor it is not necessary to hold the handgrips continu ously during the program However you s...

Page 15: ...must be connected to your portable CD player portable stereo home stereo or computer with CD player See pages 15 to 17 for connecting instructions To use iFIT com videocassettes the elliptical crosstr...

Page 16: ...to the PHONES jack on your stereo Plug your headphones into the other side of the Y adapter HOW TO CONNECT YOUR HOME STEREO Note If your stereo has an unused LINE OUT jack see instruction A below If t...

Page 17: ...used see instruction B If you have a TV with a built in VCR see instruction B If your VCR is connected to your home stereo see HOW TO CONNECT YOUR HOME STEREO on page 16 A Plug one end of a 1 8 to RCA...

Page 18: ...com videocassette insert the videocassette into your VCR Press the play button on your CD player or VCR A moment after the play button is pressed your personal trainer will begin guiding you through y...

Page 19: ...ight corner of the display Go to your computer and start an internet connection Start your Web browser if necessary and go to our Web site at www iFIT com Follow the desired links on our Web site to s...

Page 20: ...R TROUBLE SHOOTING Avoid moving your hands while using the handgrip pulse sensor Excessive movement may interfere with heart rate readings Do not hold the metal contacts too tightly doing so may inter...

Page 21: ...is to strengthen your cardiovascular sys tem your exercise must be aerobic Aerobic exer cise is activity that requires large amounts of oxygen for prolonged periods of time This increases the demand o...

Page 22: ...ng 43 1 Magnet 44 1 Flywheel Axle 45 6 M8 5mm Washer 46 4 M8 Nylon Locknut 47 2 Crank Screw 48 1 Idler Arm 49 1 J Bolt 50 1 M10 x 25mm Flat Screw 51 2 Idler Bearing 52 1 Idler Wheel 53 3 M10 3 Black W...

Page 23: ...27 28 28 88 27 28 88 30 31 68 32 32 33 34 35 35 34 29 29 29 29 36 36 37 37 21 39 40 40 21 41 42 42 43 44 45 46 45 46 47 47 48 49 50 51 52 29 46 46 54 55 56 57 57 45 45 59 60 57 45 57 45 61 61 62 63 64...

Page 24: ...rns must be pre authorized by ICON This warranty does not extend to any product or damage to a product caused by or attributable to freight damage abuse misuse improper or abnormal usage or repairs no...

Reviews: