background image

22

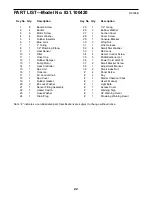
PART LIST—Model No. 831.100420

R0398B

Note: “#” indicates a non-illustrated part. Specifications are subject to change without notice. 

Key No. Qty.

Description

1

8

Buckle Screw

2

4

Buckle

3

6

Motor Screw

4

4

Motor Washer

5

4

Rubber Insulator

6

1

Blue Lens

7

1

2” O-ring

8

1

1/2” Plumbing Elbow

9

1

Heat Sensor

101

Filter

11

1

Hose Cap

12

1

Rubber Damper

13

1

Pump Motor

14

1

Heat Controller

15

1

Spa Unit

16

1

Console

17

1

Air Control Knob

18

1

Spa Cover

19

1

Rubber Gasket

202

#6 Lock Washer

21

1

Sensor Fitting Assembly

22

1

Heater Switch

23

1

Hose Washer

24

1

Drain Plug

Key No. Qty.

Description

25

1

1/2” O-ring

26

3

Rubber Washer

27

1

Suction Cover

28

1

Cover Screw

29

1

Console Bracket

302

Wing Nut

31

1

Wire Harness

32

4

Small Star Washer

33

1

Red Lens

34

4

Heater Control Screw

35

3

Multidirectional Jet

36

1

Power Cord w/GFCI

37

2

Small Bracket Screw

38

1

Adjustment Bracket

39

2

Small Index Nut

#

4

Panel Screw

#

2

Key

#

1

Starter Chemical Pack

#

1

User’s Manual

#

1

Light Bulb

#

1

Access Cover

#

1

Warning Sign

#

1

UV Warning Decal

#

1

Drowning Warning Decal

Summary of Contents for 831.100420

Page 1: ...manual for future reference SEARS CANADA INC TORONTO ONTARIO M5B 2B8 QUESTIONS PLEASE CALL DIRECT TO OUR TOLL FREE CUSTOMER HOT LINE The trained technicians on our customer hot line will provide immediate assistance free of charge to you CUSTOMER HOT LINE 1 888 936 4266 Mon Thu 8 00 am 6 30 pm Fri 8 00 am 6 00 pm EST Hydrotherapy Spa Model No 831 100420 Serial No Write the serial number in the spa...

Page 2: ...tment damage to the spa shell resulting from exposure to extreme temperatures or damage to the spa shell resulting from exposure to direct sun light and ultraviolet rays while the spa is empty damage to the pump motor plumbing and components due to improper maintenance chemical treatment or exposure damage resulting from failure to proper ly follow user s manual installation operating or maintenan...

Page 3: ...PORTANT SAFETY INSTRUCTIONS 4 BEFORE YOU BEGIN 7 CHOOSING A LOCATION FOR THE HYDROTHERAPY SPA 8 SET UP AND ASSEMBLY 9 USING THE HYDROTHERAPY SPA 11 MAINTENANCE 16 TROUBLE SHOOTING 20 PART LIST 22 EXPLODED DRAWING 23 CUSTOMER RECORD 25 ORDERING REPLACEMENT PARTS 26 ...

Page 4: ...is empty The surface of the spa shell can reach temperatures as high as 150 F in a matter of minutes if exposed to the sun while it is empty These high temperatures can cause significant damage such as blistering of the shell surface and warping of the spa shell Any damage caused by sun exposure is not covered under warranty 9 Do not bring any object into the hydrothera py spa that could damage th...

Page 5: ... hydrotherapy spa by children Children must always be super vised 28 DANGER To reduce the risk of drowning Never use the hydrotherapy spa alone Children should not use the hydrotherapy spa unless they are supervised by an adult Keep pets away from the hydrotherapy spa at all times Always replace and lock the spa cover when the hydrotherapy spa is not in use 29 WARNING To reduce the risk of injury ...

Page 6: ...ysician 37 WARNING To reduce the risk of injury It is especially important for persons over the age of 35 or persons with pre existing health problems such as obesity heart disease high or low blood pressure circulatory prob lems or diabetes to consult their physician before using this product 38 The included warning sign must be posted where all users of the spa can see and read it see POSTING TH...

Page 7: ...ORA TION 510 hydrotherapy spa gives you the specialized treatment you need to feel your best For your safety and benefit read this manual care fully before using the PROFORM RESTORATION 510 If you have additional questions please call our Customer Service Department toll free at 1 888 936 4266 Monday Thursday 8 00 am 6 30 pm Friday 8 00 am 6 00 pm EST excluding holidays To help us assist you pleas...

Page 8: ...eck system that is built flush with the top of the spa provided you leave access to the motor for ser vice 9 Be sure to note any other considerations such as aesthetics or privacy concerns which may affect the safety or enjoyment of using the hydrotherapy spa If you set up the hydrotherapy spa outside 1 You should check your local building codes con cerning the use of outdoor spas 2 The location m...

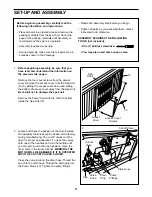
Page 9: ... from the access cover Remove the access cover from the Spa Unit 15 by sliding the access cover down and pulling the bottom of access cover away from the Spa Unit Be careful not to damage the spa shell Remove the Power Cord with the GFCI 36 from inside the Spa Unit 15 2 Locate and check the position of the cut off valves Occasionally the valves will be closed at the factory during manufacturing Th...

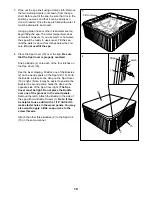
Page 10: ...Be sure that the Spa Cover is properly centered Snap a Buckle 2 onto each of the four latches on the Spa Cover 18 See the inset drawing Position one of the Buckles 2 on the wood panels on the Spa Unit 15 Hold the Buckle in place so the strap on the Spa Cover 18 is tight Note It may be easier to position the Buckle if a second person holds the strap on the opposite side of the Spa Cover tight The S...

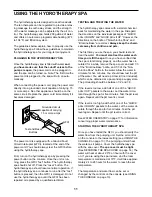
Page 11: ...ackages of QUICK pHix It DOWN and QUICK pHix It UP However the directions on the bottle of Non chlorine Shox and Bromine Base are correct Always keep the chemi cals away from children and pets The first time you use the spa you should test and treat the water You must also treat the water each time you refill the spa Once you have verified that the spa is functioning properly and the water has cir...

Page 12: ...ge on your lower or middle back The remaining jet located on the other bench seat focus es the water massage on your upper or lower back The filter C can be removed for replacement and cleaning see page 16 The suction vents D located near the floor of the spa bring the water into the pump in order to operate the system The suction covers should always be in place over the suction vents Never opera...

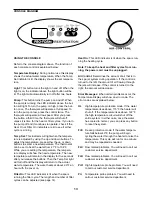
Page 13: ...rn off and the display will return to the actual water temperature The water heats at about 2 0 F an hour with the cover on Filter On This LED indicator is lit when the spa is running the filter cycle The length and number of filter cycles can be adjusted see page 14 Heat On This LED indicator is lit when the spa is run ning the heating cycle Note To keep the heat and filter cycles from run ning t...

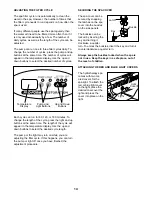
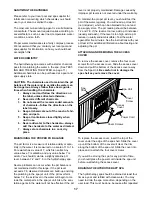
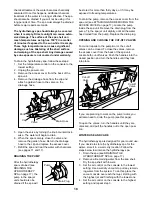
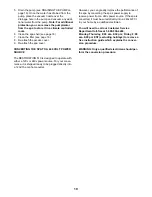
Page 14: ...ill appear in the temperature display Use the up and down buttons to select the desired cycle length The pump or the light may turn on while you are adjusting the filter cycle If this happens you can turn the pump or light off once you have finished the adjustment procedure SECURING THE SPA COVER The spa cover can be secured by snapping the latches on the spa cover into the buckles on the side pan...

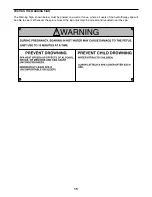
Page 15: ...ARNING SIGN The Warning Sign shown below must be posted on a wall or fence where all users of the hydrotherapy spa will be able to see it Whenever the spa is moved the sign must also be moved and reposted near the spa ...

Page 16: ...in your climate CLEANING THE SPA SHELL The spa shell should be cleaned with a mild soap solution Do not use solvents The spa should always be clean and dry before being moved or stored MAINTAINING THE SPA COVER The spa cover should be cleaned monthly To clean the spa cover use water and a non abrasive cleaner on the entire cover Rinse the cover with a garden hose to remove any cleaner residue Dry ...

Page 17: ...lems can occur when the pH balance is not maintained within this range If the pH level exceeds 7 8 dissolved minerals can build up and clog the plumbing in the spa jet unit If the pH level falls below 7 2 the acid level in the water will begin to cor rode the metal parts in the spa jet unit Also the sani tation agents in the water will not be effective if the pH level is not properly maintained Da...

Page 18: ...drained if the spa will be stored for more than thirty days or if it may be exposed to freezing temperatures To drain the pump remove the access cover from the spa unit see ATTACHING AND REMOVING THE ACCESS COVER on page 17 Locate the pump inside the spa unit Remove the drain plug from the pump Tip the spa jet unit slightly until all the water has drained from the pump Replace the drain plug OPENI...

Page 19: ...ned to operate with either a 120v or 240v power source For your conve nience it is shipped ready to be plugged directly into a 120v 15 amp home outlet However you can greatly improve the performance of the spa by converting the spa s power supply to receive power from a 240v power source If the spa is converted it must be wired directly into a 240v GFCI in your home by a qualified electrician You ...

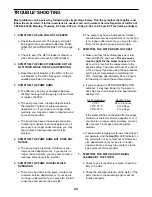
Page 20: ...may also con tact a local spa and pool service provider 6 SYMPTOM THE WATER DOES NOT HEAT a Make sure that the hydrotherapy spa is fully covered with the spa cover The spa cover must be tight for the water to heat Set the air control to low Set the temperature to the desired setting The water will heat at a rate of 2 0 F an hour If you are using the spa indoors and the room temperature is maintain...

Page 21: ...ump compart ment for excess water and watch the pump unit while it is operating to see if water drips from any of the plumbing If you can identify the location of the leak inside the spa jet unit tight en the clamp or replace the damaged seal 10 SYMPTOM THE SPA CONTINUES TO RUN AFTER IT HAS BEEN SHUT OFF a To turn the spa jets on press the Pump button once To turn the spa jets off press the contro...

Page 22: ...ontrol Knob 18 1 Spa Cover 19 1 Rubber Gasket 20 2 6 Lock Washer 21 1 Sensor Fitting Assembly 22 1 Heater Switch 23 1 Hose Washer 24 1 Drain Plug Key No Qty Description 25 1 1 2 O ring 26 3 Rubber Washer 27 1 Suction Cover 28 1 Cover Screw 29 1 Console Bracket 30 2 Wing Nut 31 1 Wire Harness 32 4 Small Star Washer 33 1 Red Lens 34 4 Heater Control Screw 35 3 Multidirectional Jet 36 1 Power Cord w ...

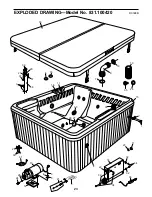
Page 23: ...1 2 2 10 15 16 17 18 36 27 28 35 35 7 8 19 35 26 14 32 34 34 32 32 22 11 23 6 33 9 21 3 4 5 12 13 25 24 31 30 29 38 3 37 37 39 20 20 EXPLODED DRAWING Model No 831 100420 R0398B 23 ...

Page 24: ...NOTES 24 ...
Page 25: ...25 CUSTOMER RECORD Model No Serial No Retailer Name Purchase Date Retailer Address ICON of Canada Inc 900 de l Industrie St Jérôme Québec Canada J7Y 4B8 PLACE STAMP HERE ...

Page 26: ... magazines do you read regularly Sports Fitness Motoring Business Computer General 12 Do you wish to be sent further bulletins about ICON products Yes No THANK YOU FOR YOUR TIME o f d u C a n a d a I n c PRODUCT WARRANTY REGISTRATION 1998 ICON of Canada Inc Printed in USA Model No 831 100420 QUESTIONS As a manufacturer we are commit ted to providing complete cus tomer satisfaction If you have ques...

Reviews: