


7
10
6. Apply a generous amount of the included grease to the
Pivot Axle (71) and to the two M8.5 Washers (55).
Insert the Pivot Axle into the Upright (2) and centre it.
Reapply grease to both ends of the Pivot Axle.
Slide a Handlebar Spacer (47) onto the short tube on
each Handlebar (6, 8), and rotate the Handlebar
Spacers so the small arrows are pointing toward the
floor. Then, slide the Handlebars onto the Pivot Axle
(71).
Make sure that the Handlebars are on the cor-
rect sides.
Tighten an M8 x 25mm Patch Screw (56) with an M8.5
Washer (55) and a Wave Washer (73) into each end of
the Pivot Axle (71). Orient the two Handlebar Caps (46)
as shown, and press the small tabs on the Handlebar
Caps into the two Handlebar Spacers (47).
6
2
55
73
71
8
6
56
46
47
Grease
Arrow
Tube
5. Identify the Left Handlebar (6), which is marked with
a sticker. Insert the Left Handlebar into one of the
Handlebar Arms (5);
make sure that the Handlebar
Arm is turned so the hexagonal holes are on the
indicated side
. Attach the Left Handlebar to one of
the Handlebar Arms with two M8 x 45mm Button
Bolts (50) and two M8 Nylon Locknuts (38).
Make
sure that the Nylon Locknuts are inside of the
hexagonal holes. Do not fully tighten the Button
Bolts yet.
Attach the Right Handlebar to the other Handlebar
Arm (not shown) in the same way.
5
6
50
38
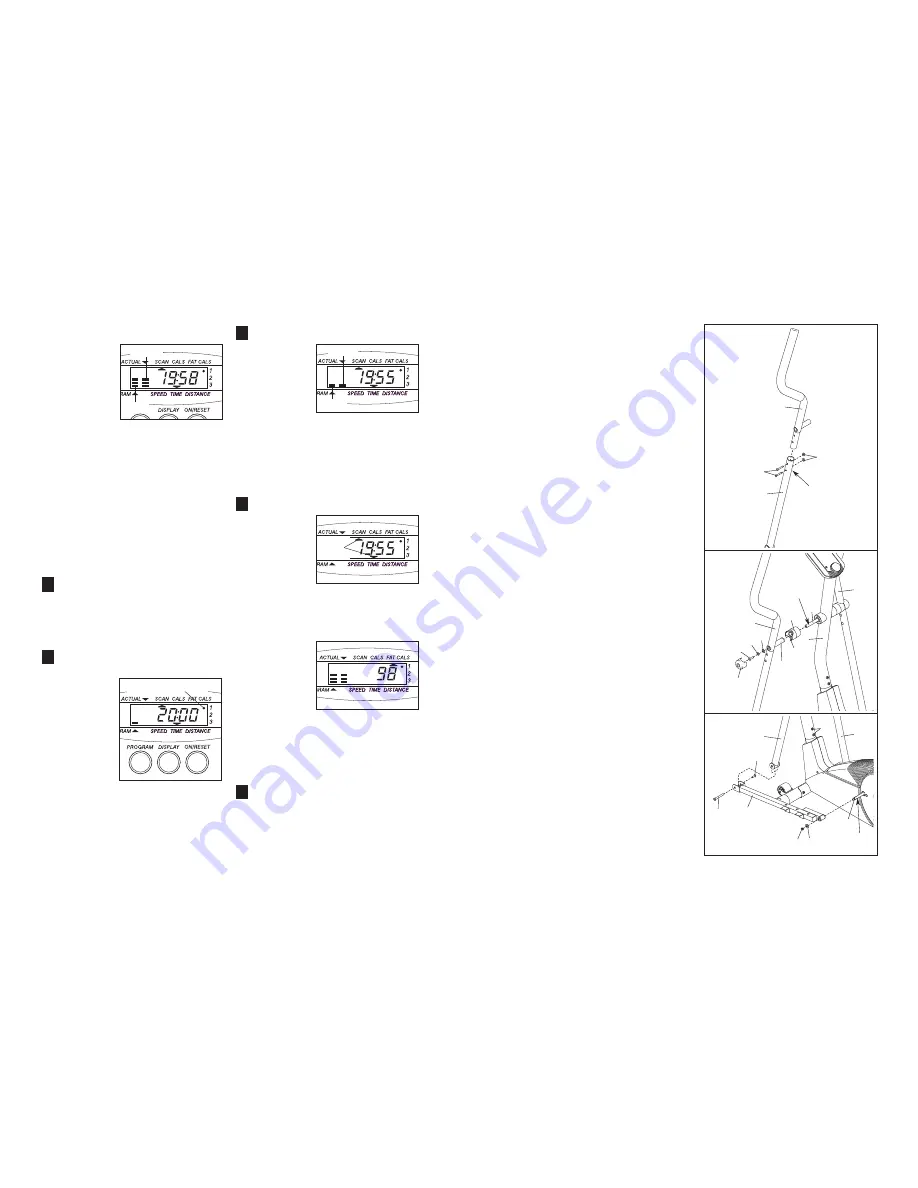
HOW THE PACER PROGRAMS OPERATE
The console offers
three motivational
pacer programs.
Each program
lasts for twenty
minutes. When
you use a pacer
program, two
columns of bars
will appear in the
display. The left column represents a target pace, and
the right column shows your actual pedaling pace.
The target pace will change periodically during the
program; as the target pace changes, simply change
your pedaling pace to keep both columns at the same
height.
Important: The target pace is a
goal
pace.
Your actual pace may be slower than the target
pace, especially during the first few months of
your exercise program. Be sure to exercise at a
pace that is comfortable for you.
STEP-BY-STEP CONSOLE OPERATION
Before the console can be operated, two 1,5V bat-
teries must be installed. (See step 9 on page 8.)
Turn on the power.
To turn on the power, press the on/reset button or
simply begin pedaling. The entire display will
appear for two seconds; the console will then be
ready for use. Note: If batteries were just
installed, the power will already be on.
Select one of the three pacer programs or the
manual mode.
To select one
of the pacer
programs,
repeatedly
press the pro-
gram button.
The program
indicator will
show which
program you
have select-
ed. To select
the manual
mode, press the program button until the program
indicator disappears. The programs will be select-
ed in the following order: program 1, program 2,
program 3, manual mode.
Begin your workout.
If you select-
ed the manual
mode, go to
step 4.
If you
selected one
of the pacer
programs, two
columns of
bars will
appear in the display. The left column will show
one bar, indicating a relatively slow pace. The right
column will show your actual pedaling pace.
Change your pace until only one bar appears in
the right column. Each time the target pace
changes during the program, change your pedal-
ing pace to keep both columns at the same height.
Follow your progress with the monitor modes.
The scan
mode
—
Repeatedly
press the dis-
play button
until an arrow
appears under
the word
“scan.” When
the scan mode is selected, the console will display
the speed, time, distance, fat calories, and calo-
ries modes, for five seconds each, in a repeating
cycle.
The speed,
time, dis-
tance, fat
calories,
or calories
mode
—To
select one of
these modes
for continuous
display, repeatedly press the display button until
an arrow appears below or above the desired
mode. Make sure that there is not an arrow under
the word “scan.”
To reset the display, press the on/reset button.
Turn off the power.
To turn off the power, simply wait for about
six minutes.
If the pedals are not moved and the
console buttons are not pressed for six minutes,
the power will turn off automatically.
5
4
3
2
1
Actual
Program Indicator
Target
Actual
Target
Mode
Arrows
7. Apply a small amount of grease to the axle on the left
Disc Crossbar (16). Slide the Left Pedal Arm (11) onto
the axle, and attach it with an M8.5 Large Washer
(35) and an M8 Nylon Locknut (38).
Insert the left Handlebar Arm (5) into the bracket on
the end of the Left Pedal Arm (11), and attach it with
a Pedal Arm Bolt Set (40).
Repeat this step to attach the Right Pedal Arm (not
shown).
See step 5. Tighten the M8 x 45mm Button Bolts (50)
in the Handlebar Arms (5).
Tighten the two M10 x 76mm Button Bolts (67).
7
5
5
11
35
38
67
40
40
Grease
16
5
Hexagonal
Holes


