background image

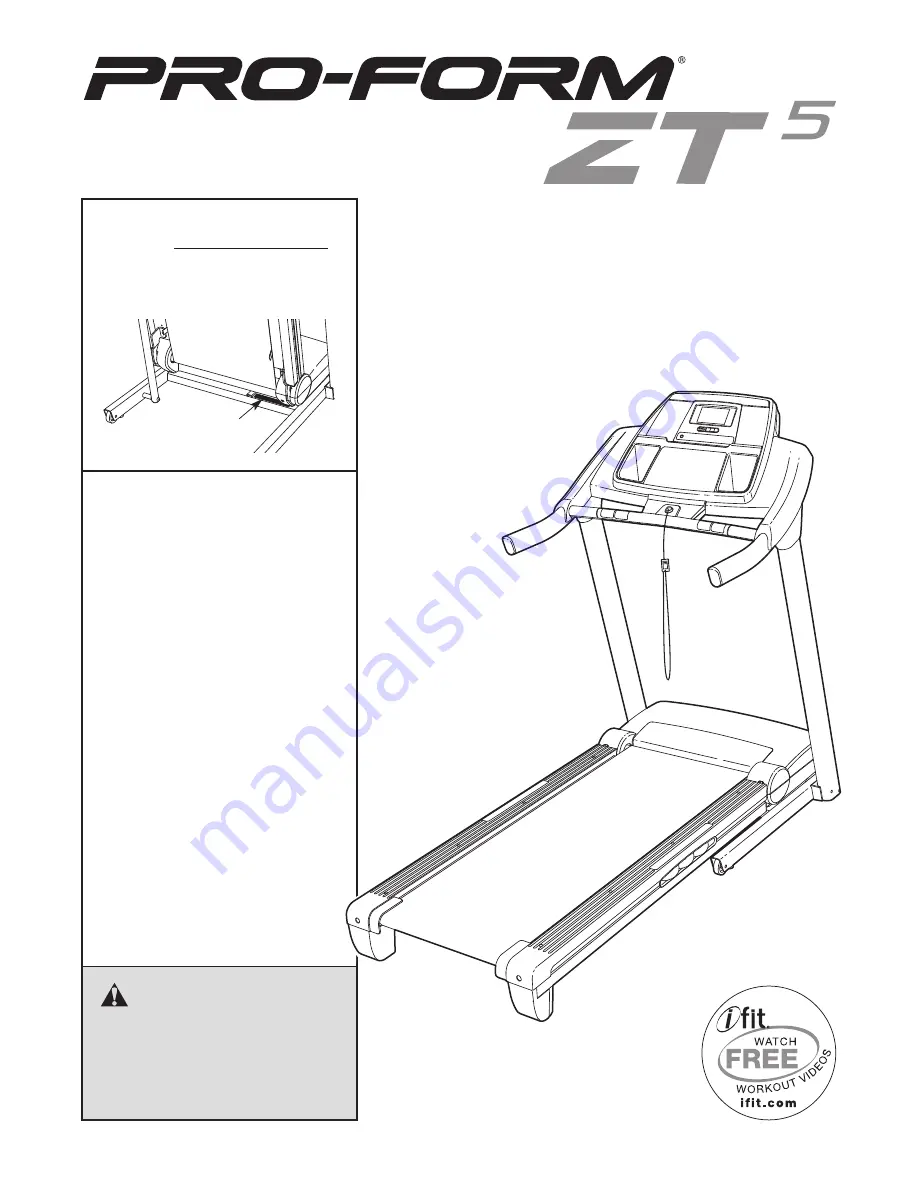
Serial Number

Decal

Model No. PFTL60509.2

Serial No.

Write the serial number in the space

above for reference.

CAUTION

Read all precautions and instruc-

tions in this manual before using

this equipment. Save this manual

for future reference.

QUESTIONS?

If you have questions, or if parts are

damaged or missing,

DO NOT CON-

TACT THE STORE; please contact

Customer Care.

IMPORTANT: Please register this

product (see the limited warranty

on the back cover of this manual)

before contacting Customer Care.

CALL TOLL-FREE:

1-888-533-1333

Mon.–Fri. 6 a.m.–6 p.m. MT

Sat. 8 a.m.–4 p.m. MT

ON THE WEB:

www.proformservice.com

USERʼS MANUAL

www.proform.com

Summary of Contents for PFTL60509.2

Page 1: ...ual for future reference QUESTIONS If you have questions or if parts are damaged or missing DO NOT CON TACT THE STORE please contact Customer Care IMPORTANT Please register this product see the limite...

Page 2: ...DRAWING 28 ORDERING REPLACEMENT PARTS Back Cover LIMITED WARRANTY Back Cover This drawing shows the locations of the warning decals If a decal is missing or il legible call the telephone number on th...

Page 3: ...ension cord 12 Use only a single outlet surge suppressor that meets all of the specifications described on page 14 To purchase a surge suppressor see your local PROFORM dealer or call the tele phone n...

Page 4: ...3 Never insert any object into any opening on the treadmill 24 Inspect and properly tighten all parts of the treadmill regularly 25 DANGER Always unplug the power cord immediately after use before cle...

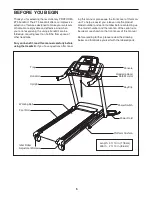
Page 5: ...stions after read ing this manual please see the front cover of this man ual To help us assist you please note the product model number and serial number before contacting us The model number and the...

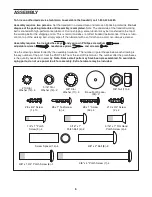
Page 6: ...mbly requires the included hex keys and your own Phillips screwdriver adjustable wrench needlenose pliers and scissors Use the drawings below to identify the assembly hardware The number in parenthese...

Page 7: ...admill onto its left side Partially fold the Frame 55 so that the treadmill is more stable do not fully fold the Frame yet Cut the shipping tie securing the Upright Wire 87 to the Base 95 Locate a pla...

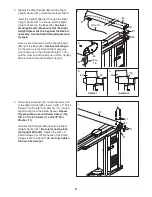
Page 8: ...11 14 7 4 3 Identify the Right Upright 85 and the Right Upright Spacer 91 which are marked Right Insert the Upright Wire 87 through the Right Upright Spacer 91 as shown Set the Right Upright Spacer o...

Page 9: ...y turn the Left Upright Spacer and try again Tighten the 3 8 x 4 Patch Screws 7 until the heads of the Patch Screws touch the Upright do not fully tighten the Patch Screws yet With the help of a secon...

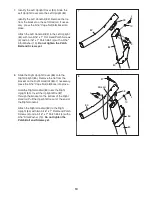
Page 10: ...5 with two 5 16 x 1 Flat Head Patch Screws 3 and a 5 16 x 1 Patch Bolt 4 with a 5 16 Star Washer 13 Do not tighten the Patch Bolt and Screws yet 38 83 Bracket 3 4 13 86 85 87 8 7 Identify the Left Upr...

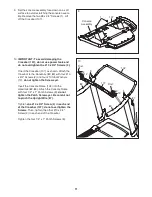
Page 11: ...sole Frame with four 1 4 x 1 Patch Screws 9 do not tighten the Patch Screws yet Be careful not to pinch the Upright Wire 87 Tighten one 10 x 3 4 Screw 2 in each end of the Crossbar 107 do not overtigh...

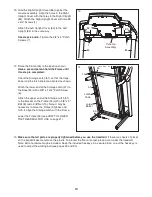
Page 12: ...s 3 and the two 5 16 x 1 Patch Bolts 4 only one side is shown With the help of a second person hold the con sole assembly near the Right Handrail 83 and the Left Handrail not shown Connect the Upright...

Page 13: ...Extra hardware may be included Keep the included hex keys in a secure place one of the hex keys is used to adjust the walking belt see pages 23 and 24 14 Raise the Frame 55 to the position shown Have...

Page 14: ...nt grounding conductor and a grounding plug Plug the power cord into a surge suppressor and plug the surge suppressor into an appropriate outlet that is properly installed and grounded in accor dance...

Page 15: ...ards containing workouts designed to help you achieve specific fitness goals For example lose unwanted pounds with the 8 week Weight Loss workout or train for a long distance run with the Marathon wor...

Page 16: ...TANT If there are sheets of plastic on the console remove the plastic To prevent damage to the walking platform wear clean athletic shoes while using the treadmill The first time you use the treadmill...

Page 17: ...ay will show the time remain ing in the workout instead of the elapsed time The lower right corner of the display will show the approximate number of calories you have burned the speed of the walking...

Page 18: ...current segment of the workout The height of the flashing segment indicates the speed setting for the current segment At the end of each segment a series of tones will sound and the next seg ment of t...

Page 19: ...ing may be programmed for consecutive segments 3 Start the walking belt Press the Go button or the Speed increase button to start the workout A moment after you press the button the treadmill will aut...

Page 20: ...or turn off the demo mode press the Speed decrease button The word ON or OFF indicating the audio setting for your personal trainer When you use an iFit card a personal trainer will guide you through...

Page 21: ...in the storage position Moving the tread mill may require two people 1 Hold the frame and one of the handrails and place one foot against a wheel 2 Pull back on the handrail until the treadmill will...

Page 22: ...If the switch has tripped wait for five minutes and then press the switch back in b Make sure that the power cord is plugged in If the power cord is plugged in unplug it wait for five minutes and then...

Page 23: ...mill will automatically rise to the maximum incline level and then return to the mini mum level This will recalibrate the incline system SYMPTOM The walking belt slows when walked on a Use only a sing...

Page 24: ...plug in the power cord insert the key and run the treadmill for a few minutes Repeat until the walking belt is centered b If the walking belt slips when walked on first re move the key and UNPLUG THE...

Page 25: ...al is to strengthen your cardiovascular system you must perform aerobic exer cise which is activity that requires large amounts of oxygen for prolonged periods of time For aerobic ex ercise adjust the...

Page 26: ...al 40 1 Left Foot Rail 41 1 Latch Warning Decal 42 2 Platform Cushion 43 2 Belt Guide 44 1 Walking Platform 45 2 Frame Cap 46 2 Frame Spacer 47 1 Magnet 48 1 Front Roller Pulley 49 1 Walking Belt 50 1...

Page 27: ...3 1 Tray 104 1 5 32 Hex Key 105 2 Console Clamp 106 1 Console Base 107 1 Crossbar 108 1 Access Door User s Manual Note Specifications are subject to change without notice For information about orderin...

Page 28: ...33 34 33 28 32 32 43 43 30 45 30 30 30 39 40 36 36 36 47 45 46 36 44 41 49 48 54 39 60 55 56 56 46 58 59 61 57 18 10 24 23 18 19 19 20 24 30 30 30 30 28 42 18 42 18 104 28 EXPLODED DRAWING A Model No...

Page 29: ...15 15 15 15 74 18 73 37 37 37 1 1 1 17 22 22 28 28 69 70 71 68 62 64 76 75 72 65 16 28 28 31 67 66 77 79 78 16 16 63 EXPLODED DRAWING B Model No PFTL60509 2 R0411A 29...

Page 30: ...90 5 96 96 8 7 11 7 11 27 35 89 89 85 95 92 88 91 92 14 94 90 5 94 25 26 35 35 97 98 87 10 10 8 93 14 87 86 83 82 81 81 80 38 38 1 1 3 3 4 4 13 13 9 9 27 35 84 30 EXPLODED DRAWING C Model No PFTL60509...

Page 31: ...99 53 1 108 103 101 12 107 1 2 52 29 102 106 1 1 1 1 1 12 2 1 1 1 1 1 1 1 100 1 105 105 50 53 1 1 31 EXPLODED DRAWING D Model No PFTL60509 2 R0411A...

Page 32: ...s warranty does not extend to freight damage to the product This warranty will automati cally be voided if the product is used as a store display model if the product is purchased or transported outsi...

Reviews: