background image

5

ASSEMBLY

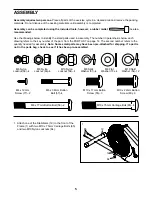
Assembly requires two persons. Place all parts of the exercise cycle in a cleared area and remove the packing
materials. Do not dispose of the packing materials until assembly is completed. 

Assembly can be completed using the included tools; however, a rubber mallet                              is also
recommended. 

Use the drawings below to identify the small parts used in assembly. The number in parenthesis below each
drawing refers to the key number of the part, from the PART LIST on page 14. The second number refers to the
quantity needed for assembly. Note: Some small parts may have been pre-attached for shipping. If a part is
not in the parts bag, check to see if it has been pre-assembled.

M10 x 75mm Carriage Bolt (65)–4

M4 x 12mm

Screw (77)–2

M8 x 77mm Button Bolt (58)–2

M8 Split

Washer (81)–4

M8 Flat

Washer (73)–4

M6 Nylon

Locknut (56)–4

M8 Nylon

Locknut (66)–6

M10 Nylon

Locknut (64)–4

M10 Split

Washer (54)–12

M6 x 38mm Button

Bolt (57)–4

M10 x 17mm Button

Screw (55)–3

M10 x 22mm Button

Screw (80)–9

65

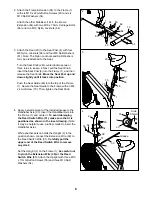
1. Attach one of the Stabilizers (19) to the front of the

Frame (1) with two M10 x 75mm Carriage Bolts (65)
and two M10 Nylon Locknuts (64).

19

64

1

1

Summary of Contents for WHIRLWIND 831.280441

Page 1: ...manual before using this equipment Keep this manual for future reference Serial Number Decal Model No 831 280441 Serial No Patent Pending Visit our website at www proform com new products prizes fitn...

Page 2: ...IONS 3 BEFORE YOU BEGIN 4 ASSEMBLY 5 HOW TO OPERATE THE EXERCISE CYCLE 9 MAINTENANCE AND TROUBLESHOOTING 11 EXERCISE GUIDELINES 12 PART LIST 14 EXPLODED DRAWING 15 HOW TO ORDER REPLACEMENT PARTS Back...

Page 3: ...the pedal bushings refer to HANDLEBAR OPERATION on page 9 If the link arms are not on the pedal bushings they may slip off during use resulting in injury to the user 10 When adjusting the height of t...

Page 4: ...ter reading this manual please call our toll free HELPLINE at 1 800 736 6879 Monday through Saturday 7 a m until 7 p m Central Time excluding holidays To help us assist you please mention the product...

Page 5: ...T LIST on page 14 The second number refers to the quantity needed for assembly Note Some small parts may have been pre attached for shipping If a part is not in the parts bag check to see if it has be...

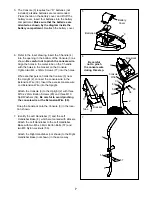
Page 6: ...Secure the Seat Guide to the Frame with an M4 x 4mm Screw 70 Then tighten the Seat Knob 3 20 6 1 66 81 46 65 19 64 64 54 80 80 80 54 54 84 1 29 70 4 Apply a small amount of the included grease to the...

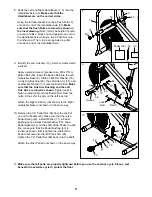
Page 7: ...the bookrack onto the Console 3 in the loca tion shown 6 5 The Console 3 requires four D batteries not included alkaline batteries are recommended Press the tab on the battery cover and lift off the b...

Page 8: ...dal In addi tion make sure that the Pedal Bushing 43 is turned as shown Firmly tighten the shaft of the Pedal clockwise into the left Crank Arm 26 Tighten the 1 2 Pedal Nut 68 back onto the shaft Atta...

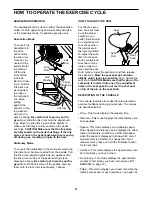
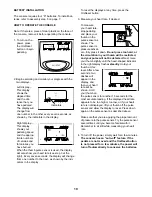
Page 9: ...exer cise the seat must be at the proper height As you pedal there should be a slight bend in your knees when the pedals are in the lowest position To adjust the seat first turn the seat knob counterc...

Page 10: ...our heart rate stop pedaling and place your thumb on the pulse sensor as shown The pulse sensor is pressure activat ed fully press it down Do not press too hard or the circulation in your thumb will b...

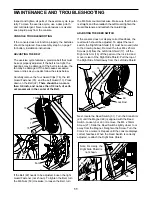
Page 11: ...own To tighten the Belt turn the M6 Nuts 53 clockwise to loosen the Belt turn the M6 Nuts counterclockwise Make sure that the fan is straight and then reattach the Left Guard tighten the Guard Fastene...

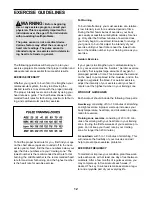
Page 12: ...ercise must be aerobic Aerobic exercise is activity that requires large amounts of oxygen for prolonged periods of time This increases the demand on the heart to pump blood to the muscles and on the l...

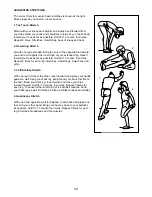
Page 13: ...le Hold for 15 counts then relax Repeat 3 times for each leg Stretches Hamstrings lower back and groin 3 Calf Achilles Stretch With one leg in front of the other reach forward and place your hands aga...

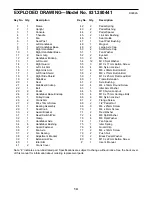
Page 14: ...1 Seat Guide 47 1 Seat Post Bushing 48 1 Magnet 49 2 Large Axle Cap 50 2 Small Axle Cap 51 1 Fan Washer 52 2 Eyebolt 53 2 M6 Nut 54 12 M10 Split Washer 55 3 M10 x 17mm Button Screw 56 4 M6 Nylon Lock...

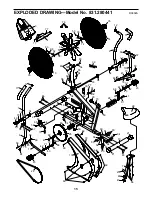
Page 15: ...9 30 31 32 30 33 34 34 34 34 34 34 35 35 36 37 37 38 38 39 40 41 41 42 43 44 42 43 44 45 45 46 47 48 49 78 50 50 74 51 52 53 52 53 54 54 54 54 55 55 80 80 56 56 57 57 58 58 59 64 66 66 64 64 64 64 65...

Page 16: ...the left When requesting help or service or ordering parts please be prepared to provide the following information The MODEL NUMBER of the product 831 280441 The NAME of the product PROFORM WHIRLWIND...

Reviews: