background image

21

English

Warranty 

Manufacturer guarantees proper functioning of the device during warranty period of
warranty period since the date of sale under condition of compliance with maintenance
and storage procedures described in this manual.  After unpacking the device please
keep the package and technical description. Warranties are canceled in case the device
was not transported in the original package or maintenance procedures were violated.
Manufacturer is not responsible for device malfunctioning as a result of improper
maintenance, storage and transportation including mechanical failures. 
In case of device failure during the warranty period, customer has the right to repair it in
Service centre for free. The equipment is accepted for warranty repair clean from dust
and mud.
Cleaning equipment from dust and mud is not included in the warranty and is charged
separately. 
Warranty service does not include training of equipment maintenance, as well other
service for providing functioning of device (connection, testing, customizing, preventive
works etc.), which customer can commit on his own according to the attached manual. 
Producer is entitled to introduce constructive and software changes, not described in the
current manual. 
Warranty service is not available in the following cases:
- Absence of warranty coupon, incorrectly filled warranty coupon, or corrected coupon
- If operation rules mentioned in the manual were violated.
- If there are mechanic damages of equipment.
- If there are foreign objects or liquid inside device. 
The present warranty is not applied to lamps, batteries, belts, network adaptors, power
units, safety fuses, brushes, parts of the body of the product and any other parts which
have naturally limited period of service including failures caused by instability or power
supply failures. Replaced defective parts are to be considered property of our company.
The owner delivers faulty equipment to a service centre at his own expense. 

Summary of Contents for PRO CS-200A

Page 1: ...PRO CS 200A www pro intell com Gebrauchsanweisung User manual Manuel d utilisation M nzz hlmaschine Coin counter Compteuse de pi ces de monnaie Fran ais English Deutsch...

Page 2: ...2...

Page 3: ...kl rung 12 English 1 The basic functions of the device 14 2 Appearance 14 3 Specification 15 4 Control panel 15 5 Safety precautions 16 6 Preparation before work 16 7 Operation 18 8 Troubleshooting 19...

Page 4: ...auch des M nzz hlers und um weiter ihn problemlos zu benutzen lesen Sie diese F hrung sorgf ltig durch und befolgen Sie die Sicherheitshinweisen 1 Standardfunktionen des M nzz hlers PRO CS 200A 1 Z hl...

Page 5: ...te gew hlt werden Wenn die Anzeigelampe auf dem Bedienungspaneel leuchtet ist dieser Modus aktiviert BAT Stapelfunktion Die Stapelfunktion kann mittels dieser Taste gew hlt werden 0 20 35 40 50 100 20...

Page 6: ...rgrund bei Feuchtigkeit oder in Na r umen sch tzen Sie das Geraet von Ersch tterungen bei staubigen Umwelteinf ssen unter starkem Lichteinfall oder Sonneneinstrahlung Nahe gef hrlichen Objekten 4 Es i...

Page 7: ...e den entsprechenden Durchmesser der M nzsorte ein Stellen Sie die entsprechrnde St rke der M nzsorte ein Geben Sie die M nze in den Einwurfschlitz ein und schalten Sie den M nzz hler durch Dr cken de...

Page 8: ...Aufnahmefach ein Dr cken Sie die Taste ADD Anzeigelampe auf dem Bedienungspaneel leuchtet Dann schalten Sie den M nzz hler durch Dr cken der Taste START ein Die gez hlten M nzen werden in das Ausgabef...

Page 9: ...den entsprechenden Durchmesser der M nzsorte mit den gr ten Abmessungen ein Stellen Sie die entsprechrnde St rke der M nzsorte mit den gr ten Abmessungen ein Geben Sie verschiedene M nzsorten in den E...

Page 10: ...e durch den ver nderten Tonsignal und bestimmen oder die M nzen aus keinem Ausgabefach herausgeworfen angenommen werden ist es notwendig die Z hlung durch Dr cken der Taste START STOP wenn der Motor i...

Page 11: ...11 Deutsch Abbildung 3 Abbildung 4 Abbildung 5...

Page 12: ...r Funktionen f r die Arbeitsf higkeit der Technik Anschalten Pr fung Abstimmung prophylaktische Arbeit und andere die Sie selbst laut der Betriebsanleitung machen k nnen nicht geh ren Der Hersteller h...

Page 13: ...13 Deutsch...

Page 14: ...basic functions of the device 1 Counting and summing up counters and coins of one face value 2 Batch mode of counting counters and coins of one face value 3 Sorting counters and coins of different fa...

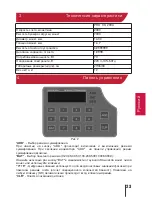
Page 15: ...indicator on the control panel is lit sum up mode is ON BAT Choose a batch mode 0 20 35 40 50 100 200 500 1000 5000 0 Press BAT button several times depending on the desired number of coins Use the fo...

Page 16: ...foreign objects Curved or damaged coins inside see p 8 8 During operation make sure there are no left coins in the stacker hopper and separator see p 8 regularly service and clean the device to keep t...

Page 17: ...shift the diameter setting handle 1 division 1 click forward and shift the thickness set ting handle in the increase direction Make sure that that the coin or a counter should get in the eject stacke...

Page 18: ...exit sum up mode press ADD and CLR buttons to reset the display value 7 3 Batch operation mode with equal face value coins mode of counting a specified number of coins Set the corresponding diameter o...

Page 19: ...objects damaged coins or foreign ones different from national in size together with conditional ones In the first case it is necessary to choose a more exact position of the switches Thickness or Dia...

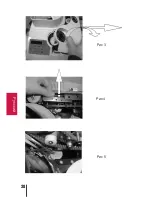
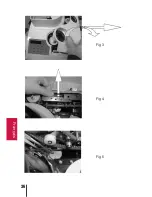
Page 20: ...20 English Figure 3 Figure 4 Figure 5...

Page 21: ...ely Warranty service does not include training of equipment maintenance as well other service for providing functioning of device connection testing customizing preventive works etc which customer can...

Page 22: ...22 PRO CS 200A 1 1 2 3 2 1 2 3 4 5 6 7 8 9 10 11 12 13 14 15 2...

Page 23: ...23 3 4 ADD ADD ADD BAT 0 20 35 40 50 100 200 500 1000 5000 0 BAT 0 9 0 9 CLR 2 PRO CS 200A 2300 7000 14 34 1 3 7 0 9999999 1 9999 70 220 10 50 27 36 33 12...

Page 24: ...24 START STOP START STOP M MEM 3 CLR 5 1 2 3 4 5 6 7 8 8 8 9 6 6 1 1 15 6 2...

Page 25: ...25 0 33 1 START 1 1 1 1 8 1 8 0 33 7 7 1 START 8 1 START...

Page 26: ...26 7 2 ADD START 8 1 START ADD CLR 7 3 BAT START 8 1 START START 7 4 START 8 1 START 7 4 7 1...

Page 27: ...27 8 1 2 START STOP START STOP 3 4 5...

Page 28: ...28 3 4 5...

Page 29: ...29...

Page 30: ...dans votre travail Avant de brancher l appareil veuillez prendre connaissance de l ensemble des informations contenues dans ce manuel concernant les fonctions de l appareil 1 Principales fonctionnalit...

Page 31: ...0 20 35 40 50 100 200 500 1000 5000 0 Appuyez plusieurs fois sur la touche BAT pour s lectionner le nombre d sir des pi ces compter ou utilisez les touches num riques 0 9 0 9 Touches num riques utili...

Page 32: ...r les pi ces de monnaie et les jetons dans la tr mie assurez vous qu il n y a pas d objets tranges de pi ces pli es dans la machine voir le point 8 Si vous avez termin votre travail avec la machine as...

Page 33: ...les r sultats d ajustement dans une table Si le curseur de diam tre stoppe voir le point 8 positionnez le sur une ou plusieurs divisions en avant faites le diam tre plus grand 7 Fonctionnement de la...

Page 34: ...ortie Fig 1 8 L cran indique le r sultat du comptage effectu La compteuse fait 2 circuits de travail et arr te appuyez sur la touche START pour repren dre le comptage R p tez l op ration autant de foi...

Page 35: ...oteur de l appareil a stopp ou les pi ces ne sont pas rejet es par aucune goulotte il est n cessaire de Arreter le comptage appuyer sur la toche START STOP si le moteur fonctionne et retir er la pi ce...

Page 36: ...36 Fran ais Fig 3 Fig 4 Fig 5...

Page 37: ...nant un suppl ment Le service de garantie ne comprend pas l apprentissage pour l utilisation de l appareil ni pour l ex cution des autres fonctions n cessaires au fonctionnement de l appareil branchem...

Page 38: ...38...

Page 39: ...39...

Page 40: ...PRO INTELLECT TECHNOLOGY www pro intell com...

Reviews: