


© Pro-Ject Audio Systems · Pro-Ject RPM 9 Carbon · Revision 2015.07.10
5
Mounting and connecting the cartridge
All cartridges with half inch mounting holes can be mounted. Leave the needle's protection cover on,
fit the cartridge to the headshell by using the supplied screws by passing one screw through each slot
in the headshell (15). Do not tighten the nuts yet.
Connect the tonearm wires with the cartridge pins as follows:
white
left channel positive (L+)
red
right channel positive (R+)
green
right channel return (R -)
blue
left channel return (L -)
The full sound quality of the record player can only be achieved if the cartridge is adjusted correctly.
Particular tools like the Pro-Ject Audio Systems alignment tool are required to accomplish this job properly.
If you are not well acquainted with the adjustment of cartridges, please call for the willing help of your
Pro-Ject Audio Systems dealer.
Please note: adjusting a cartridge and tonearm calls for the greatest care in order to avoid
damaging the cartridge or tonearm bearings. Ask your local dealer for help if you are unsure in
any of the necessary steps and precautions which must be taken.
Cartridge downforce adjustment
The supplied counterweights (6) are suitable for cartridges weighing between 5 - 7,5g (counterweight no.
28
), 7 - 10g (counterweight no.
46
), 9 - 11g (counterweight no.
43
) or 10 - 14g (counterweight no.
29
). Adjust the downforce before installing the anti-skating weight.
Following adjustments have to be done very carefully Remove cartridge protection cap. Push and turn
the counterweight (6) carefully on the rear end of the tonearm tube (9), so that the downforce scale
(6a) shows towards the front of the player. Lower the armlift and position the cartridge in the space
between arm rest and platter. Rotate the counterweight (6) until the arm tube is balanced. The arm
should return to the balanced position if it is moved up or down.
Once the arm is balanced correctly return it to the rest. Hold the counterweight (6) without moving it and
gently revolve the downforce scale ring (6a) until the zero is in line with the anti-skating stub (12). Check
whether the arm still balances out.
Rotate the counterweight counter clockwise (seen from the front) to adjust the downforce according
to the cartridge manufacturer's recommendations. One mark on the scale represents 1 mN (= 0,1g /
0,1 Pond) of downforce.
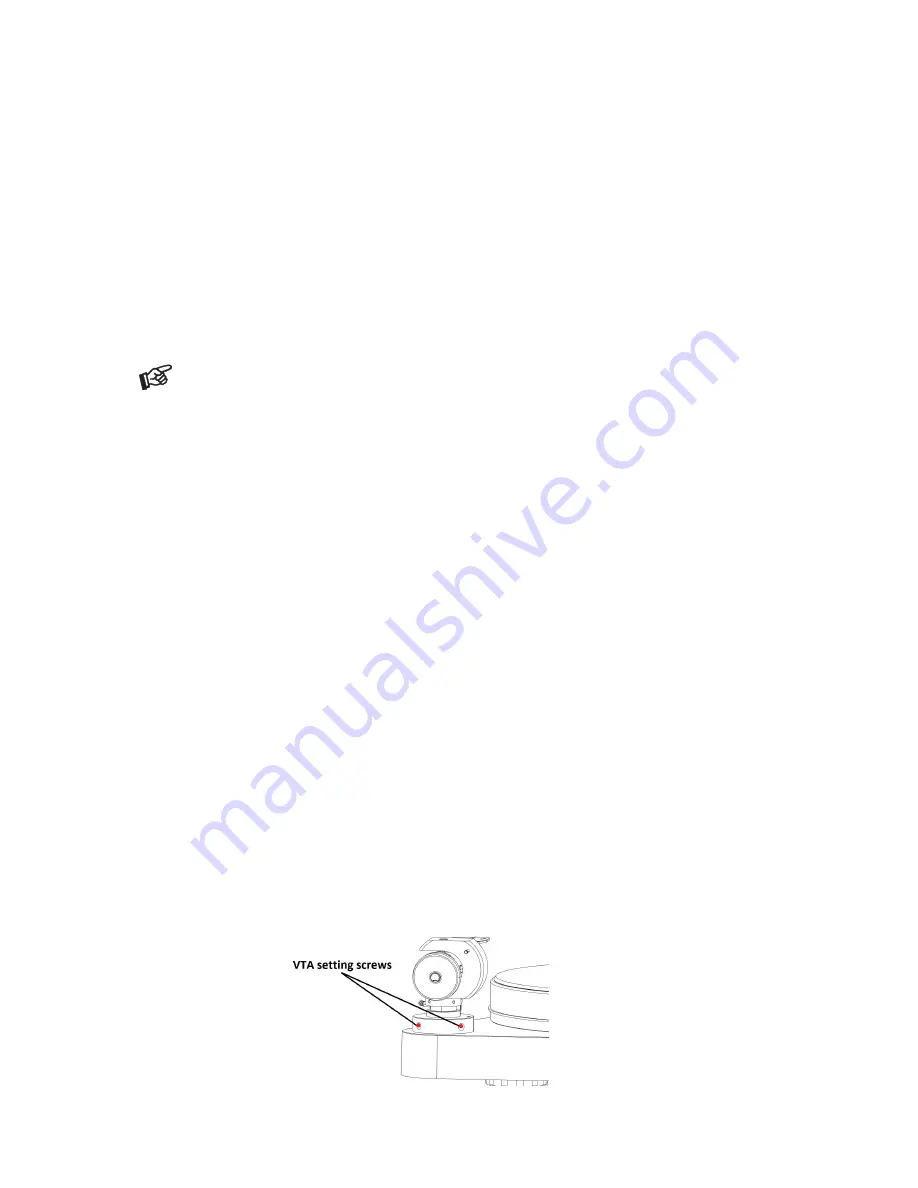
Adjusting the vertical tracking angle (vta)
Put a record and the record weight on the platter. When the needle is lowered into the record groove and
the tonearm is not resting on the lift arm, the tube of the tonearm should be parallel to the surface of the
record.
If it is not, loosen both hexagon screws in the tonearm base just enough to allow vertical movement of
the arm pillar without force and slide the arm up or down until it is parallel.
Retighten the hexagon screws without applying excessive force (which would deform the arm pillar) –
finger tight is quite sufficient.


