background image

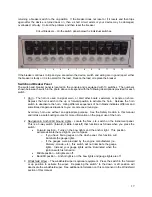
4, 5  Forward Bilge and Aft Bilge - Your 26 Super Sport is equipped with forward and aft bilge pumps 

with automatic float switches.  The 500-gph forward bilge pump is located in the center of the 
boat and is accessible via the aft wall panel in the head area.  The 1500 gph aft bilge pump is 
located in the bilge and is accessible via the bilge hatch.  The automatic float switches are 
installed in close proximity to each o

f

 the bilge pumps. 

 
The bilge pump is wired automatic to the battery and has a manual override located at the switch 
panel on the console.  The automatic float switch is wired directly to the 

Starboard

 battery 

terminals through breakers or inline fuses.  The circuit breaker is located at the helm next to the 
manual switch.  Depressing the bilge pump switch to the up or forward position activates the 
bilge pump. 
 
Depressing the applicable bilge pump switch (Forward Bilge 1 or Aft Bilge) to the up or forward 
position activates the corresponding bilge pump.  Depressing the applicable bilge pump switch to 
the down or aft position turns the pump off. 
 
If for some reason the indicator light on your bilge pump switch comes on, check your bilge for 
water.  It is not uncommon for rain water or water from washing your boat to accumulate in the 
bilge.  Standing water will activate the automatic float that is connected to the bilge pump.  If you 
notice your pump running frequently during your day on the water, you should check the thru hull 
fittings, hose connections, etc. for any possible leaks. 
 
Keep the bilge area clean and free from debris that could clog ports or inhibit float movement.  
Also, keep the battery (starboard) that provides power to the bilge pump charged.  If the battery 
is not charged and flooding occurs, the boat could swamp causing damage and possible loss of 
life or property. 
 

6  Fish Box Pump - This switch directs power to the fish box 

macerator pump, which allows you to drain the water and 
debris from the aft fish boxes.  The macerator pump allows 
you to pump all the water, ice and scales out of the aft fish 
boxes by grinding up the debris and discharging it 
overboard.  The forward fish boxes are not connected to 
this system and their contents will gravity drain via thru 
hulls on the side of the boat. 


  To activate the pump, depress the switch to the up or forward position.  This action will drain the 

fish boxes of water and/or debris and transport it to the macerator pump to be macerated and/or 
discharged overboard.  When not in use, the switch should be left in the off position. 
 

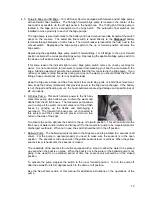
7  Baitwell Pump - The baitwell pump is located in the bilge area and is plumbed to a seacock (ball 

valve).  For the pump to operate properly you need to make sure the seacock is in the open 
position.  The seacock is wide open when the yellow seacock lever is vertical.  When the yellow 
seacock lever is horizontal, the seacock is closed. 
 
The underside of the seacock thru-hull is equipped with a scoop to allow the water to be picked 
up even when the boat is on plane.  When the boat is not in the water or the baitwell pump is not 
going to be used for an extended period of time, the seacock valve should be in the closed 
position. 
 
To activate the pump, depress the switch to the up or forward position.  To turn the pump off 
after the baitwell tub is full, depress switch to the down or aft position. 
 
See the Sea Water section of this manual for additional instructions on the operations of the 
pump. 


18

Summary of Contents for 2007 26 Super Sport

Page 1: ...l 26 Super Sport Specifications subject to change without notice Actual boats may vary from drawings and or photos Copyright 2005 Pro Line Boats Inc PO Box 1348 Crystal River FL 34423 All rights reserved December 23 2005 ...

Page 2: ...ii ...

Page 3: ...tions 9 Passenger Safety 9 Regulations 10 Rules of the Road 10 Alcohol 10 Controls Throttle Shift Controls 11 Ignition Binnacle Fwd Neutral Reverse Gear Operation 11 Key Switch Alarm 11 Lanyard Stop Switch 11 Shift Throttle Trim 12 Steering Hydraulic or Verado Power 12 Hydraulic Steering 12 Steering Tilt Upgrade Optional 12 Steering 13 Steering Wheel 13 Power Trim 13 Trim Tabs 13 Windlass Optional...

Page 4: ...rta Potti 24 Head w Dockside Discharge 25 Sea Water System 25 Baitwell Pump 25 Washdown Pump 26 Bilge Pumps 26 Fish Boxes with Macerator Pump 27 Fuel Oil Systems 27 Fuel Fill and Fuel Vent 27 Fuel Tank 28 Fuel Sender Fuel Pick Ups 28 Fuel Water Separators 28 Primer Bulbs 29 Oil Tank and Oil Fill 29 Fuel Oil Leaks 29 Stereo Equipment Optional 29 AM FM Stereo with CD Player Speakers Optional 30 XM S...

Page 5: ... Engines 39 Fueling 40 Before Fueling 40 While Fueling 40 After Fueling 40 Loading 40 Service and Care Fiberglass and Gelcoat 41 Epoxy Barrier Coat and Bottom Paint 41 Graphics 42 Gunwale Trim Rubrail 42 Washdown Fresh Water Pumps 42 Fuel Water Separators 43 Compass 43 Aluminum 43 Stainless Steel 44 Corrosion Protection 44 Head and Transom Doors 44 Tackle Box 45 Windshield 45 Bimini Top 45 Canvas ...

Page 6: ...Diagrams 52 While we endeavor to be as accurate as possible certain changes in standard equipment options and the like may have occurred which would not be included in the Owner s Manual All weights and fuel capacities are estimates and could will vary with each vessel and with each application In all cases consult your local Pro Line dealer for the most current information ...

Page 7: ...d this manual carefully and familiarize yourself with the boat before using it If a specific method or procedure is not recommended you must make sure that whatever action you take is safe for you your passengers and others on the water Always use common sense when boating Specifications Length Overall LOA 26 5 Bridge Clearance Beam 8 6 To Top of Windshield 6 10 Draft Hull 21 w T Top or Hard Top 9...

Page 8: ...ce to Pro Line boat owners within the locality of the dealership Explain local and out of area service procedures during and after the warranty periods Customer Responsibilities Review and sign the Pre Delivery Inspection PDI report for the boat and motors with your dealer to ensure that your boat is in top condition when you take delivery Examine the boat at time of delivery to insure that all sy...

Page 9: ... you with your copy of the warranty and mail the warranty card to Pro Line Boats Inc A copy of the Pro Line Boats Limited Warranty is also included in this chapter The Pro Line Boats Limited Warranty extends only to parts that were factory installed Dealer installed items are the responsibility of the dealer All warrantable repairs are to be completed by an authorized Pro Line dealer Your dealer s...

Page 10: ...me or marina Service requested by customer other than that which is necessary to satisfy the warranty obligation Oils lubricants or fluids used in normal maintenance Air freight next day or second day air or any special delivery fees unless pre approved Gelcoat cracking chalking crazing discoloration yellowing or blistering Hull blisters that form below the water line Osmosis blistering is not cov...

Page 11: ...5 ...

Page 12: ... confused with seasickness So be aware of the following CO symptoms Itchy and watery eyes flushed appearance throbbing temples inability to think coherently ringing in the ears tightness across the chest headaches drowsiness nausea dizziness fatigue vomiting collapse and convulsions Do not stand or swim near the motor when the engine is idling Carbon monoxide can harm and even kill you inside or o...

Page 13: ...ilating the area Where CO May Accumulate Carbon Monoxide can accumulate anywhere in or around your boat as shown in the following pictures Inadequately ventilated canvas enclosures Exhaust gas trapped in enclosed places Blocked exhaust outlets Another vessel s exhaust CO from the boat docked next to you can be just as deadly Station wagon effect or back drafting At slow speeds while idling or stop...

Page 14: ...k A VSC is a free bow to stern safety examination Fire Be aware of and avoid conditions that can lead to accidental fire Guard against and watch for fuel spills and leaks Inspect wiring for damage or exposure that could lead to short circuits or arcing Make sure those who smoke are careful to avoid accidental fire ignition Do not allow smoking while fueling Keep a USCG approved fire extinguisher o...

Page 15: ...and avoid hazardous conditions whenever possible When forced to operate your Pro Line in storm conditions Wear PFD s Stow loose gear and equipment Place heavy items as low as possible Head for the easiest port to reach a safe location Reduce speed You are moving too fast if the boat leaves the water If power fails anchor or rig a sea anchor off the bow an empty ice chest in a pinch Stay with the b...

Page 16: ...Line 800 368 5647 The USCG Headquarters by logging on to uscg mil The information here is only a brief overview Please contact the USCG for detailed information Audible warning signals o One short horn blast starboard course change o Two short horn blasts port course change o Three short horn blasts astern operation o Five horn blasts doubt about previous signal or danger o A Five second horn blas...

Page 17: ... vary depending upon the engine package that was selected ey Switch Alarm is located in the binnacle and sounds when the ignition key is turned on The key anyard Stop Switch p switch also called the emergency stop feature on the engine works properly K The key switch alarm switch alarm is actually is a warning alarm that goes off when any overheating problems may occur with the engine To check the...

Page 18: ...he motor from starting in gear The initial short movement of the lever to engage the transmission should be made firmly to avoid causing gear clash CAUTION Use care in shifting to avoid advancing the throttle more than intended Steering Hydraulic or Verado Power Steering systems will differ depending upon your selection of engine package Please carefully read the owner s manual provided by the spe...

Page 19: ... your dealer to have them bleed the steering system Steering Wheel The stainless steel steering wheel is mounted at the helm along with the binnacle switch panel and other controls Please refer to the Care and Maintenance section of this manual for cleaning recommendations Power Trim The power trim unit is located on the engine and can be operated by using the trim button on the engine or by using...

Page 20: ... give the over trimmed tab an adjustment in the opposite direction Push the top half of both rocker switches in half second increments to trim the bow down Warning Trim tabs can cause a dramatic change in the attitude and heading of your boat Adjust them in small increments when in open water and clear of any obstructions Windlass w Rope Chain Optional The optional windlass anchor system is locate...

Page 21: ... the windlass motor to fail To retrieve the anchor press the windlass switch to the up position and carefully raise the anchor up but not allowing it to hit the boat Windlass Windlass Switch Refer to the owner s manual that was provided by the manufacturer of the windlass for operational procedures and information related to the care and maintenance of their product When in doubt always defer to t...

Page 22: ...1 position on the switch and turn the port ignition key to start the port engine Turn off the port engine ignition key and the port battery switch Turn the starboard battery switch to the two 2 position on the switch and turn the starboard ignition key to start the starboard engine Never switch battery positions while the engines are running To ensure that the battery switch will turn off place th...

Page 23: ...rent and sometimes dangerous situations to you or someone around you Avoid any horn use without an appropriate purpose See the Safety Section in this manual and or take a safe boating course for more information on the proper use of the horn 2 Navigation Anchor All Around Lights Locate the Nav Lts switch on the instrument panel This is a 3 way switch forward middle back aft that functions as follo...

Page 24: ...lso keep the battery starboard that provides power to the bilge pump charged If the battery is not charged and flooding occurs the boat could swamp causing damage and possible loss of life or property 6 Fish Box Pump This switch directs power to the fish box macerator pump which allows you to drain the water and debris from the aft fish boxes The macerator pump allows you to pump all the water ice...

Page 25: ...ress the switch to the up or forward position The lights give off a soft warm light which should not affect your night vision but will still provide you with enough light to safely move around your cockpit in low visibility conditions 12 Head Light The head light switch provides power to the round light located in the head area To activate this light depress the switch to the up or forward positio...

Page 26: ...position when you are underway Therefore this light will be installed as follows based upon the optional top that you may have selected Bimini top standard Light will be installed on the starboard aft corner of the transom in close proximity to the baitwell tub Rigid T top Light will be mounted on the center of the Trylon top Remote Spot Light Optional The installation of the remote spot light req...

Page 27: ... by the manufacturer of the compass for operational procedures and for information related to the care and maintenance of their product When in doubt always defer to the compass manufacturer s instructions and or recommendations Horn Electric The horn is used to signal warn or alert other boats or persons on shore The horn switch is located on the switch panel The horn device is located just forwa...

Page 28: ...veling Either a GPS or a radar gun can check the running speed Temperature The temperature temp gauge indicator is labeled temp and is located on the console To verify the temp gauge is working properly start the engine and allow the engine to idle for a few minutes to ensure that the engine is warmed up The indicator will light up if the engine is overheating Check the owner s manual provided by ...

Page 29: ... a source of clean fresh drinking water Never fill the fresh water tank with anything other than fresh water Fresh Water Pump The fresh water pump is located on the port side of the bilge It is accessible by removing the optional dual battery switches and or the tackle box that are installed below the transom door Depressing the fresh water switch located on the switch panel to the forward positio...

Page 30: ...ederal standards prior to discharge All boats built since 1977 with installed toilets must have an operable approved type I II or III MSD Since 1980 all boats including those built before 1977 with installed toilets must have an operable MSD Both the U S Coast Guard and the Natural Resources Police can enforce MSD requirements Check with your local authorities Coast Guard local marina or your deal...

Page 31: ...ttom of the hull the seacock is closed The seacock should remain closed when the baitwell pump is not in use Baitwell pump shown with seacock closed is located in the bilge below the mid berth The hose on the lower port feeds raw water to the washdown pump To operate the baitwell pump locate the baitwell switch on the console and press the switch to the forward position to turn on the pump When th...

Page 32: ...o the fitting To turn on the washdown pump locate the washdown switch on the instrument panel and press the switch to the forward position If you turn on the washdown pump switch and you do not feel pressure the seacock may not be open Verify that the seacock is open and depress the switch again When not in use the washdown switch should be left in the off down or aft position The switch for the w...

Page 33: ...ft fish boxes with water Then depress the fish box switch to the on position The water and fish particles will be pumped out of the tubs and then overboard via the fish box thru hulls on the side of the boat When you are finished emptying the fish boxes place the fish box switch in the aft position to turn off the fish box macerator pump Note The 2 storage boxes on the forward casting deck are for...

Page 34: ... the float is able to move up and down freely Fuel Water Separators Depending on your selection of the various optional engine packages your boat may be equipped with a fuel water separator for each engine However some engines come equipped with a built in fuel water separator Please refer to the owner s manual provided by the manufacturer of your engine package for operational procedures and for ...

Page 35: ...ounted in the bilge as far aft as possible The oil fill will be installed on the outside of the transom above the motor well If your optional engine package requires the installation of remote oil tanks please refer to the owner s manual provided by the engine manufacturer for operational procedures and for information related to the care and maintenance of their product When in doubt always defer...

Page 36: ... for operational procedures and for information related to the care and maintenance of their product XM Stereo Upgrade Optional When activating your satellite service your service provider will request that you provide them with the Radio ID You will find this 8 character ID alpha numeric on the paperwork in your owner s package If you cannot locate the paperwork you will find the controller head ...

Page 37: ...ing latch comes with a set of two numbered keys We recommend that you make note of the key number and keep it in a safe place In the event that you need to replace the keys this will allow you to replace just the keys and not the entire lock assembly See the Service and Care section of this manual for cleaning recommendations Transom Door The poly transom door is located on the port aft corner of ...

Page 38: ... from the recessed area of the hatch twist it and lift the hatch open There is a small red dot on one side of the latch If the red dot is visible when the hatch is closed that means that even though the hatch may be closed the latch is not secure Make sure that all hatches are closed and secured before you get underway Lift the handle of the latch turn it 180o so that the latch catches and return ...

Page 39: ...ll Fuel Vent Deck drain Fish box macerator pump Thru hulls for Bilge pump Baitwell tub Fuel Fill Hose Fuel Vent Hose Fuel Sender Fuel Pick Ups Drain Fittings for Casting Deck Storage Boxes Casting Deck Storage Boxes Release the latch on the top forward edge of the console for acess to the backside of the console or dash panel Wet Dry Storage in floor below the hatch installed in front of the forwa...

Page 40: ...s manual for cleaning recommendations Grab Rails Stainless steel grab rails have been installed to provide safe boarding and navigation on the boat One is located at the port transom ladder and two more are installed on each side of the forward console storage seat Depending upon your helm seat selection additional grab rails may also be installed on either side of the seat Bow Pulpit w Anchor Rol...

Page 41: ... launching the boat always make sure that the drain plug has been installed in the fitting on the transom at the keel If your boat is being transported remove the drain plug once the boat is secured on the trailer so that any excess water can be drained via the fitting Never remove the drain plug when the boat is sitting static in the water If you live in an area where it snows and you are storing...

Page 42: ...d Side Port Forward Fish Box Drain in Lip of Forward Bilge Hatch Port Aft and Center Deck Drains Fish Box Macerator Pump Bilge Pump Baitwell Tub Drain Starboard Deck Drain Fuel Vent Anchor Locker Console Storage Seat Starboard Forward Fish Box ...

Page 43: ...alled in the port and starboard freeboard of the aft cockpit Combined they can accommodate up to 8 fishing rods Outriggers Optional This option requires the installation of the optional rigid T top frame The outrigger installation includes a pair of outrigger bases poles and lines The bases are constructed of anodized aluminum and are installed on each side of the optional T top frame Turn the han...

Page 44: ...ion for best acceleration to plane Lowers the bow which provides better stability and ride in rough water Reduces boat speed and economy due to increased drag of hull and drive More spray over bow General trim up or out characteristics are Raises the bow of the boat out of the water resulting in less hull in the water Greater speed and economy for a given throttle setting Greater maneuverability p...

Page 45: ...rmance increase fuel consumption and may introduce undesirable handling characteristics The vibration caused by running a damaged prop could cause costly damage to your lower drive unit Starting Follow the information in your engine manual if it deviates from the following instructions Before Starting the Engines Ventilate all enclosed spaces Visually inspect the bilge for fuel and check for vapor...

Page 46: ... Open the doors and hatches to ventilate the boat before starting the engines Check for fumes in the bilge and continue to ventilate if fumes are present Loading The performance of any boat is contingent upon the amount of load carried Reduce the load to permit safe operation in rough and adverse conditions Heavy loads reduce the performance and increase fuel consumption The load positioning great...

Page 47: ...wice a year more often if the boat is stored in the sun If neglected the surface will take on a dull appearance that is not restorable by waxing Hand buff with a rubbing compound such as Dupont No 7 or power buff with Mirror Glaze No 1 Then follow up with a good waxing Caution When power buffing use care not to leave swirl marks or burn the surface You may want to leave power buffing to a professi...

Page 48: ... and bottom paint This is done so that the epoxy coat will properly adhere to the hull and when done correctly will not void the hull warranty Pro Line Boats does not recommend using an etching primer in lieu of sanding the bottom Bottom painting is an annual operation but may require more frequent applications if the bottom becomes scratched damaged etc We recommend strict adherence to the manufa...

Page 49: ...oes not dry as completely or quickly as the rest of the frame The top of the frame is often overlooked when cleaning the boat and should be hand washed and dried often This area is likely to be the first place that staining or pitting occurs Aluminum is corrosion resistant but not corrosion proof The grain structure when modified by welding processes has increased susceptibility to micro corrosion...

Page 50: ... steel or other metals which cause contamination leading to rust or corrosion Always protect with a wax especially around welds to guard against micro corrosion cracking and rust spots Additional information from Romac and G G Schmitt and Sons is included in your owner s package Corrosion Protection Spray all electrical connections with a good quality corrosion guard annually and whenever an elect...

Page 51: ... to the windshield frame the windshield manufacturer recommends bedding all metal fasteners in contact with the aluminum frame with Tef Gel to prevent the possibility of rust galvanic corrosion seizing of moving parts blistering of painted surfaces etc between these two dissimilar metals See the Tef Gel website http www wolfwire com tefgel frameset htm for more details Bimini Top Canvas One of the...

Page 52: ... procedures used for cleaning are dependent upon the end use circumstances For normal cleaning most stains can be cleaned using warm soapy water and a clear water rinse Moderate scrubbing with a medium bristle brush will help to loosen soiling material from the depressions of embossed surfaces For stubborn stains use either Fantastic or Mr Clean which are commercially available mild detergents in ...

Page 53: ...oat terminals with a deoxidizing agent Check all thru hull fittings and hoses for obstructions water tightness and condition Test all lights for proper operation Check wiring terminal blocks and plugs for loose connections and corrosion Verify switch and equipment operation Check line condition Inspect anchor and rope Clean out any debris from bilge and cockpit Flush water systems Install hull dra...

Page 54: ...trical equipment electrical connections wiring harnesses outboards engines Plastics Plastic vinyl seats Plexiglas Be sure to read the manufacturer s information carefully before using Woody Wax products on any component on your boat For more information regarding this product visit their website at www woody wax com Tef Gel Bed all SS fasteners that come in contact with aluminum with Tef Gel to pr...

Page 55: ...t hoses for burned cracked or deteriorated sections All rubber hoses should be pliable and free of kinks Clean the bilge and all bilge components with a mixture of bleach and water Then follow up by misting the bilge and components with WD 40 This includes but is not limited to the hoses seacocks pumps connections clamps air conditioner pumps generator if equipped etc Once A Year Have a qualified ...

Page 56: ... Vertical Clearance Hull Deck Interior Warranty Registration Date Fuel Capacity Gallons Ignition Key Cabin Head Door Key Other Key Radio Call Letters Bat Engine Make Model HP Port Engine S N Port Drive S N Stbd Engine S N Stbd Drive S N Prop Diam Pitch P N Trailer Make Model Trailer S N GVWR Insurance Company Agent Policy Phone ...

Page 57: ...rive unit Entangled in lines or weeds Anchor is down Prop cavitates Trim out too far Motor is too high Weeds on prop Bow heavy damage to hull Prop is damaged Excessive vibration Propeller engine or drive unit damaged Hull damaged Boat will not turn Steering unit needs fluid or has trapped air Tiller is disconnected helm turns Steering trunion or mechanism jammed helm won t turn Electrical problems...

Page 58: ......

Page 59: ......

Page 60: ......

Page 61: ......

Reviews: