background image

4  

En cas de questions techniques, appelez le 1-800-665-8685

V 3,05  

8424400

Roue d’arpenteur 

professionnelle numérique SAE/métrique de 12 po

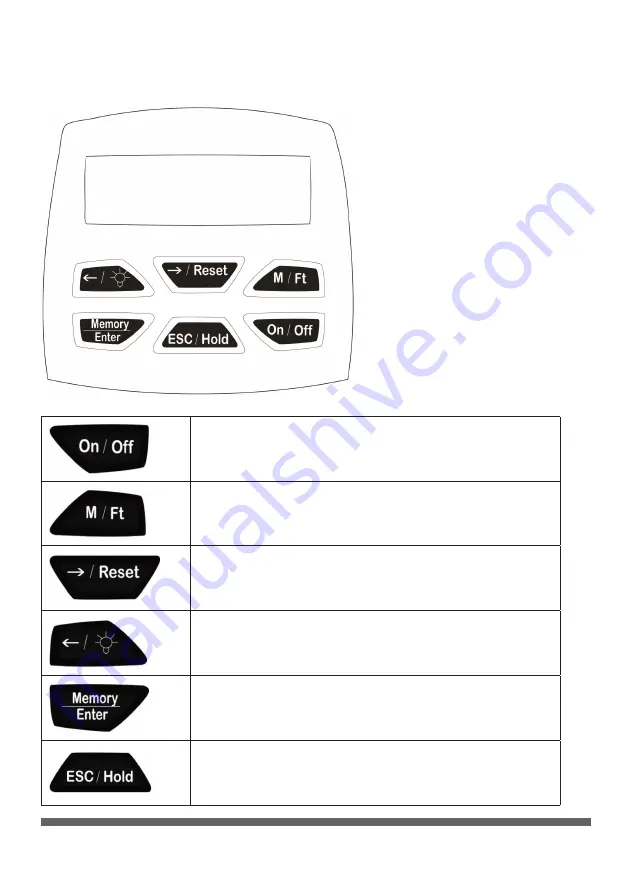
IDENTIFICATION DES BOUTONS

Bouton de mise en marche/arrêt

Bouton de changement d’unité

Remise à zéro et sélection de mémoire  

à droite

Rétroéclairage et sélection de mémoire 

à gauche

Mode de mémoire et écriture/lecture dans  

la mémoire

Lecture de maintien et déclenchement

Summary of Contents for 8424400

Page 1: ...Please read this manual before use User Manual V 3 05 8424400 12 in Professional SAE Metric Digital SURVEYOR S WHEEL ...

Page 2: ...stances where use of a tape is not ideal Essential measurement tool for surveyors landscaping contractors estimators community clubs etc Features Foldable design for easy storage High traction tire mounted on high impact ABS wheel Easy grip pistol type handle with reset hold button 5 memory slots and backlight Kick stand Protective zippered storage case INTRODUCTION Essential measurement tool for ...

Page 3: ...otection approved by the Canadian Standards Association CSA or American National Standards Institute ANSI when using the tool 2 Do not clean tool with organic solvents 3 Store in a clean dry area If measuring wheel will not be used for a long time remove the batteries to prevent leakage PARTS IDENTIFICATION A LCD Display B Control button C Handle D Aluminum Bar E Folding Wrist F Wheel Housing G Wh...

Page 4: ...r technical questions call 1 800 665 8685 V 3 05 8424400 BUTTON IDENTIFICATION Power On and Off Button Unit Change Button Reset and Memory Selection Right Backlight and Memory Selection Left Memory Mode and Writes Read Out Into Memory Hold and Release Read Out ...

Page 5: ...hes 3 Low Power Symbol 4 Hold Symbol 5 Memory Symbol OPERATION POWER ON OFF Turn the tool On by pressing the On Off button and holding the button for two seconds Press the button again to turn the tool Off UNIT CHANGE Press the M Ft button to switch the unit of measurement from Metric to SAE SET TO ZERO Press and hold the Reset and Memory Selection Right button for two seconds to set the number to...

Page 6: ...button for two seconds to turn on the backlight The backlight will turn on for fifteen seconds then turn off automatically MEMORY There are five memory spaces to store measurement numbers These memories will keep the reading even when the battery has been removed Step Button Display 1 Press the Esc Hold button to hold the number 2 Press the Memory Enter button to enter into the Memory mode 3 Selec...

Page 7: ...ory slot Previous memory will be over written 5 Press the Esc Hold button to leave the memory mode POWER SAVING MODE The tool will turn off automatically if there is no usage in a five minute period LOW POWER The low power symbol will light up when the tool is almost out of battery power MAINTENANCE Periodically wipe the tool with a damp cloth and mild detergent Do not use abrasives or solvents ...

Page 8: ...400 BATTERY REPLACEMENT 1 Open the battery compartment by using a screwdriver to remove the screw holding the cover in place 2 Replace the 9 volt battery with a new 9 volt battery DISPOSING OF THE TOOL If your tool has become damaged beyond repair do not throw it out Bring it to the appropriate recycling facility ...

Page 9: ...traight line towards the opposite wall 3 Stop the wheel against the wall 4 Record the reading on the counter 5 Add the reading to the diameter of the wheel WALL TO POINT MEASUREMENT 1 Place measuring the wheel on the ground with the back of the wheel against the wall 2 Drive the wheel in a straight line towards the endpoint 3 Stop the wheel with the lowest point over the mark 4 Record the reading ...

Page 10: ...o com for more information POINT TO POINT MEASUREMENT 1 Place the measuring wheel on the starting point with lowest point of the wheel on the mark 2 Proceed to the next mark at the end of the measurement 3 Record the reading on the counter This is the final measurement between the two points ...

Page 11: ...Veuillez lire ce manuel avant d utiliser cet outil V 3 05 8424400 Manuel d utilisateur PROFESSIONNELLE NUMÉRIQUE SAE MÉTRIQUE DE 12 PO ROUE D ARPENTEUR ...

Page 12: ...e essentiel pour les arpenteurs l aménagement paysager les entrepreneurs les estimateurs les clubs communautaires etc Caractéristiques Conception escamotable pour rangement facile Pneu à forte traction monté sur roue ABS à forte résistance aux chocs Poignée de type pistolet à prise facile avec remise à zéro bouton de maintien 5 fentes de mémoire et éclairage Béquille Boîtier de rangement protecteu...

Page 13: ...adienne de normalisation CSA ou l American National Standards Institute ANSI quand vous utilisez l outil 2 Ne nettoyez pas cet outil avec des solvants organiques 3 Entreposez le dans un endroit sec et propre Si vous ne prévoyez pas utiliser cette roue à mesurer numérique pour une période prolongée retirez ses piles pour prévenir qu elles coulent IDENTIFICATION DES PIÈCES A Affichage ACL B Bouton d...

Page 14: ...le numérique SAE métrique de 12 po IDENTIFICATION DES BOUTONS Bouton de mise en marche arrêt Bouton de changement d unité Remise à zéro et sélection de mémoire à droite Rétroéclairage et sélection de mémoire à gauche Mode de mémoire et écriture lecture dans la mémoire Lecture de maintien et déclenchement ...

Page 15: ...ètres pouces 3 Symbole de basse tension 4 Symbole de maintien 5 Symbole de mémoire UTILISATION ALIMENTATION EN MARCHE ARRÊT Ouvrez l outil en appuyant sur le bouton On Off marche arrêt et en maintenant celui ci enfoncé pendant deux secondes Appuyez sur le bouton de nouveau pour arrêter l outil CHANGEMENT D UNITÉ Appuyez sur le bouton M Ft m pi pour que l unité de mesure passe du système métrique a...

Page 16: ...t ou pour libérer la lecture maintenue RÉTROÉCLAIRAGE Appuyez sur le bouton de rétroéclairage et sélection de mémoire à gauche pendant deux secondes pour allumer le rétroéclairage Le rétroéclairage s allumera automatiquement pendant environ 15 secondes pour ensuite s éteindre MÉMOIRE Il existe cinq espaces de mémoire pour enregistrer les mesures Ces mémoires conserveront les lectures même après av...

Page 17: ... en appuyant sur le bouton de gauche ou de droite L espace de mémoire clignote lorsqu on le choisit 5 Appuyez sur le bouton Esc Hold échapper retenir pour quitter le mode de mémoire MODE ÉCOÉNERGÉTIQUE L outil s arrêtera automatiquement s il est inutilisé pour une période de cinq minutes BASSE TENSION Le symbole de basse tension s allumera si le courant de la batterie de l outil est presque épuisé...

Page 18: ...n chiffon humide et d un savon doux N utilisez pas d abrasifs ou de solvants REMPLACEMENT DES PILES 1 Ouvrez le compartiment des piles au moyen d un tournevis pour enlever la vis qui retient le couvercle en place 2 Remplacez la pile de 9 V par une neuve MISE AU REBUT DE L OUTIL Si votre outil est trop endommagé pour être réparé ne le jetez pas Apportez le à un centre de recyclage approprié ...

Page 19: ... mur opposé 3 Arrêtez la roue contre le mur 4 Notez la lecture qui apparaît sur le compteur 5 Ajoutez la lecture au diamètre de la roue DISTANCE ENTRE UN MUR ET UN POINT 1 Placez la roue d arpenteur au sol en l adossant contre le mur 2 Faites rouler la roue en ligne droite jusqu au point en question 3 Arrêtez la roue de façon à ce que le point le plus bas de la roue se trouve sur le repère au sol ...

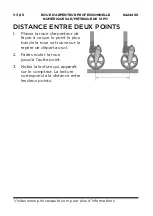
Page 20: ...lus d informations DISTANCE ENTRE DEUX POINTS 1 Placez la roue d arpenteur de façon à ce que le point le plus bas de la roue se trouve sur le repère de départ au sol 2 Faites rouler la roue jusqu à l autre point 3 Notez la lecture qui apparaît sur le compteur La lecture correspond à la distance entre les deux points ...

Reviews: