background image

and may be lethal if left untreated. Evacuate all people to an area with

clean air and seek immediate medical attention for any person

experiencing the following symptoms:

Unconsciousness

Headache

Confusion

Shortness of

breath

Weakness

Chest Pain

Dizziness

Blurred Vision

Nausea and

vomiting

Unconsciousness

UNPACKING

WARNING! Do not operate the tool if any part is missing.

Replace the missing part before operating. Failure to do so

could result in a malfunction and personal injury.

Remove the parts and accessories from the packaging and inspect for

damage.

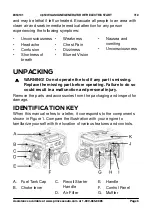
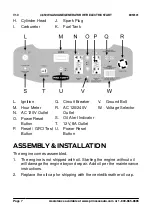
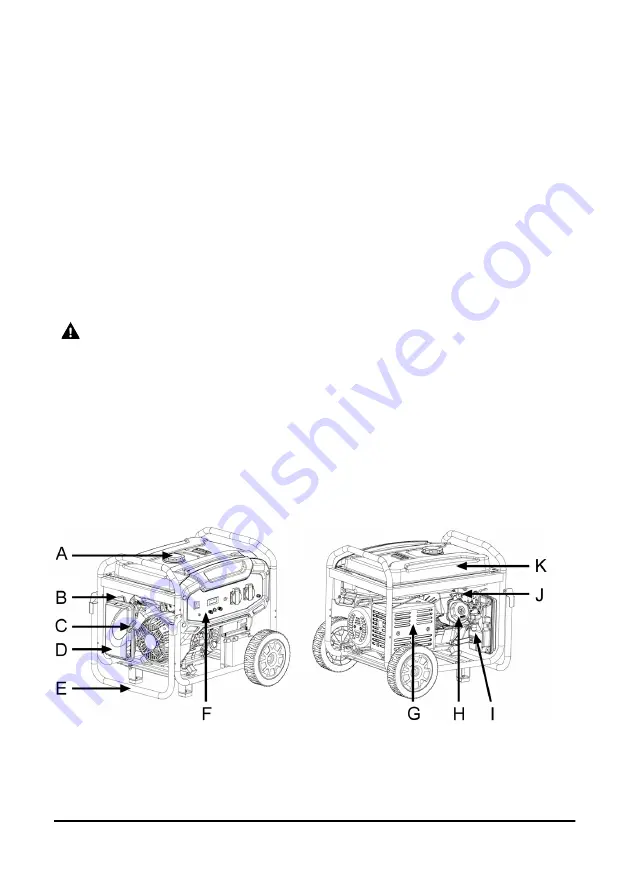
IDENTIFICATION KEY

When this manual refers to a letter, it corresponds to the components

shown in Figure 1. Compare the illustration with your engine to

familiarize yourself with the location of various features and controls.

A. Fuel Tank Cap
B. Choke lever

C. Recoil Starter

Handle

D. Air Filter

E. Handle
F. Control Panel
G. Muffler

8953101

4,650W GASOLINE GENERATOR WITH ELECTRIC START

V1.0

Assistance available at www.princessauto.com or 1-800-665-8685

Page 6

Summary of Contents for 8953101

Page 1: ...V1 0 8953101 Please read and understand all instructions before use Retain this manual for future reference 4 650W GASOLINE GENERATOR ...

Page 2: ...This page is intentionally left blank ...

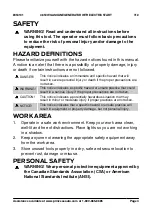
Page 3: ...or the gasoline engine is included Please read the Engine manual before using this product The Engine manual is considered accurate when information about the engine disagrees with this manual SAFETY WARNING Read and understand all instructions before using this tool The operator must follow basic precautions to reduce the risk of personal injury and or damage to the equipment HAZARD DEFINITIONS P...

Page 4: ...dry safe and secure location to prevent rust damage or misuse PERSONAL SAFETY WARNING Wear personal protective equipment approved by the Canadian Standards Association CSA or American National Standards Institute ANSI SPECIFIC SAFETY WARNING DO NOT let comfort or familiarity with product gained from repeated use replace strict adherence to the tool safety rules If you use this tool unsafely or inc...

Page 5: ... Do not alter any parts of the tool or accessories All parts and accessories are designed with built in safety features that may be compromised if altered 3 Protect yourself against electric shocks when working on electrical equipment Avoid body contact with grounded surfaces There is an increased chance of electrical shock if your body is grounded 4 Do not expose the tool to rain snow frost or an...

Page 6: ...nition M Hour Meter N AC 120V Outlet O Power Reset Button P Reset GFCI Test Button Q Circuit Breaker R AC 120 240V Outlet S Oil Alert Indicator T 12V 8A Outlet U Power Reset Button V Ground Bolt 8953101 4 650W GASOLINE GENERATOR WITH ELECTRIC START V1 0 Assistance available at www princessauto com or 1 800 665 8685 Page 6 IDENTIFICATION KEY W Voltage Selector ...

Page 7: ...nd washer if a washer is supplied 2 Push the axle bolt through the hole on the frame 3 Push the R pin through the hole in the axle bolt to secure it 4 Repeat with other wheel OPERATIONS PRE OPERATION CHECKS WARNING Do not start or run the generator in an enclosed area even if doors or windows are open Engine exhaust contains carbon monoxide an odourless and colourless poison gas Check the engine s...

Page 8: ...d terminal connector Attach a length of 10 AWG minimum wire to a ground rod driven into the earth Attached the other end to the ground terminal connector Consult municipal electrical codes or a qualified electrician to confirm grounding requirements GFCI OUTLET The GFCI outlet will quickly stop the flow of electricity in event of a ground fault Test the GFCI outlet s safety features before first u...

Page 9: ...maximum output of the generator 10 The DC terminal may be used for charging 12 volt automatic type batteries only Disconnect the negative pole battery cable from the battery when setting up to charge the battery Do not reverse the charging cables Serious damage to the generator and or battery may occur 11 Ensure a skilled electrician connects the generator when incorporating the generator into a h...

Page 10: ...fic outlet 2 Stop the engine if the circuit breaker trips again 3 Unplug all devices 4 Inspect the air inlet and control panel for any blockage Remove blockage if found 5 Calculate the power draw of all devices including the peak wattage to make sure you are not exceeding the generator s power capacity 6 Restart the engine and follow the steps for running the generator ENGINE ECO CONTROL 1 Push th...

Page 11: ...r and or others TESTING AND RESETTING THE GFCI OUTLET Test the GFCI outlet with a GFCI tester Read the GFCI tester instructions on how to interpret the light code If you don t have a GFCI tester plug a device like a lamp or radio into a working outlet Turn the device on to confirm it works Switch it off and unplug it Use this to test the outlet 1 Start the generator 2 Plug the GFCI tester into the...

Page 12: ...mproper cleaning methods may damage the engine 1 Unplug all equipment connected to the generator 2 Disconnect the battery and set aside to avoid water 3 Remove debris from all cooling fins air intakes and exhaust ports 4 Clean the generator using a well rung out hand cloth taking care when cleaning the control panel to avoid damaging any seals 5 Allow the generator to air dry before reconnecting b...

Page 13: ...fied technician service the tool PROBLEM POSSIBLE CAUSE S SOLUTION S No power generated 1 Main switch is not closed 2 Poor contact with electrical socket 3 Rated speed of generator cannot be reached 1 Turn main switch to ON position 2 Adjust the feet of the socket 3 Adjust according to requirement in manual V1 0 4 650W GASOLINE GENERATOR WITH ELECTRIC START 8953101 Page 13 Assistance available at ...

Page 14: ...crowave Oven 1 000 watt 1 000W Coffee Maker 1 500W Electric Stove Single Element 1 500W Hot Plate 2 500W Family Room Blu ray Player 10 to 35W Stereo 450W Television LCD 42 in 120W Television Plasma 42 in 220W Laptop Computer Up to 60W Other Security System 180W AM FM Clock Radio Garage Door Opener 1 2 HP 300W 520W Electric Water Heater 40 Gallon 4 000W DIY Job Site Quartz Halogen Work Light 1 000W...

Page 15: ...arting Miter Saw 10 in 1 800W Table Planer 6 in 1 800W Table Saw Radial Arm Saw 10 in 2 000W Air Compressor 1 1 2 HP 2 500W V1 0 4 650W GASOLINE GENERATOR WITH ELECTRIC START 8953101 Page 15 Assistance available at www princessauto com or 1 800 665 8685 ...

Page 16: ...enter if necessary Engine shudders during operation Choke lever position is incorrect Open the choke lever until shuddering stops Engine emits smoke 1 White smoke a Engine overloaded b Fuel Contaminated 2 Black smoke a Engine overloaded b Dirty air filter 3 Blue smoke a Excess engine oil b Incorrect engine oil 1 White smoke a Reduce the load on the engine b Replace fuel with clean fuel 2 Black smo...

Page 17: ...V1 0 8953101 Please read and understand all instructions before use Retain this manual for future reference 4 650W GASOLINE GENERATOR ENGINE ...

Page 18: ...This page is intentionally left blank ...

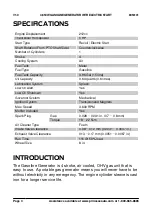
Page 19: ...Max Speed 3 600 RPM Muffler Included Yes Spark Plug Gap 0 028 0 031 in 0 7 0 8 mm Torque 18 22 N m Air Cleaner Type Foam Intake Valve Clearance 0 08 0 12 mm 0 0031 0 0047 in Exhaust Valve Clearance 0 13 0 17 mm 0 0051 0 0067 in Run Time 11h 50 load Wheel Size 8 in INTRODUCTION The Gasoline Generator is 4 stroke air cooled OHV gas unit that is easy to use A portable gas generator means you will nev...

Page 20: ...n CAUTION This notice indicates a potentially hazardous situation that may result in minor or moderate injury if proper practices are not taken NOTICE This notice indicates that a specific hazard or unsafe practice will result in equipment or property damage but not personal injury WORK AREA 1 Operate in a safe work environment Keep your work area clean well lit and free of distractions Place ligh...

Page 21: ...uch as leaves grass brush etc can catch fire if they come in contact with a hot engine c Do not place anything on the engine while it is running d Allow the muffler engine cylinder and fins to cool before touching 5 Install a spark arrestor not included before using equipment on forest covered grass covered or brush covered unimproved land 6 The manufacturer of the equipment on which this engine i...

Page 22: ...operating Failure to do so could result in a malfunction and personal injury Remove the parts and accessories from the packaging and inspect for damage IDENTIFICATION KEY When this manual refers to a letter it corresponds to the components shown in Figure 1 Compare the illustration with your engine to familiarize yourself with the location of various features and controls A Fuel Tank Cap B Choke l...

Page 23: ... Button V Ground Bolt W Voltage Selector ASSEMBLY INSTALLATION The engine comes assembled 1 The engine is not shipped with oil Starting the engine without oil will damage the engine beyond repair Add oil per the maintenance instructions 2 Replace the oil cap for shipping with the vented breather oil cap V1 0 4 650W GASOLINE GENERATOR WITH ELECTRIC START 8953101 Page 7 Assistance available at www p...

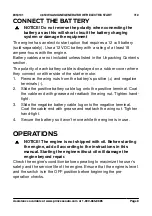
Page 24: ... positive terminal Coat the cable end with grease and reattach the wing nut Tighten hand tight 3 Slide the negative battery cable lug onto the negative terminal Coat the cable end with grease and reattach the wing nut Tighten hand tight 4 Secure the battery so it won t move while the engine is in use OPERATIONS NOTICE The engine is not shipped with oil Before starting the engine add oil according ...

Page 25: ...rt the engine until any spilled fuel has evaporated 9 Remove any excessive dirt or debris especially around the muffler and recoil starter 10 Look for signs of damage 11 Check the equipment powered by this engine 12 Review the instructions provided with the equipment powered by this engine for precautions and procedures that should be followed before starting the engine LOW OIL SHUTDOWN The oil al...

Page 26: ... ignition switch to the ON position 6 Pull the starter handle lightly until you feel resistance then pull the starter handle briskly The engine should turn over and start running Do not allow the starter handle to snap back against the engine Instead return the starter grip gently by hand 7 If the engine floods set the choke to the OPEN RUN position place the throttle in FAST and attempt to start ...

Page 27: ...ith this tool Follow instructions for changing accessories 4 Keep the tool handles or gripping surfaces clean and dry 5 Maintain the tool s labels and name plates These carry important information If unreadable or missing contact Princess Auto Ltd for replacements WARNING Only qualified service personnel should repair the tool An improperly repaired tool may present a hazard to the user and or oth...

Page 28: ...easpoon 5 ml of oil into the spark plug hole Pull starter rope slowly 8 to 10 times to properly coat the cylinder bore and piston for storage Replace spark plug and tighten Any residual oil will burn off in subsequent starts The muffler may emit white smoke Store this engine in the horizontal position with the spark plug up Do not store or transport with the spark plug down Storing or transporting...

Page 29: ... to ensure that treated gasoline has replaced the untreated gasoline in the carburetor 4 Stop the engine STORING THE ENGINE WITH FUEL WARNING Keep the engine away from ignition sources such as sparks the open flame of a pilot light when storing with fuel in the tank An ignition source can ignite gasoline vapours 1 If your engine will be stored with gasoline in the fuel tank and carburetor it is im...

Page 30: ...k with fresh gasoline 3 If the cylinder was coated with oil during storage preparation the engine will smoke briefly at start up This is normal TRANSPORTING THE ENGINE WARNING Transport the engine with an empty fuel tank or with the fuel valve lever secured in the OFF position 1 Keep the engine level when transporting to reduce the possibility of fuel leakage 2 Turn the fuel valve to the OFF posit...

Page 31: ...to the OPEN position 2 Move to ON position 3 Move to ON position 4 Fill with the recommended oil to the proper level 5 Refuel 6 Drain fuel tank and carburetor Refuel with fresh gasoline 7 Gap or replace spark plug 8 Move choke to OPEN RUN position and attempt to start the engine 9 Remove and clean spark plug Check electrode spacing and set the gap to the correct dimension Replace spark plug if dam...

Page 32: ...enter if necessary Engine shudders during operation Choke lever position is incorrect Open the choke lever until shuddering stops Engine emits smoke 1 White smoke a Engine overloaded b Fuel Contaminated 2 Black smoke a Engine overloaded b Dirty air filter 3 Blue smoke a Excess engine oil b Incorrect engine oil 1 White smoke a Reduce the load on the engine b Replace fuel with clean fuel 2 Black smo...

Page 33: ...V1 0 8953101 Vous devez lire et comprendre toutes les instructions avant d utiliser l appareil Conservez ce manuel afin de pouvoir le consulter plus tard GÉNÉRATRICE À ESSENCE 4 650W ...

Page 34: ...Cette page a été laissée blanche intentionnellement ...

Page 35: ...fabriquée en fonte afin d offrir une durée utile plus longue A separate manual for the gasoline engine is included Please read the Engine manual before using this product The Engine manual is considered accurate when information about the engine disagrees with this manual SÉCURITÉ AVERTISSEMENT Veuillez lire et comprendre toutes les instructions avant d utiliser cet outil L opérateur doit respecte...

Page 36: ...dommages au niveau de l équipement ou des biens mais non des blessures corporelles AIRE DE TRAVAIL 1 Travaillez dans un environnement de travail sécuritaire Gardez votre aire de travail propre bien éclairée et exempte de toute distraction Placez les lampes de façon à ne pas travailler dans l ombre 2 Assurez vous que les personnes qui ne portent pas l équipement de sécurité approprié ne se trouvent...

Page 37: ...arche 5 Laissez le silencieux le cylindre du moteur et les ailettes refroidir avant de toucher 6 Débranchez tous les dispositifs outils et appareils électriques de la génératrice avant de démarrer ou d arrêter le moteur Autrement la génératrice ou les dispositifs outils et appareils électriques branchés pourraient subir des dommages SÉCURITÉ EN ÉLECTRICITÉ AVERTISSEMENT Ne touchez pas et ne manipu...

Page 38: ...à d autres conditions humides ou mouillées De l eau qui s infiltre dans un outil augmente le risque de décharge électrique DÉBALLAGE AVERTISSEMENT Ne faites pas fonctionner l outil s il manque des pièces Remplacez les pièces manquantes avant l utilisation Le non respect de cet avertissement peut entraîner une défectuosité et des blessures corporelles Retirez les pièces et les accessoires de l emba...

Page 39: ...lerte d huile T Prise de 8 A 12 V U Bouton de réinitialisation de l alimentation V Boulon de mise à la masse W Sélecteur de tension ASSEMBLAGEETINSTALLATION PRÉPARATION DE LA GÉNÉRATRICE La génératrice demande peu de préparation lorsqu elle est sortie de la boîte Cependant avant de tenter de démarrer la génératrice assurez vous qu elle est prête V1 0 GÉNÉRATRICE À ESSENCE AVEC DÉMARRAGE ÉLECTRIQUE...

Page 40: ...S À L UTILISATION AVERTISSEMENT Ne mettez pas en marche et ne faites pas fonctionner la génératrice dans un lieu fermé même si des portes ou des fenêtres sont ouvertes Les gaz d échappement du moteur contiennent du monoxyde de carbone un gaz toxique qui est inodore et incolore Vérifiez l état du moteur avant l utilisation afin de maximiser la sécurité de l utilisateur et la durée utile du moteur A...

Page 41: ...Consultez les codes électriques municipaux ou un électricien qualifié afin de confirmer les exigences en matière de mise à la masse PRISE DU DISJONCTEUR La prise du disjoncteur de fuite à la terre interrompra rapidement le flux d électricité advenant un défaut à la terre Essayez les caractéristiques de sécurité de la prise de disjoncteur différentiel de fuite à la terre avant de les utiliser pour ...

Page 42: ...d examine the generator for the cause of the malfunction 9 Lors de l utilisation de la puissance électrique c a et c c en même temps ne dépassez pas la capacité maximale de puissance de la génératrice 10 La borne c c de cette génératrice peut seulement être utilisée pour charger les batteries de type automatique de 12 V Débranchez le câble relié à la borne négative de la batterie au moment de proc...

Page 43: ...ATION DE LA GÉNÉRATRICE Les disjoncteurs se ferment automatiquement lorsque la puissance des appareils électroniques branchés excède la sortie nominale de la génératrice Cela peut être causé par une surcharge des circuits de la génératrice ou par une réduction de l efficacité du moteur 1 Rétablissez le courant CC en appuyant sur le bouton de réinitialisation CC Rétablissez le courant CA en appuyan...

Page 44: ...onctionnement 2 Inspectez les composants de l outil régulièrement Réparez ou remplacez les composants endommagés ou usés Utilisez seulement des pièces de rechange identiques lors de l entretien 3 Utilisez seulement des accessoires à utiliser avec cet outil Suivez les instructions pour remplacer les accessoires 4 Gardez les poignées des outils ou les surfaces de prise propres et sèches 5 Veillez à ...

Page 45: ... différentiel de fuite à la terre et lisez les codes Si vous utilisez un appareil branchez le dans la prise du disjoncteur différentiel de fuite à la terre à la terre et mettez le en marche 3 L appareil de vérification doit indiquer que la prise fonctionne correctement ou l appareil est en marche 4 Appuyez sur le bouton Test essai et déclenchez la prise du disjoncteur différentiel de fuite à la te...

Page 46: ...la génératrice Des méthodes de nettoyage inappropriées peuvent causer des dommages au moteur 1 Débranchez tout l équipement connecté à la génératrice 2 Déconnectez la batterie et mettez la de côté pour éviter tout contact avec de l eau 3 Retirez les débris de tous les ailettes de refroidissement les admissions d air et les orifices d échappement 4 Nettoyez la génératrice avec un linge bien essoré ...

Page 47: ...ou si des pièces sont manquantes visitez un magasin Princess Auto Ltd afin de trouver une solution Si cela n est pas possible demandez à un technicien qualifié de réparer l outil PROBLÈME CAUSE S POSSIBLE S SOLUTION S Aucun courant n est produit 1 L interrupteur principal n est pas fermé 2 Mauvais contact avec la prise électrique 3 La vitesse nominale de la génératrice ne peut être atteinte 1 Tour...

Page 48: ...tiseur de fenêtre 10 000 BTU 1 200 W 1 800 W Ventilateur de fenêtre 300 W 600 W Ventilateur de fournaise 1 2 CV 800 W 1 300 W Cuisine Four à micro ondes 1 000 W 1 000 W Cafetière 1 500 W Cuisinière électrique un seul élément 1 500 W Plaque chauffante 2 500 W Salle familiale Lecteur Blu ray 10 à 35 W Stéréo 450 W Téléviseur ACL de 42 po 120 W Téléviseur plasma de 42 po 220 W Ordinateur portable Jus...

Page 49: ... 3 CV 600 W 1 200 W Scie alternative 960 W Perceuse électrique 1 2 CV 1 000 W Scie circulaire 7 1 4 po 1 500 W Scie à onglets 10 po 1 800 W Rabot sur table 6 po 1 800 W Scie circulaire à table scie radiale 10 po 2 000 W Compresseur d air 1 1 2 CV 2 500 W V1 0 GÉNÉRATRICE À ESSENCE AVEC DÉMARRAGE ÉLECTRIQUE 4 650 W 8953101 Page 17 Assistance available at www princessauto com or 1 800 665 8685 ...

Page 50: ...V1 0 8953101 Vous devez lire et comprendre toutes les instructions avant d utiliser l appareil Conservez ce manuel afin de pouvoir le consulter plus tard MOTEUR GÉNÉRATEUR À ESSENCE 4 650W ...

Page 51: ...Cette page a été laissée blanche intentionnellement ...

Page 52: ...au d huile Oui Système régulateur Mécanique Système d allumage Magnéto transistorisé Régime max 3 600 tr min Silencieux compris Oui Bougie Écartement 0 7 à 0 8 mm 0 028 à 0 031 po Couple 18 à 22 N m Type de filtre à air Mousse Jeu de la soupape d admission 0 08 à 0 12 mm 0 0031 à 0 0047 po Jeu de la soupape d échappement 0 13 à 0 17 mm 0 0051 à 0 0067 po Durée de fonctionnement 11 heures à 50 de c...

Page 53: ...les graves ou même la mort si on omet de prendre les précautions nécessaires AVERTISSEMENT Cet avis indique un risque particulier ou une pratique non sécuritaire qui pourrait entraîner des blessures graves si on omet de prendre les précautions nécessaires ATTENTION Cet avis indique une situation possiblement dangereuse qui peut entraîner des blessures mineures ou modérées si on ne procède pas de l...

Page 54: ...he à effectuer Ce moteur a été conçu pour une utilisation spécifique Ne l utilisez pas à une fin autre que celle pour laquelle il a été conçu 2 Tous les utilisateurs doivent comprendre le fonctionnement de toutes les commandes et apprendre la façon d arrêter rapidement le moteur en cas d urgence 3 Ne modifiez pas le ressort de régulateur les tringles ou les autres pièces du moteur afin d augmenter...

Page 55: ...ce clos puisque les gaz d échappement contiennent du monoxyde de carbone L inhalation du monoxyde de carbone peut rendre malade ou entraîner la mort La zone doit être bien aérée L ouverture des fenêtres et des portes ne suffit pas pour aérer un endroit Le monoxyde de carbone est un gaz incolore et inodore qui est difficile à détecter L empoisonnement au monoxyde de carbone résulte de l inhalation ...

Page 56: ...it référence à une lettre la lettre désigne les composants montrés sur la figure 1 Comparez l illustration avec votre moteur pour prendre connaissance de l emplacement des diverses caractéristiques et des fonctions A Capuchon du réservoir de carburant B Levier d étrangleur C Poignée de lanceur à rappel D Filtre à air E Poignée F Panneau de commandes G Silencieux H Culasse I Carburateur J Bougie K ...

Page 57: ...NSTALLATION Le moteur est déjà assemblé 1 Le moteur ne contient pas d huile au moment de son expédition Le démarrage du moteur sans huile aura pour effet d endommager le moteur qui sera ainsi impossible à réparer Ajoutez de l huile conformément aux instructions d entretien 2 Remplacez le bouchon d huile prévu pour l expédition par le bouchon d huile comportant une mise à l air libre un reniflard 8...

Page 58: ...mité du câble de graisse et réinstallez l écrou à oreilles Serrez à la main 3 Glissez la cosse du câble négatif de la batterie sur la borne négative Enduisez l extrémité du câble de graisse et réinstallez l écrou à oreilles Serrez à la main 4 Fixez la batterie pour éviter qu elle ne bouge pendant l utilisation du moteur UTILISATIONS AVIS Le moteur ne contient pas d huile au moment de son expéditio...

Page 59: ...oteur Si le moteur tourne avec un niveau d huile insuffisant celui ci risquerait d être endommagé 8 Regardez autour et sous le moteur afin de détecter les signes de fuites d huile ou d essence Ne démarrez pas le moteur avant que tout déversement de carburant se soit évaporé 9 Éliminez la saleté et les débris excessifs en particulier autour du silencieux et du lanceur à rappel 10 Vérifiez s il y a ...

Page 60: ...angleur n est pas nécessaire lors du redémarrage d un moteur chaud 3 Déplacez le levier d accélérateur de la position MIN à environ 1 3 de la distance vers la position MAX 4 Poussez sur le bouton de démarrage ou tournez la clé pour démarrer le moteur a Si le moteur ne démarre pas dans les 5 secondes relâchez le bouton et attendez au moins 10 secondes avant de faire redémarrer le moteur b Tentez de...

Page 61: ...nterrupteur de moteur à la position OFF arrêt pour arrêter le moteur Arrêtez le moteur en suivant cette procédure 1 Déplacez le levier d accélérateur à la position MIN 2 Mettez l interrupteur de moteur en position OFF arrêt 3 Mettez le robinet de carburant en position OFF arrêt SOINETENTRETIEN 1 Entretenez l outil avec soin Un outil en bon état sera efficace plus facile à contrôler et préviendra l...

Page 62: ...bricant before using the engine again Proper storage preparation is essential for keeping your engine in good condition The steps below will help keep rust and corrosion from impairing your engine s function and appearance The engine will easier to start when used again Take the following precautions if storing your engine for more than 30 days Store in a clean dry area Change the oil while the en...

Page 63: ...ms will vary with factors such as gasoline blend storage temperatures and the amount of fuel in the tank The air in a partially filled fuel tank will promote fuel deterioration as will very warm storage temperatures Fuel problems may occur in a few months or sooner if the gasoline was not fresh when the tank was filled Adding a gasoline stabilizer that is formulated for this purpose can extend fue...

Page 64: ...cause fuel or oil leakage 4 Cover the engine once the engine and exhaust system is cool Some materials can ignite or melt if the engine and or exhaust system is hot Do not use sheet plastic as a dust cover Use a cover made from a breathable fabric to prevent rust and corrosion 5 Store with gasoline that does not contain ethanol or a similar alcohol based fuel additive Fuel with alcohol based addit...

Page 65: ...aître la liste des sites de mise au rebut ou les règlements en ce qui concerne les appareils électroniques les batteries l huile ou les autres liquides toxiques Veillez à ne PAS polluer en évitant l élimination d huile usée dans l environnement DIAGNOSTICDEPANNE Si l outil ne fonctionne pas correctement ou si des pièces sont manquantes visitez un magasin Princess Auto Ltd afin de trouver une solut...

Page 66: ...le à la position de marche ON 3 Mettez le à la position de marche ON 4 Remplissez d huile recommandée jusqu au niveau prescrit 5 Remplissez 6 Vidangez le réservoir de carburant et le carburateur Remplissez avec de l essence neuve 7 Modifiez l écartement ou remplacez la bougie 8 Placez l étrangleur à la position d ouverture OPEN ou de marche RUN et tentez de démarrer le moteur 9 Retirez et nettoyez...

Page 67: ...ez les composants défaillants au besoin Communiquez avec Princess Auto Ltd ou apportez le moteur dans un centre de réparation approprié au besoin Le moteur vibre en cours de fonctionnement La position du levier d étrangleur est incorrecte Ouvrez le levier d étrangleur jusqu à ce que la vibration cesse Le moteur produit de la fumée 1 Fumée blanche a Surcharge du moteur b Carburant contaminé 2 Fumée...

Page 68: ...Cette page a été laissée blanche intentionnellement ...

Reviews: