background image

17

E

N

G

L

IS

H

!

!

BEFORE OPERATING:

=

  Check to that nuts and bolts are all snug.

=

  Check to the quantity and quality of oil (see compressor lubrication, above).

INITIAL BREAK-IN

1.  Open drain valve to permit air to escape, so no air pressure builds up in the 

air tank.

2.  Plug power supply cord into correct power source.

3.  Run the compressor in this no-load condition for 20 to 30 minutes to 

lubricate the bearings and pistons.

4.  Close the air tank drain valve. 

5.  Your compressor is now ready for use.

6.  After 2 weeks, tighten all nuts and bolts, including head bolts.

MAINTENANCE


„

WARNING!

 Before any maintenance or adjustments to your air compressor, 

always take the following safety precautions: 

1. Disconnect electrical power. 

2. Open the drain valve to drain air tank of pressure.

DAILY MAINTENANCE

Before each use:

1.  Check the oil level

2.  Be sure all nuts and bolts are tight 

3.  Check for any unusual noise or vibration 

After use: 

Open the air tank drain valve to drain condensation from tank

MONTHLY MAINTENANCE:

1. 

Inspect air system for leaks by applying soapy water to all joints. Tighten 

those joints if leakage is observed.

2.  Check that all nuts and bolts stay tight.

AFTER 250 HOURS OR SIX (6) MONTHS (wHICHEVER COMES 
FIRST)

1.  Change compressor oil (see compressor lubrication, above)

2.  Paint spraying operations or dusty environments may require you replace 

oil more often

CAUTION:

  All air line components (including hoses, pipe, connectors, filters, 

& regulators, etc.) must be rated for a minimum working pressure of 150 PSI or 

150% of the maximum system pressure, whichever is greater. 


„

Disconnect any tools from the air supply before performing maintenance, 

clearing a jammed fastener, leaving the work area, moving the tool to another 

location, or handing it to another person.


„

When cleaning air filter, or any parts in direct contact with the air production, 

do not use any flammable or toxic cleaner or solvent


„

During the break-in period, nuts and bolts have a tendency to loosen up. After 

two weeks, tighten all nuts and bolts including head bolts.

INSTALLATION AND LOCATION

Summary of Contents for PAK152c

Page 1: ...ssistance If a part is damaged or missing replacement parts can be shipped from our facility For immediate help with assembly or for additional product information call our toll free number 1 866 599...

Page 2: ...es blessures 4 LES OUTILS RELI S LA TERRE doivent tre branch s une prise elle m me correctement install e et mise la terre La mise la terre permet au courant lectrique d emprunter le chemin offrant le...

Page 3: ...CIDENTELS Assurez vous que l interrupteur est la position d ARR T avant de brancher l outil 15 N UTILISEZ PAS L OUTIL SI SON INTERRUPTEUR NE PERMET PAS DE LE METTRE EN MARCHE OU DE L ARR TER Avant d u...

Page 4: ...S doivent faire respecter toutes les directives de s curit et autres directives comprises dans ce manuel Gardez le manuel la port e de tous ceux qui utiliseront l quipement 1 SOUPAPE DE S RET Cette so...

Page 5: ...si des dommages Assurez vous que l outil utilis r ponde aux exigences du compresseur Pour comprimer l air le piston de la pompe se d place de haut en bas sur le cylindre la descente l air est tir par...

Page 6: ...E D HUILE 1 Retirez le bouchon de vidange d huile indicateur de niveau d huile Videz l huile compl tement 2 Replacez le bouchon de vidange d huile nous recommandons l utilisation d un produit scellant...

Page 7: ...Changez l huile du compresseur consultez la section lubrification du compresseur ci dessus 2 Pour des op rations de vaporisation de peinture ou dans un environnement poussi reux l huile doit tre chan...

Page 8: ...oivent tre ex cut es par le personnel d un centre de service autoris Si vous ouvrez cet outil vous risquez d annuler la garantie garantie Merci d avoir achet cet outil PRO PULSE Ces outils ont t con u...

Page 9: ...e 1 30 Joint d axe 1 31 Palier 1 32 Rotor 1 33 Stator 1 34 Palier 1 NO DESCRIPTION QT 35 Couvercle arri re 1 36 Condensateur 1 37 Condensateur 1 38 crou de vis 2 39 Rondelle 3 40 Rondelle lastique 3...

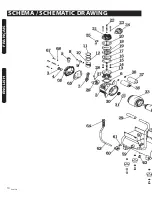
Page 10: ...10 PAK152c FRAN AIS ENGLISH SCH MA SCHEMATIC DRAwING...

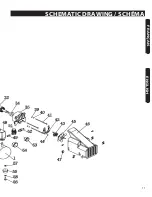
Page 11: ...11 FRAN AIS ENGLISH SCHEMATIC DRAwING SCH MA...

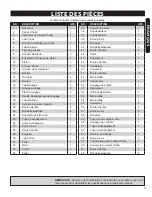
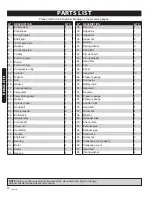
Page 12: ...1 NO DESCRIPTION QTY 35 Rear cap 1 36 Capacitor 1 37 Capacitor 1 38 Screw nut 2 39 Washer 3 40 Spring washer 3 41 Head bolt 3 42 Circuit board 1 43 Circuit breaker 1 44 Head bolt 2 45 Fan 1 46 Cover 1...

Page 13: ...ow resistance path to carry electricity to ground away from the operator should the tool malfunction electrically Do not remove the grounding prong from the plug nor alter the plug in any way If in do...

Page 14: ...r alignment of moving parts binding of moving parts breakage of parts mountings and other conditions that may affect its operation Inspect screws and tighten any that are loose Any part that is damage...

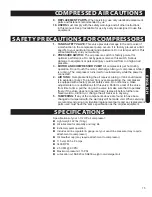
Page 15: ...rizing the air receiver piping or tank could cause it to explode or burst To protect from over pressurizing the compressor is equipped with a factory preset safety valve Do not remove make adjustments...

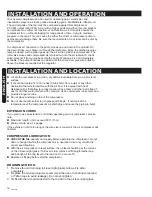
Page 16: ...a wall or any other obstruction that would interfere with the air flow It is equiped with heat dissipation fins that allow for proper cooling Keep them and other parts free of dust or dirt that could...

Page 17: ...r tank drain valve to drain condensation from tank MONTHLY MAINTENANCE 1 Inspect air system for leaks by applying soapy water to all joints Tighten those joints if leakage is observed 2 Check that all...

Page 18: ...specifications WARNING Repairs should be made by an authorized repair centre Opening this tool could invalidate your warranty WARRANTY Thank you for investing in a PRO PULSE power tool These products...

Reviews: