background image

ARC  8 0 0 

PRO 

WEL D 

source (standard set-up is straight polarity - Negative to con-
troller (or gun) and Positive (ground cable) to the work sur-
face).  

6. Turn on the power supply and adjust the current and time 
for the weld base diameter of the fastener to be welded.  

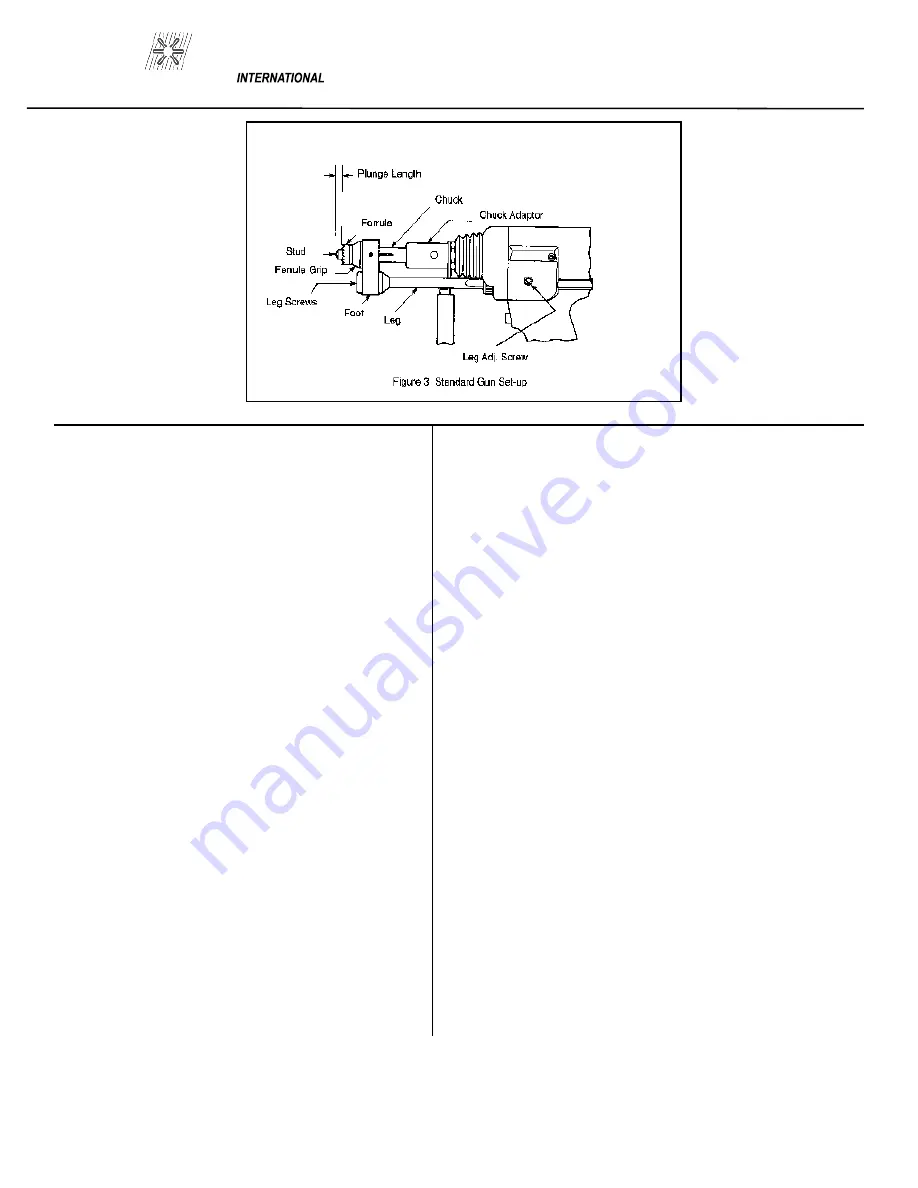
7. Place the gun, loaded with the stud and ferrule, squarely 
against the grounded work surface. The main spring in the 
gun will take up the “plunge length” and the ferrule will seat 
against the base plate.  

DO NOT MOVE THE GUN DURING THE WELD CY-
CLE 
 

8. Pull the trigger holding the gun completely still as above. 
The gun will lift the stud from the base plate and draw an 
arc. The end of the stud and the adjacent material of the base 
plate, will be melted by the weld arc.  
The gun will then plunge the stud into the molten pool, extin-
guishing the arc, to end the controlled portion of the weld 
cycle.  

9. After the controlled weld cycle, allow the molten metal to 
solidify briefly with the work surface to assure completion 
of the cycle (about an extra second holding "still" after the 
weld is usually sufficient).  

10. Remove the gun from the work by lifting straight away 
from the welded stud (this will assure better life to the gun's 
expendable accessories). The ferrule may now be removed 
by breaking it away from the welded stud to allow inspect- 

tion of the weld results. After inspection of sample welds the 
gun can be adjusted, as per the step in this procedure, 
for optimum results.  

8.2 Checking Gun Lift  

To measure lift, turn the stud welding unit on and set the 
timer to maximum time. (On certain units there may be a Lift 
Check switch available, and in these cases this switch can be 
used to check lift.) Trigger the gun in the air, or on a 
non-grounded or insulated surface, to observe the lift cycle. 
Measuring the distance the stud or gun mechanism 
moves equals lift - usually this can be easily done by visual 
observation or simple measurement against a static ref- 
erence point (i.e. the ferrule properly seated in the ferrule 
grip).   

                     Recommended Lift Settings.   

                     Stud Base Dia.         Lift Setting   

                     Less than 1/2”              1/16”  
                     1/2” through 3/4”        3/32”  
                     Greater than 3/4”         7/64”  

When it does become necessary to adjust lift, you do so by 
removing the rear cap from the gun. This will expose the 
rear coil yoke assembly, the set screw and the lift adjusting 
screw (Loosen the set screw to avoid damaging the threads 
of the lift adjusting screw).   

To increase lift: turn the lift adjusting screw out (counter 
clockwise).  

PAGE  4 

Summary of Contents for ARC 800

Page 1: ...OPERATION MAINTENANCE MANUAL ...

Page 2: ......

Page 3: ...ION 3 8 0 WELD GUN SETUP 3 8 1 PLUNGE LENGTH 3 8 2 CHECKING GUN LIFT 4 9 0 SETTING UP POWER SOURCE 5 9 1 CONNECTIONS AND SETTINGS 5 9 2 WELD TEST INSPECTIONS 5 10 0 MAINTENANCE 6 10 1 WELD CABLES 6 10 2 INTERNAL CLEANING 6 11 0 TROUBLESHOOTING 7 12 0 PARTS LIST 8 9 10 11 LIST OF FIGURES 1 JUMPER LINK ARRANGEMENT 2 2 CONTROL PANEL FRONT 3 3 STANDARD GUN SET UP 4 4 WELD INSPECTION 5 5 FUSE BLOCK 6 6...

Page 4: ...ARC 800 PRO WELD ...

Page 5: ...ARC 800 PRO WELD ...

Page 6: ...ARC 800 PRO WELD ...

Page 7: ...ARC 800 PRO WELD ...

Page 8: ...ING YOUR UNIT Upon receipt of your unit place it as close as possible to the point of installation before unpacking it Once the unit is un packed it is recommended that you inspect it for any physical damage that may have occurred in shipping Your unit has been completely assembled and inspected at the factory Upon receipt the unit must be hooked up to the recommended incoming power before welding...

Page 9: ... 100 380V 4 10 75 415V 10 10 50 This unit is equipped with input voltage jumper links either installed or in a bag on the jumper link board to allow operation from different line voltages If installed the jumper links are positioned for the high est voltage stated on the nameplate or on the input data label In either case the jumper links should always be checked to see if they are prop erly posit...

Page 10: ... of the ferrule Tighten the leg adjusting screws after setting the plunge and recheck centering to be sure the stud is aligned properly in the fer rule 4 The lift height which determines the arc length has been preset at the factory and will automatically lift and plunge the stud during the welding process Lift is the distance the gun will raise the stud above the welding surface during the weld T...

Page 11: ... from the welded stud this will assure better life to the gun s expendable accessories The ferrule may now be removed by breaking it away from the welded stud to allow inspect tion of the weld results After inspection of sample welds the gun can be adjusted as per the step in this procedure for optimum results 8 2 Checking Gun Lift To measure lift turn the stud welding unit on and set the timer to...

Page 12: ... cable receptacle in the front of the power supply d Set the Time adjustment required for the particular stud size see table 9 1 e Set the Current adjustment to the current setting for the par ticular stud size see table 9 1 f Turn on the power supply by depressing the START button Table 9 1 Approximate Settings Stud Base Weld Weld Minimum Plate Inches mm Seconds Amperes Inches mm 1 4 6 4 0 20 425...

Page 13: ...rns Allow cooling period before servicing CAUTION Read and follow the safety information at the beginning of this section before proceeding 10 1 Weld Cables Every three months inspect cables for breaks in insulation Repair or replace cables if insulation breaks are present Clean and tighten connections at each inspection Figure 5 FUSE BLOCK 10 2 Internal Cleaning Every six months blow or vacuum du...

Page 14: ...rd for proper voltage 3 Defective 600 0015 P C board 3 Replace 4 Defective current potentiometer 4 Replace 5 Excessive weld cable length 5 Reduce cable length Maximum output but 1 Defective 600 0015 P C board 1 Replace no control 2 Open lead going to shunt 2 Repair broken leads on shielded cable connection 3 Defective current potentiometer 3 Replace Gun does not lift 1 Blown 4 amp fuse 1 Check and...

Page 15: ...2 Knob 102 0060 3 LED Red 108 0028 4 LED Green 108 0029 5 Knob 104 0043 6 Face Plate 104 0042 7 On Off Switch 104 0041 8 Potentiometer 111 0001 9 Camlok Female Panel Mount 107 0002 10 Panel Mount R S Connector 107 0001 PAGE 8 1 2 3 4 5 7 8 9 10 Figure 6 FRONT PANEL Figure 7 CONNECTORS 6 ...

Page 16: ...14 Thermostat 102 0032 15 SCR Isolated 25A 400V 108 0042 16 Cap 1000 MFD 200V 106 0024 17 Terminal Strip 12 Pole Euro 102 0025 18 Choke Coil 105 0004 19 6 Terminal Fuse Block 104 0038 20 Fuse Decal 122 0034 21 Terminal Strip 12 Pole Euro 102 0025 22 SCR 108 0058 23 ARC 800 PCB 600 0015 12 13 14 15 16 17 18 19 20 21 22 23 ...

Page 17: ...t 102 0081 Sheet Metal Misc Parts NOT PICTURED DESCRIPTION PART NUMBER Base 101 0031 1 Left Side Panel 101 0031 2 Right Side Panel 101 0031 3 Top Cover 101 0031 4 Front Panel 101 0031 5 Back Panel 101 0031 6 MTG Panel 101 0031 7 Compartment 101 0031 8 Rear Door 101 0031 9 Handle 101 0031 10 Axle 102 0046 Handle Plastic 102 0063 Door Latch Knob 102 0124 Door Latch Cam 102 0125 ...

Page 18: ...K 2 2K 2 2K 2 2K 10K 10K 10K 10K 10K 10K 10K 10K 10K 10K 10K 10K 100 100 100 100 10 10 470 470 470 470 470 470 1K 1K 1K 1K 1K 220 220 220 4 7K 4 7K 4 7K 4 7K 22K 22K 470 22K 22K 22K 10K 3 3K 3 3K 3 3K 47K 1 8K 82K 130K 2 7K 3 9K 3K 390K 47 33K 1M 470M 40V 100M 25V 10M 250V 47M 63V 47 63 22 100 4 7 4 7 4 7 10 10 10 1 1 1 1 1 A06 A56 A06 A06 A06 A56 A06 A56 A56 TCR22 6027 6027 LM723 LM358 LM358 LM35...

Page 19: ......

Page 20: ...WELD PRO MANUFACTURED BY MADE IN THE U S A ...

Reviews: