background image

WHEEL-E usage instructions 


22


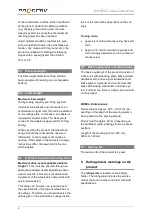
Figure 30: Charging status display on the recharge-
able battery 


To 

switch on the display

, press and hold 

down the ON/OFF button 

 for some seconds 

until the display is switched on. 


Figure 31: ON/OFF button on the display 


Figure 32: Display is switched on; support level is 
shown on the display (support level 0) 


To 

turn off the display

, press and hold down 

the ON/OFF button 

 for a few seconds. In 

this case, the rechargeable battery is still 
switched on. Therefore, to 

switch off the en-

tire drive system

, press the ON/OFF button 

on the rechargeable battery (Fig. 29). 

After 5 minutes without activation, the display 
automatically switches off, the battery switches 
off after 30 minutes.  


20.5.2  Driving forwards 

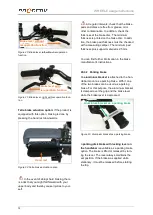
To activate forward travel, slide the switch on 
the handlebar to the middle or left position. 


Figure 33: Switch on the handlebar to engage re-
versegear 


Figure 34: Switch in middle position (forward gear)  


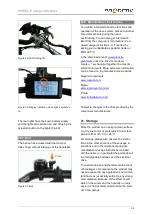
To 

set off

, switch on one of the 5 support lev-

els using the UP (

) and DOWN (

) arrow 

keys on the display. 


Figure 35: Selecting the support level on the display 

ON/OFF button on the display 

Selecting the support level via the arrow 
keys


UP

and

 DOWN


Support level 

Summary of Contents for WHEEL-E

Page 1: ...WHEEL E usage instructions 0 Usage instructions Service booklet WHEEL E Traction device...

Page 2: ...8 6 Basic equipment and dimensions 9 8 7 Service life 9 9 Rating plate markings on the product 9 10 Commissioning and handover 10 11 Introduction to the product and the surroundings 10 12 Safety inst...

Page 3: ...4 Reversing 24 20 5 5 Recuperation rechargeable battery re charging 24 20 6 Lights 25 20 7 Bell 26 20 8 Manufacturer instructions 26 21 Storage 26 22 Transport 27 22 1 Securing handling of the product...

Page 4: ...er 35 32 3 Important legal information 36 33 Appendix Inspection lists 37 The following instructions are intended for and may only be carried out by the rehabilita tion specialist dealer or PRO ACTIV...

Page 5: ...traction device referred to as product below is classified as a class I prod uct 3 2 Conformity As the manufacturer PRO ACTIV Reha Technik GmbH declares that the respective product is a class I produc...

Page 6: ...as well as the rehabilitation specialist dealer about the use and settings of your product as well as all the safety accessories available e g chest belt and hip belt It is then vital that the advice...

Page 7: ...the rehabili tation specialist dealer or PRO ACTIV 7 Proper use This traction device is designed to be used outdoors on tarmac and adequately paved roads that ensure traction and stability of the prod...

Page 8: ...approx 85 kg the following ranges can be achieved With a 48 V rechargeable battery 10 5 Ah 504 Wh 25 45 km With a 48 V double rechargeable battery 10 5 Ah 504 Wh 50 90 km 8 1 3 Speed One programmed t...

Page 9: ...aths and spaces in accordance with the road traffic regulations It is also not permitted to use it on cycle paths according to the road traffic regulations in Germany PRO ACTIV would also like to poin...

Page 10: ...be ensured through an appropriate adapter assembly setting caster wheels must be removed recommended equipment of the wheelchair caster forks with quick release axle This value can however be reduced...

Page 11: ...ord of training chapter 31 and the hand over certificate in cluding the associated check list chapter 32 must be filled in The rehabilitation specialist dealer should send the completed documents to P...

Page 12: ...pinching your fingers For this reason please allow your rehabilitation specialist dealer to explain how to work these mechanisms and then have a go yourself under instruction Check the function of th...

Page 13: ...ldings assumes a maximum turning circle of 1 5 m Do not attach objects carrier bags etc to the product These could cause an unwant ed drive impulse when stationary and prevent safe operation of the pr...

Page 14: ...lchair s usage instructions or the re strictions dependent on the settings When driving over or passing obstacles it is important that you avoid any product or body parts catching on the obstacle as t...

Page 15: ...vent any unintended drive signals 17 Safety instructions after driving use Always turn off the drive system immedi ately when it is not in use to prevent accidental triggering of a drive signal and to...

Page 16: ...ttachment off the valve and replace the valve cap Figure 9 Compressor Figure 10 Valve adapter and clamp lever of the compressor 20 Functional elements 20 1 Parking stand 20 1 1 Active and passive posi...

Page 17: ...the insertion maul on the wheelchair side should correspond with the dimension from the ground to the upper edge of the insertion bolt on the product side As soon as there is a deviation from these t...

Page 18: ...must be fulfilled for the proper seating position The handlebar including the installed fit tings may not touch the knees or thighs when steering The steering movement may not be blocked by the knees...

Page 19: ...r rehabilitation specialist dealer or PRO ACTIV Note that the lines and the cable lengths must be adjusted after making a large adjust ment to the handlebar position 20 2 3 Grips The product is design...

Page 20: ...checked with a measuring calliper The minimum pad thickness plus support material is 2 5 mm You can find further information in the brake manufacturer s instructions 20 3 2 Parking brake An aluminium...

Page 21: ...art Improper opening or deliberate destruction of the rechargeable bat tery bears the risk of severe injury All warranty claims expire when the rechargeable battery is opened Rechargeable batteries th...

Page 22: ...e socket protective cap is inserted in the R socket Then switch the drive system back on To prevent short circuits due to moisture the protective cap must be placed on the sock et that does not have a...

Page 23: ...witch off the en tire drive system press the ON OFF button on the rechargeable battery Fig 29 After 5 minutes without activation the display automatically switches off the battery switches off after 3...

Page 24: ...ntimetres using the handrim so that the drive system receives ref erences You can then accelerate normally using the driving signal transmitter with the set support level Tetra gas actuation option If...

Page 25: ...s controlled by pressing the drive signal transmitter downwards In re verse gear there is only one support level Figure 44 Press the drive signal transmitter down to accelerate Tetra gas actuation opt...

Page 26: ...ear lights are gen erally installed on the back cross bar on the back of the coupled wheelchair The lights are switched on and off using the respective actua tion button on the lights Figure 47 Actuat...

Page 27: ...most im portant documents More extensive information can be found on the manufacturers websites Magura components www magura com Sigma www sigmasport com en Triride www trirideitalia com en Subject t...

Page 28: ...wheelchair user or other per sons with their wheelchairs in vehicles ob serve the instructions in the usage instructions of the wheelchair 22 3 Securing the product in a vehicle without a person To r...

Page 29: ...duct becomes wet when using dry it after use Clean your product with water solvent or neutral cleaning agents Do not use any abra sive cleaning agents or aggressive acidic cleaners when cleaning Drive...

Page 30: ...printed on the tyre covers If you should discover any problems dur ing these checks please immediately contact your rehabilitation specialist dealer or PRO ACTIV Service and repair work on the produc...

Page 31: ...ed recycling facilities separate from general residual waste Proper disposal serves to prevent possible environ mental and health damage These guidelines are applicable only to devices that are instal...

Page 32: ...issioned and used in non compliance with these usage instructions Repairs or other work have been carried out by non authorised persons Third party parts have been installed or connected to the produc...

Page 33: ...17 26 M10 34 51 M12 59 87 M10 x 1 36 53 Securing details All screws on PRO ACTIV products should be secured with thread lock fluid medium strength e g Weicon AN302 43 where there are no securing clam...

Page 34: ...also been advised about situations where the assistance of another person is required The usage instructions were handed to me us Instructor Name date signature 1 Person being trained Name date signat...

Page 35: ...ng page If the product is to be used on public roads the user accord ing to their own statements or those of the legal representa tive or guardian and the assessment of the person providing the traini...

Page 36: ...oval and insertion of the rechargeable batteries as well as operation of the change over device if fitted has been demonstrated and then performed by the user themselves and or an assistant Handling a...

Page 37: ...ermit PRO ACTIV delivers the product with an electric drive system that supports a maximum speed of 15 km h With this equipment the product can be used in public areas and on the road with an insuranc...

Page 38: ...fluid brake pads brake cables and tyres on the product and wheelchair Check the electrical connections and the drive signal transmitter Check the spoke tension of the drive wheel and if required cor...

Page 39: ...update if necessary Check the spoke tension of the drive wheel and if required cor rection of the tension recentring as well as check of the axle nuts of the drive wheel for firm seating tightening to...

Page 40: ...update if necessary Check the spoke tension of the drive wheel and if required cor rection of the tension recentring as well as check of the axle nuts of the drive wheel for firm seating tightening to...

Page 41: ...update if necessary Check the spoke tension of the drive wheel and if required cor rection of the tension recentring as well as check of the axle nuts of the drive wheel for firm seating tightening to...

Page 42: ...update if necessary Check the spoke tension of the drive wheel and if required cor rection of the tension recentring as well as check of the axle nuts of the drive wheel for firm seating tightening to...

Page 43: ...update if necessary Check the spoke tension of the drive wheel and if required cor rection of the tension recentring as well as check of the axle nuts of the drive wheel for firm seating tightening to...

Page 44: ...update if necessary Check the spoke tension of the drive wheel and if required cor rection of the tension recentring as well as check of the axle nuts of the drive wheel for firm seating tightening to...

Page 45: ...update if necessary Check the spoke tension of the drive wheel and if required cor rection of the tension recentring as well as check of the axle nuts of the drive wheel for firm seating tightening to...

Page 46: ...update if necessary Check the spoke tension of the drive wheel and if required cor rection of the tension recentring as well as check of the axle nuts of the drive wheel for firm seating tightening to...

Page 47: ...update if necessary Check the spoke tension of the drive wheel and if required cor rection of the tension recentring as well as check of the axle nuts of the drive wheel for firm seating tightening to...

Page 48: ...cialist dealer PRO ACTIV Reha Technik GmbH Im Hofst tt 11 D 72359 Dotternhausen Germany Phone 49 7427 9480 0 Fax 49 7427 9480 7025 Email info proactiv gmbh com www proactiv gmbh com No 000 000 3307 07...

Reviews: