background image

PRO-COM OWNER’S MANUAL 
VENTED GAS LOGS                                        5                                                  WAL21-01


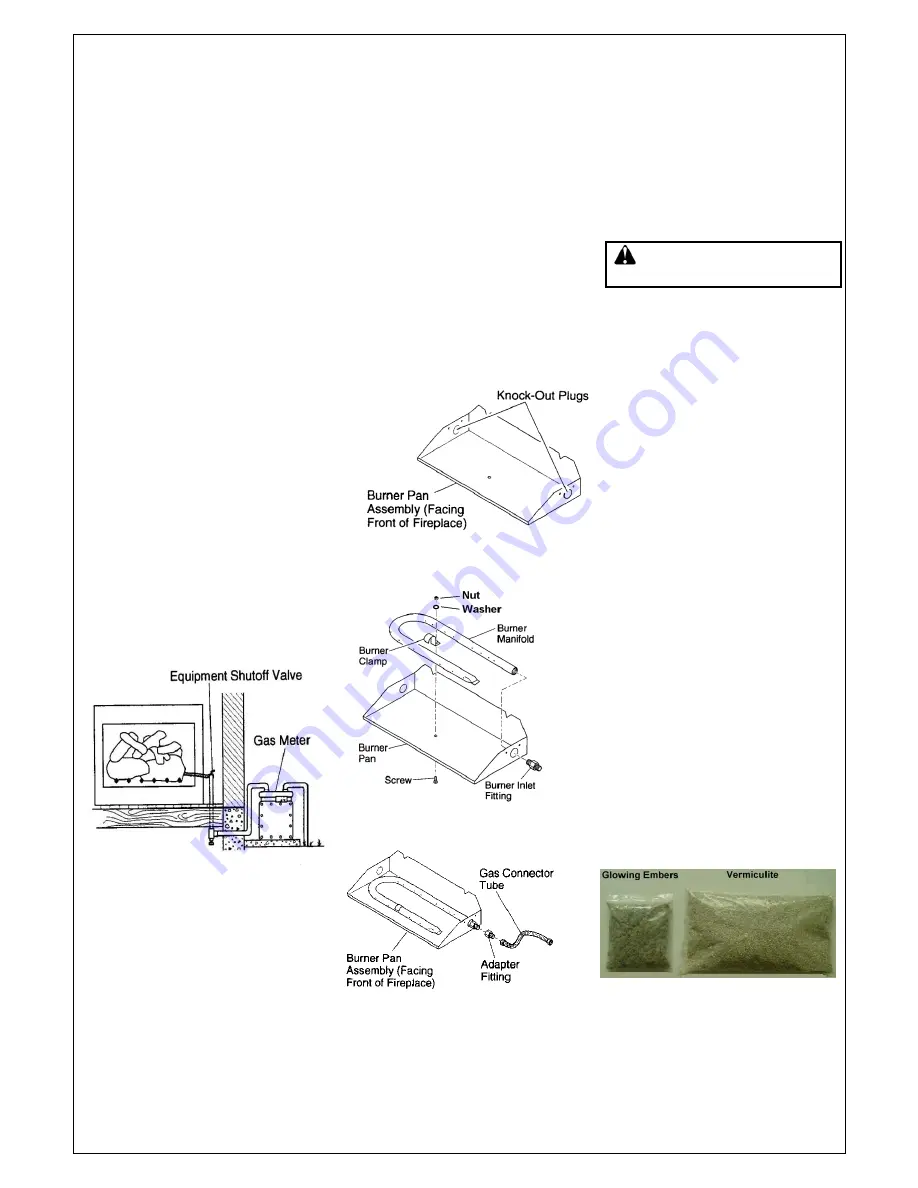
Figure 8- Connecting Gas to Appliance


Figure 9- Glowing Embers and         


Vermiculite


Figure 5 –Checking Gas Joints 

Test Pressures Equal To or Less Than 
1/2 PSIG (3.5 kPa) 

1. Close equipment shutoff valve (see 

Figure 5). 

2.  Pressurize supply piping system by 

either using compressed air or opening 
main gas valve located on or near gas 
meter. 

3.  Check all joints from gas meter to 

equipment shutoff valve (see Figure 
5). Apply mixture of liquid soap and 
water to gas joints. Bubbles forming 
show a leak. 

4. 

Correct all leaks immediately.


ADDING PAN MATERIAL 

1. Open the bag of ash bed material 

(vermiculite) and spread it evenly 
across the burner pan to the top. You 
may over-flow the front and sides of the 
pan to cover the entire pan and 
connecting hardware. Do not cover 
control system valve. 

2. Open the glowing embers and evenly 

cover the ash bed material (vermiculite) 
in the burner pan.


Pressure Testing Gas Supply 
Piping System 

Test Pressures In Excess Of 1/2 PSIG 
(3.5 kPa) 

1. Disconnect appliance with its appliance 

main gas valve (control valve) and 
equipment shutoff valve from gas supply 
piping system. Pressures in excess of 
1/2psig will damage heater regulator. 

2. Cap off open end of gas pipe where 

equipment shutoff valve was connected. 

3. Pressurize supply piping system by either 

using compressed air or opening main 
gas valve located on or near gas meter. 

4. Check all joints of gas supply piping 

system. Apply mixture of liquid soap and 
water to gas joints. Bubbles forming show 
a leak. 

5. Correct all leaks immediately. 
6.Reconnect log set and equipment shutoff 

valve to gas supply. Check reconnected 
fittings for leaks. 

TESTING BURNER FOR LEAKS 

1.  Generously apply soapy solution to 

all connections. 


2.  Light the burner with the shutoff 

valve, no more than half open, and 
holding a match slightly in front of the 
pan (see Lighting Instructions, page 6).

3. Inspect all connections for bubbles, 

raw gas odor, or flame from any area 
other than the burner (leaks). If leaks 
are detected, shut off the gas valve 
immediately. Tighten, or reassemble 
the loose connection(s) using pipe joint 
compound until burner system is leak 
free. 

4. When the burner is tested and leak 

free, observe the individual tongues of 
flame on the burner. 

Note

: The burner 

design includes more ports on the 
outside of the bar. Make sure that all 
ports are clear and producing flame 
evenly across the burner. If any ports 
appear blocked, clear them by 
removing the burner manifold and 
reaming the ports with a modified 
paper clip or other suitable tool. 

5. When finished testing, turn the gas 

shutoff valve OFF to extinguish all 
flames. 

INSTALLATION 

Continued 

Installation and Gas Connection 

1. Place the burner pan assembly in 

the center of the fireplace floor. Make 
sure the front of pan faces forward. 

2. Thread the gas supply fitting to the 

fireplace gas supply pipe. Use thread 
sealant.


3. Install adapter fitting onto the burner 

inlet fitting using thread sealant on 
male threads of burner inlet fitting 
(see Figure 8). 

4. Install the gas connector tube to the 

gas supply fitting. Carefully shape 
tube to attach to adapter fitting. 


WARNING:


Never check 

for gas leaks with open flame.


INSTALLING THE GRATE, LOGS   

See Page 10-15 Logs installation 


HEARTH KIT ASSEMBLY 

AND INSTALLATION


Kit Assembly 

Note:


The following instructions 

apply to dual flame "U" style 
burners. Be sure all pipe threaded 
connections are tight, and have 
thread compound to prevent leaks. 
1. Determine which side the gas line 
will be coming into the fireplace.


2. Using a hammer and screw driver, 

remove knock-out plug from the side 
of the pan that corresponds to the 
gas line (see Figure 6). 

3. Unscrew burner inlet fitting from 

burner manifold (see Figure 7). 

4. Place burner manifold in pan with 

threaded opening facing open 
knock-out plug. 

5. Using thread sealant (resistant to the 

action of natural gas) on larger end of 
fitting, screw the burner inlet fitting 
through hole and into burner manifold. 
Tighten using a wrench. 

6. Using burner clamp, screw, and nut 

provided, assemble clamp to pan. 
This will hold the burner manifold in 
place. 

7. If using optional control system kit, 

follow instructions included with kit for 
installation and operation.


Figure 6 – Knock-Out Plug Locations


Figure 7 – Installing Burner


Summary of Contents for WAN18LA

Page 1: ...on may result causing property damage personal injury or loss of life WARNING This is a gas fired appliance It uses air oxygen from the room in which it is installed Provisions for adequate combustion and ventilation air must be provided Refer to Air for Combustion and Ventilation section on page 3 of this manual Aftermarket Completion of sale not for purpose of resale from the manufacturer Do not...

Page 2: ...oung children when they are in the room with log set WARNING Keep flue open when operating unit IMPORTANT Read this owner s manual carefully and completely before trying to assemble operate or service this log set Improper use of this log set can cause serious injury or death from burns fire explosion electrical shock and carbon monoxide poisoning 1 This appliance as supplied is only for use with ...

Page 3: ...st provide adequate fresh air for these appliances This will insure proper venting of vented fuel burning appliances NOTICE Installation service and repair of this appliance must be performed by a qualified installer service agency company or gas supplier experienced with this type of gas appliance Only factory authorized components listed in these instructions may be used in accordance with the m...

Page 4: ...ed or the damper blade must be cut or removed CAUTION Only use a new black iron or steel pipe Internally tinned copper tubing may be used in certain areas Check your local codes Use pipe of 1 2 diameter or greater to allow proper gas volume to log set If pipe is too small loss of pressure will occur Installation must include an equipment shutoff valve union and plugged 1 8 NPT tap Locate NPT tap w...

Page 5: ...e gas valve immediately Tighten or reassemble the loose connection s using pipe joint compound until burner system is leak free 4 When the burner is tested and leak free observe the individual tongues of flame on the burner Note The burner design includes more ports on the outside of the bar Make sure that all ports are clear and producing flame evenly across the burner If any ports appear blocked...

Page 6: ... burning turn the shutoff valve OFF and repeat steps 1 through 4 again CURING LOGS During the 2 3 hour appliance break in period you may detect an odor from the appliance as the various paints and compounds used in the manufacturing of this log set cure This is a normal and temporary situation that is not cause for alarm However you may want to provide extra ventilation to the room during this tim...

Page 7: ...and checked 3 Separate the logs to allow more flame passage 4 Remove any foreign items from the flame pattern 5 Preheat flue in very cold weather POSSIBLE CAUSE OBSERVED PROBLEM Log set is smoking sooting excessively Note It is natural and unavoidable for vented gas log sets to produce moderate levels of carbon soot where flames contact the logs 1 Relieve any tight bends or kinks in gas supply lin...

Page 8: ...PRO COM OWNER S MANUAL VENTED GAS LOGS 8 WAL21 01 ILLUSTRATED PARTS BREAKDOWN WAN18LA WAN24LA WAN30LA ...

Page 9: ... Adapter 1 4 WAL06 01 WAL06 01 WAL06 01 Injector Mounting 1 5 ML091 04 WAL07 02 WAL07 03 Injector 1 6 WAL01 01 WAL01 02 WAL01 03 Burner Pan 1 7 WAL02 01 WAL02 02 WAL02 03 Burner Manifold 1 8 WAB01 WAB05 WAB07 Logs Grate 1 9 WAL18 01 WAL18 01 WAL18 01 Grate Step 2 10 WAB03 WAB03 WAB03 Damper Clamp Assembly 1 11 6170 4Z 6170 4Z 6170 4Z Nut 1 12 861 1 4Z 861 1 4Z 861 1 4Z Washer 1 13 WAL19 01 WAL19 0...

Page 10: ... 2 Place the back log 1 onto the grate steps see Figure 3 3 Place the front logs 2 3 on the grate and slide forward against the front bars on the grate see Figure 4 4 Place logs 4 5 onto logs 1 2 3 by inserting log 1 s locating pin into lower hole of logs 4 5 see Figure 5 5 Place log 6 onto log 5 by inserting log 5 s locating pin into lower hole of log 6 see Figure 6 6 Place log 7 onto logs 4 6 by...

Page 11: ...PRO COM OWNER S MANUAL VENTED GAS LOGS 11 WAL21 01 WAN18LA LOG INSTALLATION Continued Figure 6 Placement of Top Logs Figure 5 Placement of Top Logs Figure 7 Placement of Top Logs ...

Page 12: ...igure 3 3 Place the front logs 2 3 on the grate and slide forward against the front bars on the grate see Figure 4 4 Place logs 4 5 onto logs 1 2 3 by inserting log 1 s locating pin into lower hole of logs 4 5 see Figure 5 5 Place log 6 onto log 5 by inserting log 5 s locating pin into lower hole of log 6 see Figure 6 6 Place log 7 onto logs 4 6 by inserting log 4 s locating pin into lower hole of...

Page 13: ...COM OWNER S MANUAL VENTED GAS LOGS 13 WAL21 01 Figure 6 Placement of Top Logs WAN24LA LOG INSTALLATION Continued Figure 8 Placement of Top Logs Figure 7 Placement of Top Logs Figure 5 Placement of Top Logs ...

Page 14: ...e 3 3 Place the front logs 2 3 on the grate and slide forward against the front bars on the grate see Figure 4 4 Place logs 4 5 6 onto logs 1 2 3 by inserting log 1 s locating pin into lower hole of logs 4 5 6 see Figure 5 5 Place log 7 onto logs 4 5 by inserting log 4 s locating pin into lower hole of log 7 see Figure 6 6 Place log 8 onto logs 2 4 by inserting log 4 s locating pin into lower hole...

Page 15: ...PRO COM OWNER S MANUAL VENTED GAS LOGS 15 WAL21 01 WAN30LA LOG INSTALLATION Continued Figure 6 Placement of Top Logs Figure 7 Placement of Top Logs Figure 5 Placement of Top Logs ...

Page 16: ...re not in original condition because of normal wear and tear or parts that fail or become damaged as a result of misuse accidents lack of proper maintenance or defects caused by improper installation Travel diagnostic cost labor transportation and any and all such other costs related to repairing a defective heater will be the responsibility of the owner TO THE FULL EXTENT ALLOWED BY THE LAW OF TH...

Reviews: