background image

P19. 

maintenance

Very little maintenance is required to your Topper, but some

care and attention will produce better sailing performance.

Hull and deck

The polypropylene from which the hull and deck are 

moulded is very strong but can be scratched so avoid

pulling the boat over shingle or scraping it on anything 

hard and always try to rig the boat on a reasonably soft 

surface.

The moulding material has special additives to provide

resistance to the effects of ultra-violet light, but very

prolonged exposure to strong sunlight may affect the 

surface over the period of a number of years. Therefore 

it is recommended that you cover the boat or store it in the

shade.

Static electricity on a polypropylene surface attracts dust.

The harder you rub it with a duster the more dust will stick.

So it is best to wash it or try an anti-static polish.

An annual check of screw tightness is a good discipline, but

be careful not to overtighten.

Mast Cup

Clean out the grit and sand. The base of the cup can may

get worn from the repeated movement of the mast heel. If

the cup becomes worn, remove the central screw holding

the cup in position and fit a replacement cup and disc. Do

not tamper with the bolt beneath the cup.

Self bailer

Keep clean and wash out grit. Ensure screws are tight but

be careful not to overtighten.

Drainplug

It is recommended that this is removed at night and for 

winter storage.

Rudder

The rudder blade is intended to stay down in the fully lowered

position when the tiller is lowered onto the pillar of the 

rudder stock (aluminium casting). If the rudder blade hits a

submerged object hard, the blade will force the tiller to slide

up on the pillar to allow it to move forward, thus releasing a

locking mechanism and letting the rudder blade come up.

In order to do this correctly - yet not allow the blade to

come up during normal sailing - the friction at the joint

between the tiller and rudder must be adjusted correctly.

This is done by adjusting the spring nut on the tiller pivot

bolt. You must get this right by trial and error. It is also

important that the bearing surfaces between the locking

pegs on the tiller and the notches on the rudder stock pillar

are smooth and clean, otherwise the tiller will not slide

upwards when the rudder blade hits an obstacle.

Tiller extension

No maintenance is required but check that the universal

linkage is secure.

Rudder Pintle on Hull

This is the stainless steel transom plate on which the rudder

pivots. Check occasionally that the fixing screws are secure

and that there is not undue wear on the pivot pin.

Mastgate

Keep washed out and free from grit and sand. Do not 

lubricate.

Top mast

This is designed to be water tight. The upper end fitting 

is sealed in with mastic and the lower end is plugged. It 

is difficult to check the top mast for leakage and the only

practical way is by prolonged immersion.

Lower mast and boom

Check screws and rivets on fittings regularly.

Sail

The sail is very strong and will not rot, but can be spoiled 

by unsympathetic use. Occasionally wash any salt off the

sail with fresh water with a hose, do not use a washing

machine. Dry and fold carefully. Roll up the folded sail 

and stow it in its bag. If you crumple up the sail or stuff it in

the bag unfolded you are liable to breakdown the smooth

surface of the cloth and affect the performance of the sail. 

It will not ruin it but it will become less efficient.

Blocks

Wash these occasionally and keep them free from grit. Do

not lubricate.

Ropes

Check these occasionally for chafe and wear and tear.

Storage

The Topper may be stood on its transom, providing pintle

and gudgeon are kept clear of the ground. It can be slung

in straps or stored upside down in the same way that it is

supported on a roof rack. If the hull is put in a rack the right

way up, it is important to ensure that the forward support

lies directly under the mast step, and that the load is spread

as much as possible.

Owners manual Topper  8/2/06  12:35  Page 19

Summary of Contents for Topper

Page 1: ...Topper Owners Manual Owners manual Topper 8 2 06 12 34 Page 1...

Page 2: ...B Kicking Strap Boom Vang C Downhaul D Mainsheet Assembly E Bow Painter F Outhaul G Rope Horse H Clew Strop I Masthead Crane J 2 part Aluminium Mast K Topper Sail Insignia L Self Adhesive sail numbers...

Page 3: ...ilt to the One Design of Ian Proctor under licence of the Copyright from Ian Proctor Designs Limited Topper is a registered Trade Mark of Ian Proctor Designs Ltd S U V W X Y T Owners manual Topper 8 2...

Page 4: ...ng the owner of a brand new Topper sailboat We at Topper International believe that Topper s advanced design and sophisticated construction process will ensure that you enjoy many years of trouble fre...

Page 5: ...unpacked everything lay out the various control lines on the foredeck and identify them A Main Halyard Loop B Kicking Strap C Downhaul D Mainsheet E Bow Painter F Outhaul G Traveller H Daggerboard Sho...

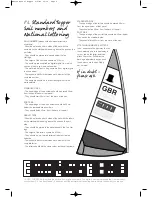
Page 6: ...etters on the starboard side being above the ones on the port side They should be placed in the panel beneath the Top Hat logo The height of the letters should be 230mm They should be pre formed lette...

Page 7: ...sets of numbers should be in the 2nd coloured panel from the bottom of the sail The numbers should be in a contrasting colour to the sailcloth Use white numbers on red dark blue purple sail panels Use...

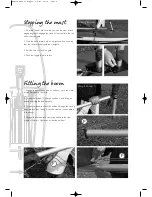
Page 8: ...the mast 2 Insert the mast into the luff sleeve and pull the sail down the mast If it is windy keep your back to the wind 3 Continue until the whole sail is sleeved and the masthead has appeared thro...

Page 9: ...k Fitting the boom 1 Engage the gooseneck end of the boom on to the mast immediately above the collar 2 Thread the outhaul F through the boom end fitting as shown knotting the end securely 3 Thread th...

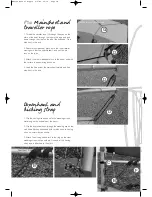
Page 10: ...g as shown 4 Lead the free end of the mainsheet forward and tie a stop knot in the end Downhaul and kicking strap 1 Clip the kicking strap hook onto the webbing strop s metal ring on the underside of...

Page 11: ...a retaining knot having first adjusted the tension to suit Reefing the sail The Topper sail can be quickly reduced in size by furling it around the mast This will make the boat more manageable for no...

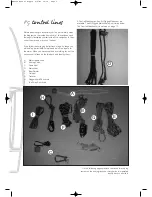
Page 12: ...he rigging instructions for setting up the Standard and Race Rigged versions of the Topper are the same This section aims to highlight the areas that differ control lines Begin by laying out the Race...

Page 13: ...ges on page 7 4 1 outhaul To rig the 4 1 outhaul D drill a hole through the gooseneck and attach block with stopper knot Attach the outhaul carbine hook in the clew cringle of the sail Thread the outh...

Page 14: ...e traveller one on the outer end of the boom and the final one on a short length of rope behind the kicking strap webbing 1 Attach the becket block onto the boom end fitting with the short rigging lin...

Page 15: ...aveller To rig the 2 1 Traveller system firstly attach the clamcleat to the aft of the bulkhead replacing the standard cleat The traveller is tied across the back of the boat with a bowline with a lon...

Page 16: ...2 4 Kicker sheet in the mainsheet so the mainsheet blocks are 75mm apart Take up the slack on the kicker plus a little more Downhaul none Outhaul so there is a maximum distance from the boom to the sa...

Page 17: ...iling the sail should never be baggy In moderate winds tension the foot of the sail so that it is just pulled into horizontal creases at the foot In light winds ease the outhaul so that the creases ju...

Page 18: ...uld generally be fully down In very light airs beating to windward it may help to push the boat round from one tack to another if the blade is raised two notches The strains on the rudder assembly are...

Page 19: ...en the tiller and rudder must be adjusted correctly This is done by adjusting the spring nut on the tiller pivot bolt You must get this right by trial and error It is also important that the bearing s...

Page 20: ...e inconvenience loss of use of boat or any other expenses incurred parts warranty conditions All equipment or accessories which are not manufactured by Topper International whether or not warranteed b...

Page 21: ...t TN23 6LN Please enroll me as a full member of the International Topper Class Association Name Age if under 21 Address Daytime telephone number Mobile number Evening telephone number Topper Sail numb...

Page 22: ...Owners manual Topper 8 2 06 12 35 Page 22...

Page 23: ...C per il Disegno della Categoria C Declaraci n de Conformidad El presente barco se ha dise ado de acuerdo con la Directiva 94 25 EC titulada Requisitos de Seguridad Esenciales para Barcos de Uso Recre...

Page 24: ...N Telephone 01233 629186 Fax 01233 645897 email info toppersailboats com www toppersailboats com International Topper Class Association ITCA GBR 17 Woods Hill Lane Ashurst Woods West Sussex RH19 3RW T...

Reviews: