p.3
PREPARATIONS
Before installing a new Produits Neptune Rouge bathtub, we strongly recommend following the
installation checklist and hiring a certified plumber to handle the installation.
Visually inspect the bathtub to make sure it has not been damaged during transport. In case of damage,
do not proceed with the installation.
Make sure the bathtub is the model that you ordered, that its dimensions are correct and that the
location of the drain corresponds to the plans.
Ensure that the floor of the bathroom is level and it is able to withstand the weight of the bathtub once
filled with water (about 450 kg or 1000 lb). THE FOUR LEGS OF THE BATHTUB SHOULD BE IN CONTACT
WITH THE FLOOR.
To protect the bathtub during instalation, cut a piece cardboard in the package and place it in the
bottom of the bathtub.
If your bathtub has a protective plastic film, do not remove it before having finished the installation. If
necessary, remove the film temporarily in order to install the faucets. Also remove the film from where
it may remain stuck, or lodged post installation. to remove the film, soak a cloth with isopropyl alcohol
and wipe the entire surface of the adhesive film.
If the bathtub is equipped with adjustable metal legs, they must first be installed by screwing them into
the metal opening beneath the bathtub.
BATHTUB INSTALLATION
1.
Clear and clean the space around where the bathtub will be positioned so as to avoid damage to
the bathtub during installation.
2.
Check the level and the strength of the floor where the bathtub will be positioned. A bathtub
filled halfway with water can weigh up to 450 kg (1000 lb) and the floor must be strong enough to
support this weight.
3.
The basic installation of plumbing (pipes and drain/water supply) must be performed by a qualified
plumber prior to installation of the bathtub.
4.
To hook the drain to the floor drain, we strongly suggest to have an access underneath
the bathtub or to use a floor drain specific for this installation (type 123-Connect D111).
In this case, please refer to its installation guide.
5.
If installing a deck-mounted faucet, do so at step 10 of this guide.
6.
Temporarily set the bathtub in its intended location, ensuring that the drain hole is aligned to the
floor drain and then draw the contour of the bathtub on the ground.
7.
Check the level and adjust if necessary by screwing or unscrewing the legs beneath the bathtub
(maximum adjustment of 1” - 25 mm) and ensuring that the bathtub is always resting on all four
legs while minimizing the space between the skirt and the floor (the skirt can rest on the floor but
shall in no way support the weight the bathtub).
8.
Lock the bathtub legs into position by tightening the adjoining nut once an accurate acceptable
level is confirmed.
9.
Lay the bathtub on its side having previously laid cardboard packaging the ground to protect the
surface of the bathtub. Be sure to use a piece of cardboard without staples to avoid damaging the
surface the bathtub.
10.
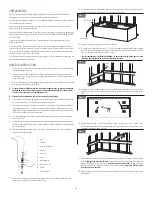
Tighten the seal ring of the floor drain to the end the drain and if necessary, install the faucets
using the its installation guide.
1. Plug
2. Cap Seal
3. Opening Mechanism
4. Strainer
5a. Putty ring
5b. Seal
6. Mounting Nut
7a. Drain pipe (1.5’’)
7b. Gasket
7c. Tightening Nut
11.
Apply a bead of silicone to the entire circumference of the skirt and the bathtub legs. We also
recommend setting circle of silicone to seal the drain.
12.
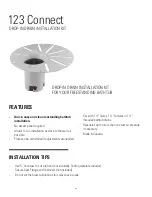
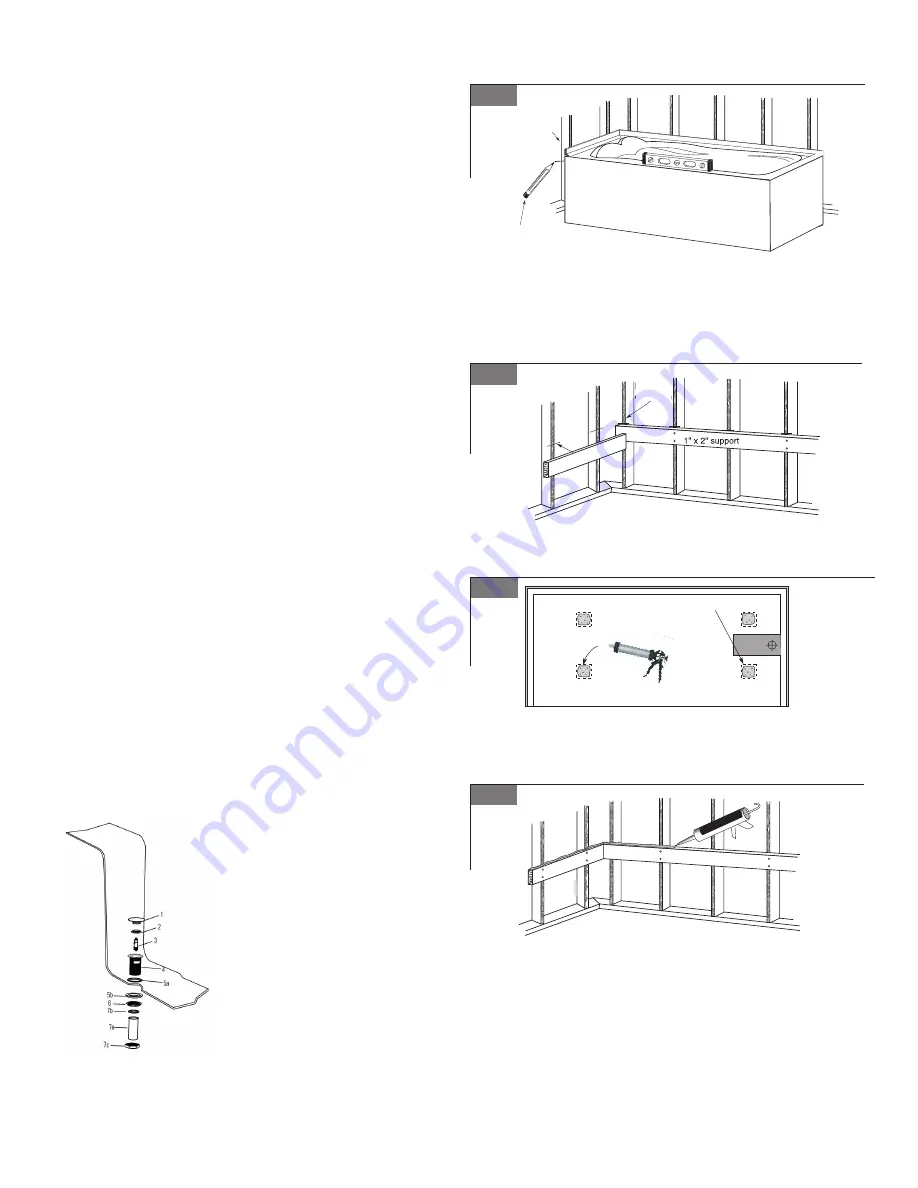
Using a pencil, mark the wall studs directly under the lip of the deck. (Fig.2) If you intend to set the
bathtub in a mortar bed, the position of the feet should be marked too.
13.
Remove the bathtub so that you have access to the walls.
14.
Cut supports for the bathtub deck from 1”x 2” stock. The supports should be long enough to support
the entire length of the bathtub. These supports are fastened to the wall studs with the top of the
support at the level of the marks from step 12. (Fig.3)
*
For the installation of the Belgrade bathtub, it’s necessary to provide the space for the
faucet on the support which will be fixed to the wall studs.
15.
Silicone should now be applied under the legs to attach to the floor and reduce the risk of squeaks.
(Fig.4) Note: A bed of mortar strongly recommended to decrease the flexion of the bottom of the
bath.
16.
Apply a generous bead of construction adhesive along the top of the 1” X 2” support strips.
(Fig.5) This will prevent the bathtub from shifting and also compensate for the unevenness of the
fiberglass reinforcement under the deck.
17.
Set the bathtub into position. Check that the bottom of the deck comes into contact with the support
strips.
If you opted to use a mortar bed
, check that the mortar has spread and that the feet are
supported. Add more mortar if necessary.
If you did not use a mortar bed
, the shims should be
replaced under the feet, and glued in place with construction adhesive.
Note: Do NOT fix feet to
floor using nails or screws.
18.
When installation is complete (including plumbing installation), seal the bathtub onto the podium
using silicone.
Fig. 2
Fig. 3
Fig. 4
Fig. 5
Wall stud
Mark studs
Pencil
mark
Pencil outline of feet
Adhesive


