

www.profelmnet.com
16
ProfelmNet
®
Technical leaflet
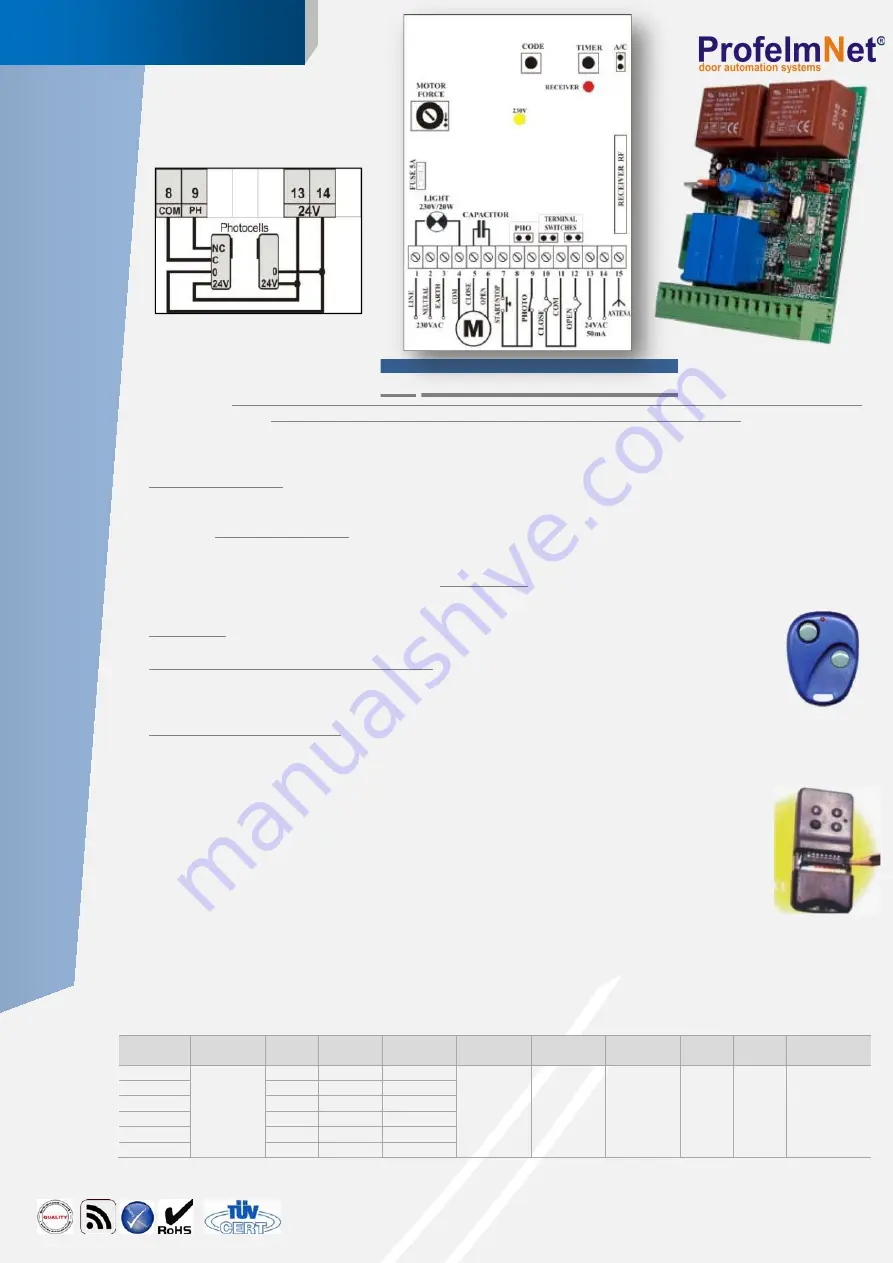
Photo-cell connections
Covering distance
: From 20 – 80 m. according to the environment interferences, and the place of installation
PROGRAMMING
Installation:
The first motor move after power-up (230V) is the OPEN direction, otherwise substitute open/close motor wires.
When you connect the motor limit switches, remove the 2 jumpers to activate them
Working time: Adjustable from 1-180S. While the door is fully closed, press and keep the TIMER button of the controller pressed
until the door fully open position. Then leave it. The working time is saved
Photo-cell: Connect the photocell contact and power supply 24VAC according to the diagram in the right. When you finish,
remove the jumper PHO to activate the photocell contact. In case of failure, put back the jumper and recheck connections.
Photocell operation: When the door closes and the photocell beam is cut-off, the door stops immediately and automatically
activates the open function. If the photocell beam is cut-off, the door never closes.
Auto close: Remove the jumper A/C to activate it. There is a double counter in the A/C function. The first one is 120 seconds and
is applied when the door stops after an open function. During this counting time of 120 sec., if the photocell beam is disturbed,
then after the beam is free, the A/C counting time becomes 10 sec. until the fully closed position.
Motor force: Adjust with the trimmer. Place it in the middle position and check that the door works smoothly.
Rolling code transmitters (PSR-PTR series) programming:
Clear Memory
: The first step is to clear the rolling code memory. Press the button CODE of the controller and the
RED light goes ON after a while. Keep it pressed until the light goes off. The memory is now clear.
Adding a new transmitter with the controller button
: Press the CODE button and the RED light goes on (after a
small delay). Leave it and during the next 3 seconds, press the desired transmitter channel button until the RED
light blinks and goes OFF. The new transmitter is saved. Follow the same procedure to program more (up to 20
or 80) new transmitters.
Adding a new transmitter remotely
: The motor is stopped. Press a working transmitter button (already in memory) to start the
motor working and hold it pressed until the motor stops. When it stops, leave it and press the new transmitter button
immediately. The new transmitter is saved. Repeat steps to program more transmitters remotely. When the memory is full (20 or
80 transmitters) you cannot add more new transmitters.
Standard code transmitter (PR-PS series) programming:
Select your personal code on the transmitter with the use of the dip-switches.
Press the button (CODE) of the controller and keep it pressed. The RECEIVER LED is ON.
With the other hand, press the transmitter desired channel button. The RECEIVER LED single flashes to show
you that the transmitter code is saved. Leave both buttons.
If you will use extra transmitters, please remember to select the same dip-switch codes with the already
programmed transmitter on each one of the new.
Indication lights:
Yellow 230v led: Its always ON power 230VAC. If not, check the means wires and the Fuse 5A of the controller.
Red receiver led: Goes ON every time a transmitter is pressed. It is used to check the RF module and transmitters that are
functioning. If not, please check the transmitter battery and the RF module plug on the controller or change the RF module.
RESET THE AUTOMATION: In case of malfunction, please remove the power supply (230Vac) for 10 seconds, reconnect and
recheck.
Package specifications
PCB dimensions: 105 (L) X 75 (W) X 25 (H), Weight: 0,235Kg.
KEELOQ® patented by Microchip provides both access and security to systems in which it is used
Order
number
Power
supply
Freq.
(MHz)
Codifica
tion
Covering
distance
Relay
contacts
Standby
current
Working
Time
Auto-
close
Photo
cell
START/STOP
button
PSR-2023
433,92
Rolling
30-60m
PTR-2023
110VAC or
868,30
Rolling
20-50m
PS-2023
230VAC
433,92
Motorola
30-60m
10A at
10mA
0-180S
YES
YES
YES
PS-2023
600W
433,92
National
30-80m
230VAC
adjustable
PR-2023
Max.
318
Motorola
20-50m
PR-2023
306
National
20-80m
2023 tech


