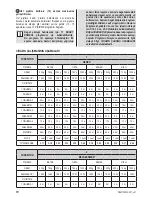
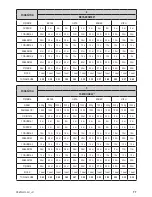
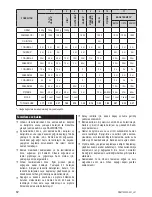
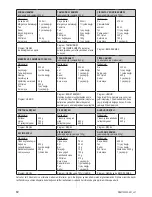
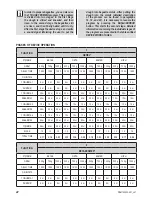
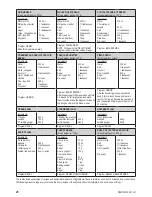
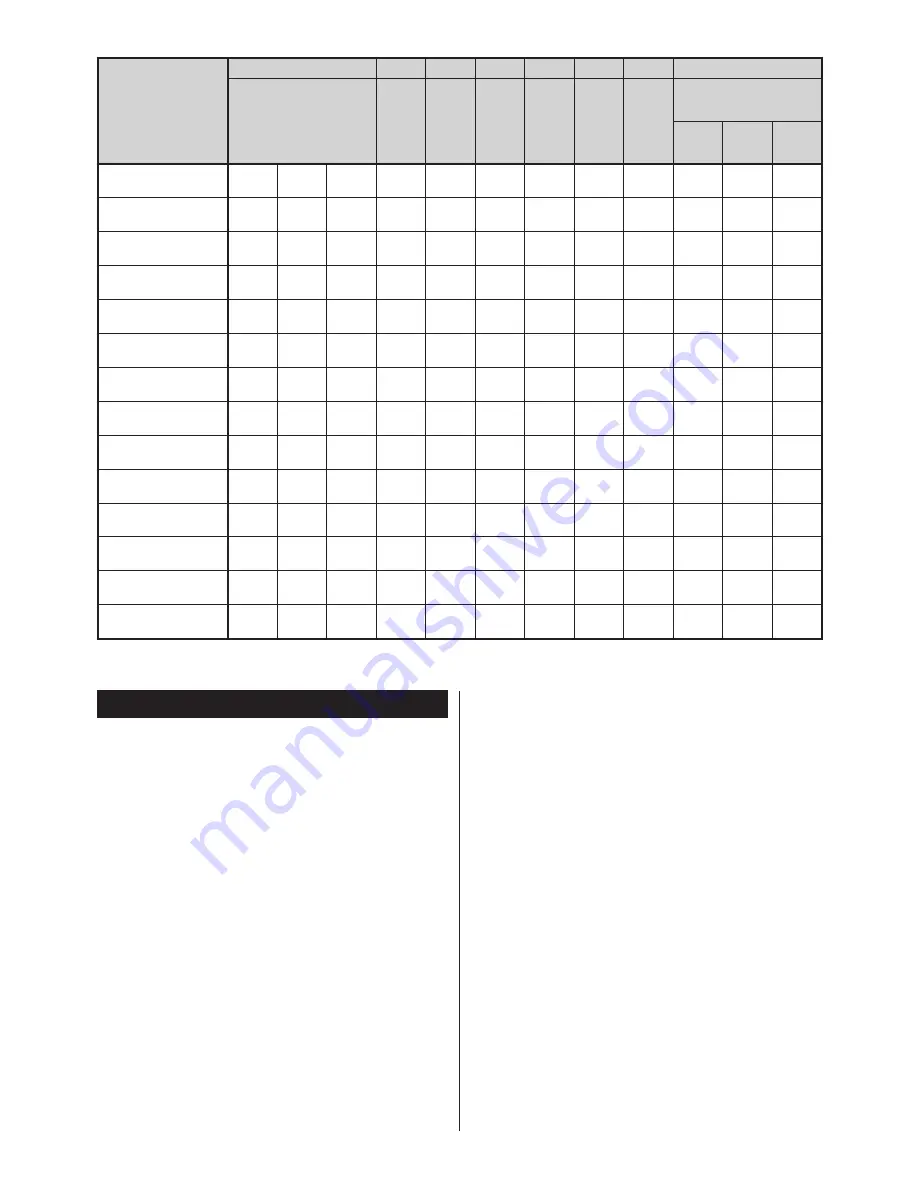
background image

24

FUNCTION

4

5

6

7

8

9

10

11

TA

TLI 

HAMUR*

HIZLI*

GLUTENSİZ* 

HAMUR*

MAKARNA


HAMURU

REÇEL


PİŞİRME

BAGET EKMEĞİ*

BEYAZ ORTA ESMER

GRAM 

500 g

750 g 1000 g 1000 g

-

-

-

-

-

-

-

-

DELAY TIME

15:00

15:00

15:00

-

-

15:00

-

15:00

-

15:00

15:00

15:00

ÖN ISITMA 

0 m

YOĞURMA 1 

5 m

5 m

5 m

5 m

5 m

5 m

3 m

5 m

5 m

5 m

5 m

DURDUR

5 m

5 m

5 m

0 m

5 m

0 m

0m

0 m

0m

YOĞURMA 2 

20 m

20 m

20 m

15 m

10 m

20 m

11 m

10 m

20 m

20 m

20 m

KABARMA 1

39 m

39 m

39 m

12 m

0 m

60 m

0 m

55 m

55 m

55 m

YOĞURMA 3

10 s

10 s

10 s

0

0 s

0 s

0 s

0 s

KABARMA 2 

26 m

26 m

26 m

0

0

0 m

0 m

0 m

YOĞURMA 4 

5 s

5 s

5 s

0

0 s

0 s

0 s

0 s

KABARMA 3

52 m

52 m

52 m

60 m

0 m

0

15 m

15 m

15 m

PİŞİRME

50 m

55 m

60 m

48 m

55 m

0 m

70 m 60-90 m 52 m

57 m

62 m

SICAK 

1 h

1 h

1 h

1 h

1 h

-

-

1 h 

1 h

1h 

1 h

TOTAL TIME 

3:17

3:22

3:27

1:20

2:10

1:30

0:14

1:25

1:00

2:27

2:32

2:37

*

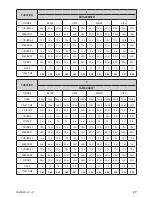
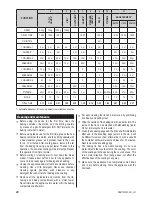
 – Automatic dispenser for loose ingredients is available as an option.

Cleaning and maintenance


Before  using  the  device  for  the  first  time,  clean  the 

baking  container,  the  molds,  and  the  stirring  spatula 

by means of a gentle detergent (DO NOT immerse the 

baking container in water).


Before using the device for the first time, grease the new 

baking container, the molds, and the stirring spatula with 

a heat-resistant grease, and preheat them in the oven 

for ca. 10 minutes. After cooling down, remove the fat 

from the baking tin using a paper towel. Thanks to this 

operation, the non-stick coating will be protected. Repeat 

this operation from time to time. 


Before storing or cleaning wait to cool down the bread 

maker. It takes about half an hour for the appliance to 

cool and to be ready again for baking and kneading.


Unplug the appliance and wait until it cools down before 

cleaning.  Use  a  mild  detergent.  Never  use  chemical 

cleaning  agents,  gasoline,  oven  cleaners  or  any 

detergent that can scratch or damage the coating. 


Remove  all  the  ingredients  and  crumbs  from  the  lid, 

casing  and  baking  compartment  with  a  moist  towel. 

Never immerse the appliance into water or fill the baking 

compartment with water! 


For easy cleaning the lid can be removed by positioning 

it vertically and pulling it out. 


Wipe the outside of the baking tin with a damp cloth. The 

inside of the tin can be washed with dishwashing liquid. 

Do not immerse the tin into water. 


Clean the kneading pegs and the drive shaft immediately 

after use. If the kneading pegs remain in the tin, it will 

be difficult to remove them afterwards. In such a case fill 

the container with warm water and leave for 30 minutes. 

Next remove the kneading pegs. 


The  baking  tin  has  a  non-stick  coating.  Do  not  use 

metal objects that could scratch the coating. The color 

of the coating will change during the course of use. This 

is  a  normal  situation.  This  change  does  not  affect  the 

effectiveness of the coating in any way. 


Make  sure  the  appliance  has  completely  cooled  down 

and is dry before storing. Store the appliance with the 

lid closed.

PBM1000W-001_v01

Summary of Contents for PBM1000W

Page 1: ...r baking baguettes 3 Adding additional ingredients during baking 4 Non stick coating 1 3 2 4 PBM1000W KULLANIM KILAVUZU EKMEK YAPMA MAK NES USER MANUAL BREAD BAKING MACHINE TR EN Size i b rakmayan ak...

Page 2: ...as ve yetkili k ld m z teknik servis elemanlar d ndaki ah slar taraf ndan bak m onar m veya ba ka bir nedenle m dahale edilmemi olmas art yla b t n par alar dahil olmak zere tamamen malzeme i ilik ve...

Page 3: ...areti bulunmaktad r Cihaz n zellikleri C HAZIN PAR ALARI 1 S k lebilir kapak 2 Tutama 3 zleme penceresi 4 Gev ek malzeme da t c s 5 Haval nd rma 6 Ekmek kal b 7 Hamur kar t rma kolu 8 Pi irme b l m 9...

Page 4: ...ld programlar cihaz n al ma a amalar ile ilgili cetvellerde a klanm t r G VENL K FONKS YONLARI Cihaz kullan ld ktan sonra yeni bir programa ba lamak i in fazla s cak ise BA LA d mesine bas nca ekrand...

Page 5: ...Hamurun kabarmas i in bekletin Son yo urma devrinden sonra ekmek makinesi hamurun kabarmas i in uygun s cakl a kadar s t l r Ekme in kabard a amada kapa kapat p ekmek haz r olana kadar a may n Resiml...

Page 6: ...S YON 2 BEYAZ EKMEK P RME BEYAZ ORTA ESMER HIZLI GRAM 500 g 750 g 1000 g 500 g 750 g 1000 g 500 g 750 g 1000 g 500 g 750 g 1000 g ZAMANLAYICI 15 00 15 00 15 00 15 00 15 00 15 00 15 00 15 00 15 00 15 0...

Page 7: ...GRAM 500 g 750 g 1000 g 500 g 750 g 1000 g 500 g 750 g 1000 g 500 g 750 g 1000 g ZAMANLAYICI 15 00 15 00 15 00 15 00 15 00 15 00 15 00 15 00 15 00 15 00 15 00 15 00 N ISITMA 30 m 30 m 30 m 30 m 30 m 3...

Page 8: ...Bu sayede yap maz kaplama korunacakt r Bu i lemi zaman zaman tekrarlay n Ekmek makinesini saklamadan ya da temizlemeden nce so umas i in bekletin Cihaz n so umas ve tekrar pi irmeye ve yo urmaya haz...

Page 9: ...nden sonra hala s cakt r Ekranda normal program kodu g z kene kadar BA LA DURDUR d mesini bas l tutun Cihaz n fi ini prizden s k n Ekmek kal b n kar p ev s cakl nda so utun Cihaz n fi ini yeniden priz...

Page 10: ...ru yo urduktan sonra 2 4 e b l n Uzun somun ekilleri olu turup kal plar na yerle tirin Hamurda apraz kesikler yap p ekmek makinesine yerle tirin Program HAMUR Yo urma bitince hamuru a p yuvarlak ekli...

Page 11: ...ars pi memi y zey Ekme in hacmi kal ptan b y kt r a f zellikle beyaz ekmek i in fazla un f Fazla maya ya da az tuz a b Fazla eker a b ekerden ba ka tatl malzemeler b Dilimler d zenli de il ya da i ind...

Page 12: ...tah l n eklenmesi lgili programlar kulland n zda sesli sinyali duyduktan sonra bu malzemeleri ekleyebilirsiniz Bu malzemeleri daha erken eklerseniz yo urma s ras nda ezilecektir Tarifler ile ilgili no...

Page 13: ...miktar ndan daha az miktar kullanabilirsiniz 6 Pi irme sonu lar Pi irme sonu lar su sertli i hava nemi rak m malzemelerin yo unlu u gibi artlara ba l d r Bu nedenle tariflerdeki miktarlar belirli ko...

Page 14: ...e metal parts become hot during use Pay special attention while handling the appliance especially if it is full of hot substances DANGER WARNING Risk of injury This appliance can be used by children a...

Page 15: ...n on the rating label Appliance features APPLIANCE ELEMENTS 1 Removable cover 2 Handle 3 Viewing window 4 Loose ingredients dispenser 5 Vents 6 Baking tin 7 Kneading peg 8 Baking compartment 9 Bottom...

Page 16: ...referring to phases of device operation SAFETY FUNCTIONS If the temperature of the appliance is still too high to start a new program after using the appliance previously the symbol E 01 will appear o...

Page 17: ...il the end of baking bread The photos are only intended to present the phases of the dough growth 13 Baking The bread baking machine automatically sets the baking temperature and time If the bread is...

Page 18: ...13 3 18 3 25 3 18 3 23 3 30 2 12 2 17 2 24 FUNCTION 2 BEYAZ EKMEK P RME BEYAZ ORTA ESMER HIZLI GRAM 500 g 750 g 1000 g 500 g 750 g 1000 g 500 g 750 g 1000 g 500 g 750 g 1000 g DELAY TIME 15 00 15 00 1...

Page 19: ...g 750 g 1000 g 500 g 750 g 1000 g 500 g 750 g 1000 g DELAY TIME 15 00 15 00 15 00 15 00 15 00 15 00 15 00 15 00 15 00 15 00 15 00 15 00 N ISITMA 30 m 30 m 30 m 30 m 30 m 30 m 30 m 30 m 30 m 5 m 5 m 5...

Page 20: ...nks to this operation the non stick coating will be protected Repeat this operation from time to time Before storing or cleaning wait to cool down the bread maker It takes about half an hour for the a...

Page 21: ...hot after the previous baking process Press and hold the BA LA DURDUR button until the normal program code appears on the display Unplug the appliance Take out the baking tin and leave to cool at roo...

Page 22: ...KME After kneading split the prepared dough into 2 4 pieces Form long loaves and place them in molds Make the diagonal incises on the dough and place it in bread maker Program HAMUR After the kneading...

Page 23: ...st ingredients e g yogurt g Coarse structure or too many holes in bread Too much water g No salt b Great humidity too hot water h i Too much liquid c Mushroom like unbaked surface Bread volume too big...

Page 24: ...sure the ingredients with the included measuring spoon or spoons used at home if the recipe requires measuring the ingredients in tablespoons and teaspoons Measure the ingredients given in grams corre...

Page 25: ...ss Despite the precise weight indications there may be slight differences The actual weight of the bread depends to a large extent on the air humidity in the room at the moment of preparation Breads w...

Page 26: ...rmunu doldurarak ya da 216 528 91 88 nolu telefona faks ekerek ula abilirsiniz A a da yer alan konulara zen g stermenizi nemle rica ederiz 1 Cihaz n z mutlaka kullanma k lavuzunda belirtilen hususlara...

Reviews: