


10
PSI1165G-001_v01
7
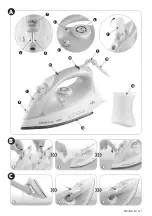
Water Tank Cover
8
Spray Nozzle
9
Bend Protector
10
Power Cord
11
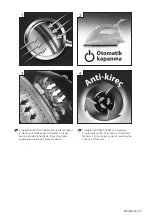
Auto-Off Light
12
Heater Light (red)
13
Water Cup
14
Soleplate
Before first use
1
Unwind and straighten the
Power Cord
.
2
Fill the tank with water. See the “FILLING THE IRON
WATER” section.
3
Plug in the unit.
First use
1
Proceed as described in the “Before first use” section.
2
Turn the
Temperature Dial
clockwise to „●●●”.
3
The
Heater Light
will come on.
The light will go off once the required
temperature is reached.
4
Set the
Steam Control
to position.
5
Place the iron in horizontal position or press the steam
burst button. Steam will come out of the holes in the soleplate.
●
The iron is ready for use.
6
Begin first time ironing with an old towel.
The iron will stop steaming once the water tank
is empty.
Ironing
Always follow the ironing instructions on the
garment’s care label.
FILLING THE IRON WITH WATER
●
Unplug the unit.
1
Set the
Steam Control
to position and lift the
Water
Tank Cover
.
2
Fill the tank with water using the supplied cup.
For best ironing results, it is recommended to
use fresh demineralised or distilled water.
Do not use chemically descaled water or any
other liquids.
Never exceed the ‘Max’ level marked on the
side of the water tank.
3
Close the
Water Tank Cover
.
B
DRY IRONING
1
Proceed as described in the “Before First Use” section.
2
Set the
Steam Control
to position.
3
Turn the
Temperature Dial
to „●”, „●●” or „●●●”.
4
The
Heater Light
will come on.
The light will go off once the required
temperature is reached.
●
The iron is ready for use.
STEAM IRONING
1
Proceed as described in the “Before first use” section.
2
Turn the
Temperature Dial
to „●●” or „●●●”.
For optimum steam quality, do not set the
Temperature Dial to „●” position for steam
ironing.
3
The
Heater Light
will come on.
The light will go off once the required
temperature is reached.
●
The iron is ready for use.
4
Use the
Steam Control
to set the required amount of
steam.
SPRAYING
This function can be used any time without
affecting any other settings.
1
Fill the water tank. See the “FILLING THE IRON WITH
WATER” section.
2
Aim the nozzle at the garment.
3
Press the
Spray Button
.
It may be necessary to press the spray button
a few times to start spraying.
STEAM BURST
This function ensures extra amount of steam to remove
stubborn wrinkles (creases) from the ironed fabrics.
1
Proceed as described in “Before first use” section.
2
Turn the
Temperature Dial
to „●●” or „●●●”.
3
The
Heater Light
will come on.
The light will go off once the required
temperature is reached.
●
The iron is ready for use.
4
Press the
Steam Burst Button
– steam will burst from
the holes of the soleplate.
5
For stubborn wrinkles, wait a few seconds and press
Steam Burst button
again.
Most wrinkles can be removed within three
presses.


