background image

12

PSI1165G-001_v01

The  manufacturer/importer  does  not  accept  any  liability  for  any 

damages resulting from unintended use or improper handling.

The manufacturer/importer reserves his rights to modify the product 

any  time  in  order  to  adjust  it  to  law  regulations,  norms,  directives, 

or  due  to  construction,  trade,  aesthetic  or  other  reasons,  without 

notifying in advance.

13

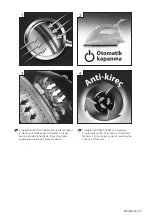
 Wipe the soleplate with a cold damp cloth. 


  The water flowing out of the soleplate is very 

hot. Take extra care when performing the self-

clean operation.

ANTI DRIP


The anti-drip system is designed to prevent water leaking 

from the soleplate when the iron is not sufficiently hot.


When  engaged,  the  anti  drip  system  may  produce 

a clicking sound, particularly during heat-up or when the 

iron is cooling down. This is normal and indicates that the 

system is working correctly.

AUTO OFF

The  iron  has  an  auto-off  feature  in  vertical  and  horizontal 

position which activates automatically when the appliance is 

plugged in and left unattended. 
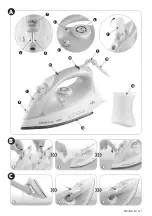
1

 The  iron  will  shut-off  automatically  after  about  30 

seconds  of  inactivity  if  left  on  its  soleplate  (in  horizontal 

position) and after about 8 minutes in vertical position.

2


The Auto-Off Light

 will pulse (flash) which indicates that 

the iron is in the automatic shot-off mode. 

3

 Move the unit to continue ironing. The iron will go back to 

the previous settings and will heat-up again.


  The  iron  will  revert  to  the  previous  settings 

each  time  it  is  used  (moved).  The  iron  will 

heat-up  for  about  60  seconds  up  to  the 

temperature set with the temperature dial.

Cleaning And Maintenance


Unplug the appliance.


Before cleaning, allow the iron to cool completely.


Use a soft cloth and mild detergent for cleaning the iron.


For cleaning the housing, do not use abrasive cleaning 

agents  such  as  emulsions,  creams,  pastes,  etc.  They 

may remove graphic symbols, such as scales, markings, 

warning signs, etc.


Never use sharp or rough objects to remove the deposits 

from the soleplate. 


Never use any abrasive, vinegar or descaling agents to 

clean the soleplate.

Ecology – environment protection

Each user can protect the natural environment. It is neither 

difficult nor expensive.

In order to do it: put the cardboard packing into 

recycling paper container; put the polyethylene 

(PE) bags into container for plastic.

When  worn  out,  dispose  the  appliance  to 

particular  disposal  centre,  because  of  the 

dangerous  elements  of  this  appliance,  which 

can be hazardous for natural environment.

Do not dispose the appliance with the municipal waste!

Summary of Contents for PSI1165G

Page 1: ...PSI1165G PSI1165G KULLANIM KILAVUZU BUHARLI T USER MANUAL STEAM IRON 3 7 8 12 TR EN steam iron BUHARLI T...

Page 2: ...A PSI1165G 001_v01 C B 1 2 3 1 2 3 1 6 5 7 4 2 3 12 9 10 13 14 11 7 8...

Page 3: ...l veya d zg n al m yorsa t y kullanmay n t leme s ras nda veya hemen sonras nda t taban plakas na dokunmay n s cakt r t leme s ras nda ve tamamlanmas ndan hemen sonra sembol ile belirlenen alana temas...

Page 4: ...y n n n tersine do ru evirerek kapat n M N pozisyona ayarlay n t y k sa bir s re i in kullanmak istemiyorsan z buhar reg lat r n ayarlayarak buhar fonksiyonunu kapat n z En az ayda bir kez T N N TABA...

Page 5: ...2 Giysilere p sk rtme k noktas n y neltiniz 3 P sk rtme d mesi bas n z P sk rtme d meye birka kez bast ktan sonra ortaya kabilir t yap s 1 Buhar d zenleyici 2 ok buhar d mesi 3 P sk rtme d mesi 4 Ken...

Page 6: ...da daha s k ger ekle tirmenizi neririz 1 t n n haz rlanmas ad mlar n takip edin 2 S cakl k d zenleyici pozisyonlar na eviriniz 3 Is t c g sterge yanar C OK BUHAR Bu zellik a r buru uk k vr lm malzemel...

Page 7: ...ir y zey zerine yerle tirin ve tamamen so umas n bekleyin 13 t n n tabann nemli bir bez ile siliniz Akan su ok s cakt r zellikle dikkatli olunuz DAMLAMA EMN YET S z nt y nleme sistemi t yeterince s ca...

Page 8: ...st after ironing It is hot Please refer to the following figure 1 and figure 2 Caution Hot surface Figure 1 Right side Figure 2 Left side The appliance generates high temperature Use it carefully and...

Page 9: ...Features 1 Steam Control 2 Steam Burst Button 3 Spray Button 4 Self Clean Button 5 Temperature Indicator 6 Temperature Dial A Never direct the steam to human or pets The iron must not be left unatten...

Page 10: ...over B DRY IRONING 1 Proceed as described in the Before First Use section 2 Set the Steam Control to position 3 Turn the Temperature Dial to or 4 The Heater Light will come on The light will go off on...

Page 11: ...cooled completely store it vertically in a safe place Emptying The Water Tank Set the Steam Control to position Unplug the unit 1 Hold the iron upside down and shake it gently to remove the remaining...

Page 12: ...es in vertical position 2 The Auto Off Light will pulse flash which indicates that the iron is in the automatic shot off mode 3 Move the unit to continue ironing The iron will go back to the previous...

Page 13: ...yaz ma formunu doldurarak ya da 216 528 91 88 nolu telefona faks ekerek ula abilirsiniz A a da yer alan konulara zen g stermenizi nemle rica ederiz 1 Cihaz n z mutlaka kullanma k lavuzunda belirtilen...

Page 14: ...lcili i ithalat s veya imalat reticisinden birisinin d zenleyece i raporla ar zan n tamiri m mk n bulunmad n n belirlenmesi durumlar nda t ketici mal n cretsiz de i tirilmesini bedel iadesi veya ay p...

Page 15: ...PSI1165G 001_v01 Notes...

Page 16: ...G venli otomatik kapanma zelli i 3 Kendi kendini temizleme zelli i 4 Kire olu mas n engelleyen entegre anti kalsiyum sistemi 1 Reinforced PRO STEAM iron soleplate 2 Automatic switch off function 3 Se...

Reviews: