CARE AND MAINTENANCE
Stainless Steel Exterior
Never clean the stainless steel exterior when it is hot. After the
initial grilling, certain areas of the grill may discolor. This is a
normal discoloration caused by the intense heat given off by the
burners.
After the grill has cooled, routine cleaning is done with warm
soapy water applied with a sponge or soft cloth. Always rinse
with clean hot water and wipe dry with a soft cloth.
Specks of grease can gather on the surface of the stainless steel
and get baked-on. These stubborn stains can be removed with a
mild non-scratching abrasive household powder. Add a small
amount of vinegar to the scouring powder to increase its potency.
Always scrub in the direction of the grain.
Commercial stainless steel cleaner and polishers also work well,
such as MHP’s Stainless Steel Cleaner (Part #SSC). Do not use
steel wool to clean stainless steel.
NOTE: Over time the
stainless steel will turn a mild gold patina from the grill’s
heat. This is normal.
Grill Interior Cleaning
Turn all grill burners on “HIGH”. Do not turn on the Rotisserie
Burner if Equipped. Let the grill heat for 15 minutes or so with the
lid closed. Turn burners “OFF” and allow the grill to cool com-
pletely.
Cooking Grids:
After the grill has cooled, use a brass bristle long
handle brush to scrub the cooking grids. Wipe out the inside of
the grill with a sponge, SOS pad and water. A putty knife can be
used to scrape off thicker debris.
Drip Tray:
The drip tray will collect grease from the grill area and
spills from the side burners. Do not attempt to remove or clean
until thoroughly cooled. Slide the tray out and wipe it clean. Make
sure the drip tray is fully inserted back into the grill. To avoid a
grease fire, the drip tray should be cleaned after every use.
Burners:
The burners are constructed of stainless steel and
should only require minimal maintenance. However, they should
be checked every 6 months and cleaned if needed.
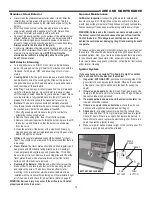
1. Shut off gas supply and make sure the grill is cool before
attempting to check the burners.
2. Remove the cooking grids, then lift out the flavor plates.
3. Remove the mounting screw holding the burner in place then lift
the burner up and forward so that the burner is pulled away
from the valve.
4. Clean the exterior of the burner with a wire brush. Clear any
clogged gas ports with a straightened paper clip. Shake out any
debris through the air shutter.
Orifices:
No regular maintenance should be needed for the ori-
fices. They should only be removed if it is determined that there is
a blockage.
Flavor Plates:
The flavor plates should be cleaned regularly as it
has grease and other debris falling directly on to it. Keeping it
clean will greatly reduce flare-ups and grease fires. TO CLEAN;
Be sure the grill is cool. Remove the cooking grids and lift out the
flavor plates. Brush with a steel wire brush until all the carbon
build up and other debris are removed.
Replacing The Burners:
Slide the end with air shutter over the
brass orifice. Then place the burner onto the mounting bracket
and replace the screw. The burners have an offset hole for
mounting to the rear bracket, which will allow the burner to be
installed with the crossover holes facing up. Once reinstalled, light
all of the burners and check for proper flame. (Refer to page 8)
WARNING: Serious injury may occur if the orifice is not located
properly seated into the burner.
12
General Maintenance
Grill Burner Inspection:
Inspect the grill burners for spiders and
insects once a year or if the grill has not been used for more than a
month. Inspect the grill burners if the grill does not reach temperature,
heats unevenly or flames appear yellow along with the smell of gas.
WARNING: Spiders and other insects can nest and spin webs in
the burner venturi tubes which causes the gas to flow from the
front of the burner. This dangerous condition can cause a fire
behind the control panel, damaging the grill and making it unsafe
to operate.
To remove spider webs and/or other obstructions, you must clean out
the venturis. This should be done routinely if the grill has sat idle for
extended periods. Also, if you live in an area where spiders are plenti-
ful, you should clean the venturis often, especially in the fall when
there is an increase in egg sack production. Follow Burner instructions
under Interior Cleaning.
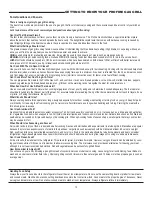
SPARK
MODULE
BEZEL
“AAA”
BATTERY
PUSH
BUTTON
+
Ignitor System
BATTERY REPLACEMENT
If you experience an occasional “No-Spark, No Light” condition
here’s a check list to troubleshoot the problem
1.
Inspection: WITH GAS OFF,
position a mirror along side of the
gas collector box and press ignitor button. Observe the condition
of the spark. (Low light conditions are the best for seeing the
spark).
2. If there’s a good spark,
but the grill won’t light, gas may not be
flowing to the burner and into the collector box. The gas orifice or
the venturi tube may be blocked.
3. If a weak spark arcs down around the ceramic insulator,
the
insulator should be cleaned.
4. If there is no spark in the collector box,
check the wire con-
nections at the ignitor and electrode under the grill.
5. Check spark,
by pulling connector wire from the collector box.
Hold wire end about 1/8” from grill metal part and operate ignitor.
Check for spark. If there is no spark, first replace the battery, if
there still isn’t a spark, replace the electronic ignitor. If there is a
spark the electronic ignitor is okay.
6.
Make sure ignitor button module is tight on the control panel. If it
is loose a good ground will not be attained.


