background image

©2020 Hot Melt Technologies, Inc


Page 7

Proflex

®

 G9-4

Temperature and System Controls

Operating Instructions

8

9

Zone Temp and Status Display buttons:

  Press and hold any 

zone button, (e.g. Tank, Hose, Gun, Grid) to display the set 
temperature, then release to see the actual temperature.  
The selected zone’s status (Sensor Fault, Ready, etc.) will also 
be displayed in the Zone Status area.

Hose/Gun On/Off buttons:

 Turns the power ON or OFF to each 

hose/gun group individually. The LED illuminates accordingly.

Front Panel Lock: 

Used to secure the front panel. To enhance 

the systems tamper resistance, a key lock option is available.

Auto Standby Timer

*


 To change, place Set/Run switch in set position. Push the 

Auto Standby button and use the “+” and “–” arrows to 
adjust from 0 to 5 hours. Return the Set/Run to run position.

Power OFF Timer

:

 To change, place Set/Run switch in set position. Push the 

Power Off button and use the “+” and “–” arrows to adjust 
from 0 to 5 hours. Return the Set/Run to run position.

Manual Standby

*

:

 If activated, LED will light and all 

temperatures will lower to set % value.

 To change % of standby, place Set/Run switch in set 

position. Push the Temperature Set Back Control button  
and use the “+” and “–” arrows to adjust from 20% to 70%. 
Return the Set/Run switch to run position. The programmed 
% applies to both Auto and Manual Standby.

Pump Ready Delay Timer

*

:

 If additional melted adhesive is 

needed, this feature adds up to 60 minutes of time before 
allowing the pump motor to work.

 To change, place Set/Run switch in set position. Push the 

Pump Ready delay button and use the “+” and “–” arrows  
to adjust from 0 to 60 minutes. Return the Set/Run switch  
to run position.

Pump Ready:

 The pump motor will not operate until  

the actual tank temperature is within 25°F (14°C) 


of set temperature.

Pump ON/OFF Switch:

 The pump will only operate when: this 

switch is ON, the “READY” LED is lit (see #14 above), and a 
trigger input is provided.

Set/Run switch

*

:

 Should be in Run Mode during normal 

operation. Place in Set Mode to change set temperatures 
of any zone, (e.g. Tank, Hose, Gun, Grid) or values of other 
features (e.g. High Limit, Auto Standby Timer, etc.). Return 

switch to Run Mode when finished with adjustment(s).

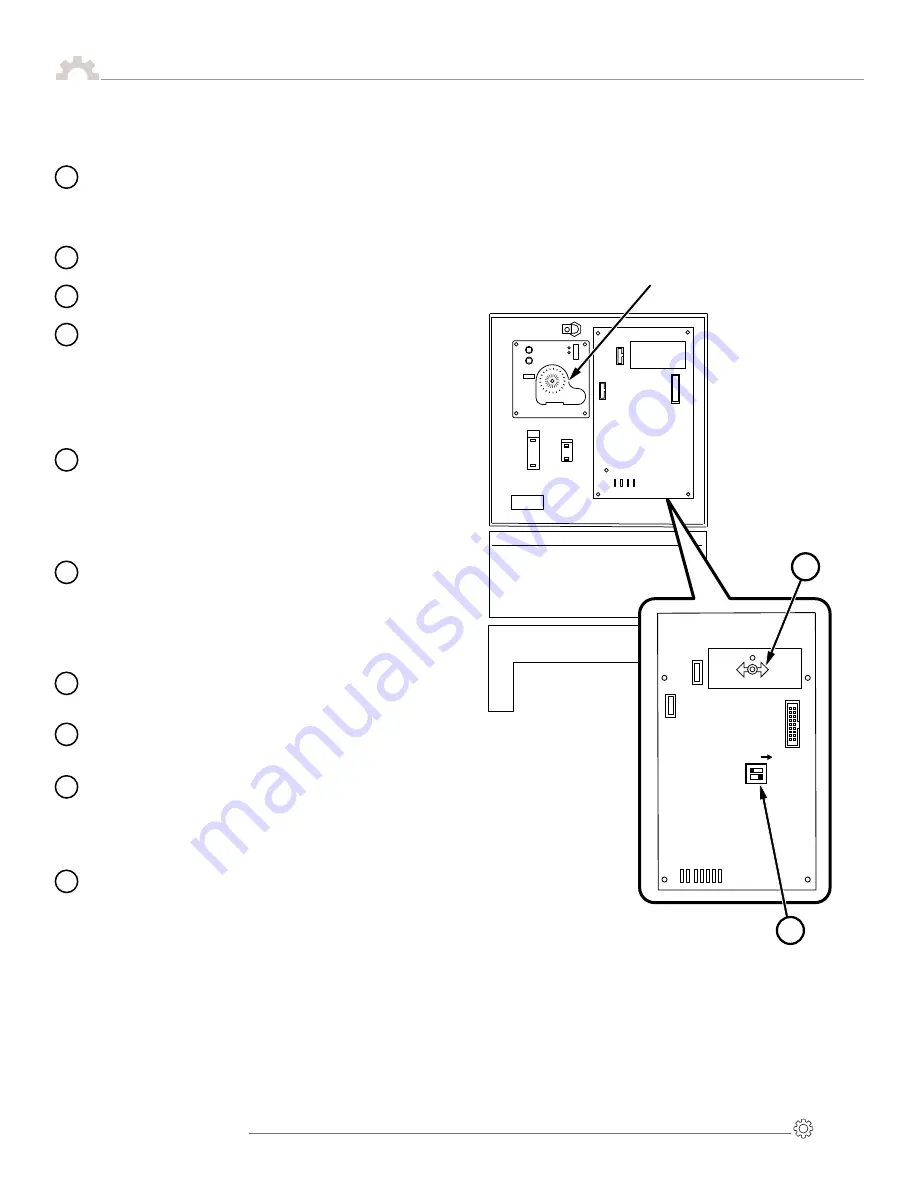
All Zone Ready:

 To restrict operation of the pump until  

all active zones, (e.g., Tank, Hose and Gun) have reached  
their respective Ready Temp, set the All Zone Ready dip  
switch to ON. 

°F vs °C:

 Dip switch used to change from °F or °C 


(default is Fahrenheit) For Celsius set the switch to ON.

10

11

12

13

14

15

17

16

Set Mode                                Run Mode

ALL ZONE READY

CELSIUS

ON

16

17

Optional 24-7 Timer
(934-247)

*System will return to normal operation if no adjustments are made for 15 seconds.  

Set Mode LED on front panel will flash, indicating switch is still in Set Mode position.

07/08/20 Rev A

Summary of Contents for G9

Page 1: ...ion Temperature Controls Microprocessor 4th Gen 4 Hose 4 Gun Single Motor Pump Voltage Requirements 220 VAC Single Phase 40 A 07 08 20 Rev A 1723 W Hamlin Rd Rochester Hills MI 48309 248 853 2011 www hotmelt tech com No One Puts It Together Like HMT ...

Page 2: ...ardware of HMT products are permitted Only use original spare parts original accessories or standard parts that have been approved by HMT The instructions are part of this product No applications other than those described in the instructions are permitted Improper Use Examples of misuse of the product include Melting and pumping of unsuitable adhesives e g PUR Polyurethane hot melt adhesives In d...

Page 3: ...et Up 4 5 Operating Instructions 6 8 Front Panel Controls 6 Temperature and System Controls 7 Front Panel 8 Electrical 9 10 Fuse Relay Chart 9 Schematic 10 Warranty Information 11 2020 Hot Melt Technologies Inc Page 3 Proflex G9 4 ...

Page 4: ... and or servicing hot melt equipment Before installing any hot melt equipment determine proper electrical requirements per all applicable codes At Hot Melt Technologies we pay special attention to the needs of operators and service personnel when designing equipment but molten hot melt adhesives are dangerous and can cause severe burns Extreme care must be exercised to insure personnel safety Fire...

Page 5: ...the system to share the same circuit with other electrical items A dedicated supply is recommended Do not use an extension cord If you change the configuration of your system in any way that may affect the electrical requirements ex add a gun longer hose automate etc call HMT Technical Service Support at 248 853 2011 for assistance L2 L1 G L2 L1 G L2 R L1 B G G 220 VAC Single Phase Control Box Pro...

Page 6: ... Main Power Switch OFF then ON again All zones will default to the new High Limit and must be reset Arrow keys and Set Mode LED See 4 11 12 13 and 16 for usage Zone Status Sensor Fault The LED will light and indicate that no RTD sensor input is present in the selected zone Over Temp The LED will light and affected zone LED will blink if temperature exceeds High Limit by 25 F 14 C The audible Over ...

Page 7: ...he programmed applies to both Auto and Manual Standby Pump Ready Delay Timer If additional melted adhesive is needed this feature adds up to 60 minutes of time before allowing the pump motor to work To change place Set Run switch in set position Push the Pump Ready delay button and use the and arrows to adjust from 0 to 60 minutes Return the Set Run switch to run position Pump Ready The pump motor...

Page 8: ... 3 4 3 4 6 7 4 5 3 1 2 BILL OF MATERIALS ITEM DESCRIPTION PART NO QTY 1 Control Box Assembly 934 912 1 2 Pump Switch 10 A 211 010 1 3 Main Power Switch 40 A 220 VAC 211 017 1 4 Service Clock 243 004 1 5 Over Temp Alarm 243 006 1 6 Decal 340 143 1 7a Front Panel Latch Non Locking 340 030 1 7b Front Panel Latch Locking Optional 340 032 1 07 08 20 Rev A Front Panel ...

Page 9: ... F3 F4 Transformer Secondary 1 A 125 VAC GMA 214 101 F5 F7 A C Motor 1 D C Motor 1 5 A 125 VAC GMA 8 A 125 VAC GMA 214 105 214 108 F6 F8 Accessory Output 2 A 125 VAC GMA 214 102 Temp Control Board to Sensor Board Cable 220 048 Not shown Set Mode Run Mode F9 F7 F10 F8 F4 F2 F1 F3 CR5 F16 F15 F7 F8 HOSE GUN HOSE GUN F9 F10 HOSE GUN F17 F18 HOSE GUN HOSE GUN F5 F6 HOSE GUN HOSE GUN F13 F14 F11 F12 F3...

Page 10: ...151 152 153 154 154 156 SR SR 178 132 128A 177 131 127A 108 107 179 164 109 2CR 110 111 114 115 117 118 121 122 124 125 169 170 171 172 173 174 175 176 F10 Accessory 2 F8 Accessory 1 F7 Motor Motor Switch Pump Motor C4 3 C4 4 C1 2 C1 3 C2 8 C2 9 C2 10 C2 11 C3 8 C3 9 C3 10 C3 11 C8 8 C8 9 C8 10 C8 11 C9 8 C9 9 C9 10 C9 11 104A 103A 178 177 179 133 134 139 135 Over Temp Safety Relay C6 9 F9 Hose 4 ...

Page 11: ...is adhesive dispensing system is equipped with a Ground Fault Equipment Protector GFEP that has been installed on the circuit powering the hose and gun zones This GFEP is designed to protect the hoses from an unintended ground fault GFEP must be switched ON Indicator window RED for hose and gun zones to heat If a ground fault is detected on any hose or gun zone the GFEP will switch OFF Indicator w...

Page 12: ...y to any damage to the ASU that is the result of improper maintenance or installation This warranty does not cover any ASU that has been altered or modified by the customer In addition the warranty does not extend to repairs made necessary by normal wear or by the use of hot melt materials in the ASU which in the reasonable opinion of HMT are either incompatible with the ASU or adversely affect it...

Reviews: