background image

16

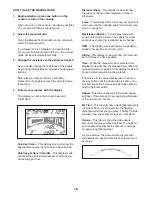
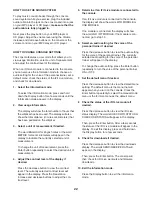
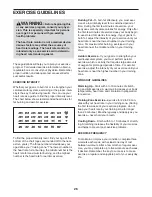
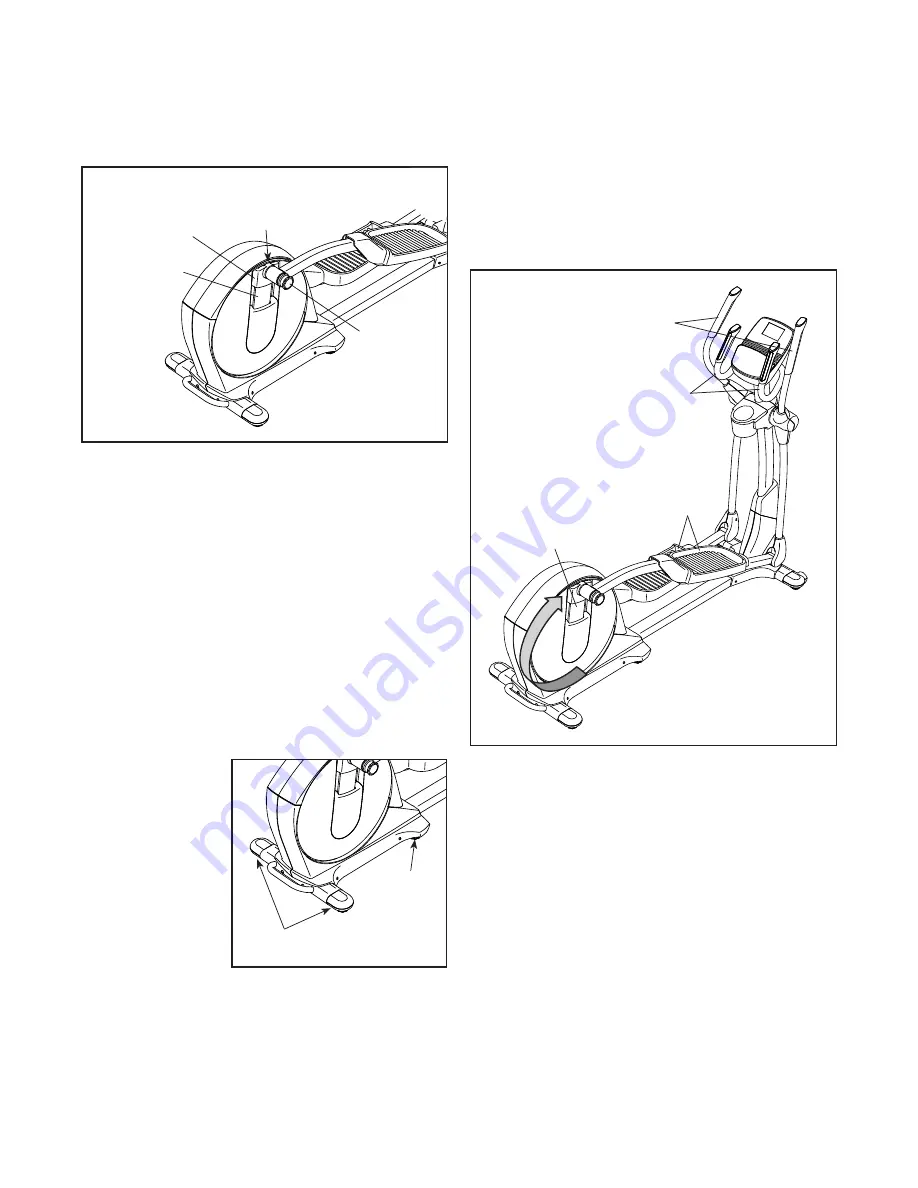
HOW TO ADJUST THE STRIDE LENGTH

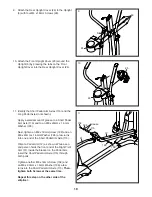
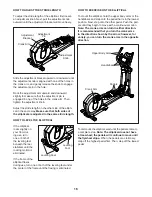
To adjust the stride length of the elliptical, first loosen 
an adjustment knob. Next, pull the adjustment knob 
outward until the adjustment bracket will move freely. 

Slide the adjustment bracket upward or downward until 
the adjustment knob is aligned with one of the holes in 
the crank arm, and gently release the knob to engage 
the adjustment pin in the hole. 

Rock the adjustment arm upward and downward 
slightly to make sure that the adjustment pin is 
engaged in one of the holes in the crank arm. Then, 
tighten the adjustment knob.

Adjust the stride length on the other side of the ellipti-
cal in the same way. 

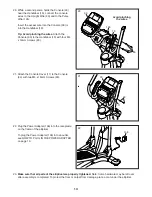
Make sure that both sides of 

the elliptical are adjusted to the same stride length.

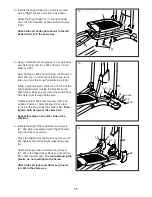
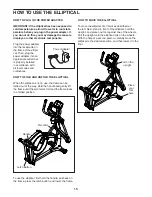
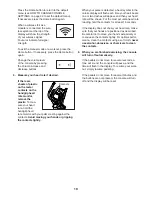
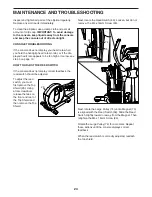
HOW TO LEVEL THE ELLIPTICAL

If the elliptical 
rocks slightly on 
your floor dur-
ing use, turn 
one or both of 
the leveling feet 
beneath the rear 
stabilizer until the 
rocking motion is 
eliminated.

If the frame of the 
elliptical flexes 
during use, turn one or both of the leveling feet under 
the center of the frame until the flexing is eliminated.

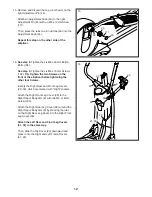
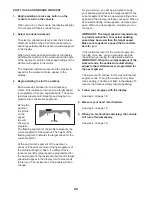
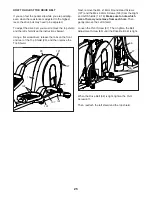
HOW TO EXERCISE ON THE ELLIPTICAL

To mount the elliptical, hold the upper body arms or the 
handlebars and step onto the pedal that is in the lowest 
position.


Next, step onto the other pedal. Push the ped-

als until they begin to move with a continuous motion. 

Note: The crank arms can turn in either direction. 
It is recommended that you turn the crank arms 
in the direction shown by the arrow; however, for 
variety, you can turn the crank arms in the opposite 
direction.

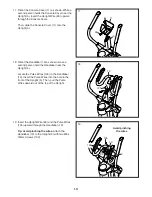
To dismount the elliptical, wait until the pedals come to 
a complete stop. 

Note: The elliptical does not have 

a free wheel; the pedals will continue to move until 
the flywheel stops.

 When the pedals are stationary, 

step off the highest pedal first. Then, step off the lowest 
pedal. 

Pedals

Crank Arm

Handlebars

Upper Body Arms

Leveling Feet

Leveling 

Foot

Adjustment 

Knob

Adjustment 

Pin

Adjustment 

Bracket

Crank Arm

Summary of Contents for 10.0 Ce Elliptical

Page 1: ...No Write the serial number in the space above for reference QUESTIONS If you have questions or if parts are damaged or missing DO NOT CONTACT THE STORE please contact Customer Care IMPORTANT Please r...

Page 2: ...ent decal Apply the decal in the loca tion shown Note The decal s may not be shown at actual size TABLE OF CONTENTS WARNING DECAL PLACEMENT 2 IMPORTANT PRECAUTIONS 3 BEFORE YOU BEGIN 4 PART IDENTIFICA...

Page 3: ...each side To protect the floor or carpet from dam age place a mat under the elliptical 7 Inspect and properly tighten all parts regu larly Replace any worn parts immediately 8 Keep children under age...

Page 4: ...this manual please see the front cover of this manual To help us assist you note the product model number and serial number before contacting us The model number and the location of the serial number...

Page 5: ...tton Screw 123 6 M10 x 120mm Screw 100 4 PART IDENTIFICATION CHART Use the drawings below to identify the small parts needed for assembly The number in parentheses below each drawing is the key number...

Page 6: ...do not use power tools ASSEMBLY 2 Identify and orient the Front Stabilizer 3 as shown While a second person lifts the Frame 1 attach the Front Stabilizer 3 to the Frame with two M10 x 120mm Screws 100...

Page 7: ...32 4 Identify and orient the Upright 5 and the Top Cover 23 as shown Slide the Top Cover upward onto the Upright Have a second person hold the Upright 5 and the Top Cover 23 near the Frame 1 Connect t...

Page 8: ...2 131 102 131 102 6 Identify the Right Upper Body Arm 8 and the Right Upper Body Leg 6 which are marked with R stickers and orient them as shown Insert the Right Upper Body Arm 8 into the Right Upper...

Page 9: ...ight Axle 48 into the Upright 5 and center it Slide a Wave Washer 118 onto each end of the Upright Axle Slide the Right and Left Upper Body Arms 8 9 onto the Upright Axle 48 8 At the same time tighten...

Page 10: ...rm Axle 115 and to an M8 x 23mm x 1 5mm Washer 126 Next tighten an M8 x 16mm Screw 102 and an M8 x 23mm x 1 5mm Washer 126 a few turns into one end of the Short Pedal Arm Axle 115 Orient a Pedal Arm 1...

Page 11: ...2 inside the bracket on the Right Upper Body Leg 6 insert the Long Pedal Arm Axle 106 through both parts Tighten another M8 x 16mm Screw 102 and an M8 x 23mm x 1 5mm Washer 126 a few turns into the Lo...

Page 12: ...en the two Screws on the front of the elliptical before tightening the other four Screws Identify the Right Rear and Front Leg Covers 29 30 which are marked with Right stickers Attach the Right Front...

Page 13: ...lebar 10 as shown Have a second person hold the Handlebar near the Upright 5 Locate the Pulse Wires 135 in the Handlebar 10 Insert the Pulse Wires into the hole in the front of the Upright 5 Then pull...

Page 14: ...s 93 21 Attach the Console Cover 11 to the Console 33 with two M4 x 16mm Screws 93 22 Plug the Power Adapter 136 into the receptacle on the frame of the elliptical To plug the Power Adapter 136 into a...

Page 15: ...en the elliptical is not in use the frame can be folded out of the way Hold the handle and gently lift the frame until the pivot arms fold and the frame locks in a folded position To use the elliptica...

Page 16: ...stabilizer until the rocking motion is eliminated If the frame of the elliptical flexes during use turn one or both of the leveling feet under the center of the frame until the flexing is eliminated H...

Page 17: ...o features an iFit Live mode that enables the console to communicate with your wireless network through an optional iFit Live module With the iFit Live mode you can download personalized work outs cre...

Page 18: ...our heart rate when you use the handgrip heart rate monitor see step 5 on page 19 Resistance Resist This display mode will show the resistance level of the pedals for a few seconds each time the resis...

Page 19: ...ing your hands or gripping the contacts tightly When your pulse is detected a heart symbol in the calorie display will flash each time your heart beats one or two dashes will appear and then your hear...

Page 20: ...nt of the profile will begin to flash If a different resis tance level and or target speed is programmed for the next segment the resistance level and or target speed will appear in the display for a...

Page 21: ...n a race that you have previously scheduled For more information on the iFit Live workouts please see www iFit com When you select an iFit Live workout the display will show the duration of the workou...

Page 22: ...the decrease button to view the contrast level The currently selected contrast level will appear in the display Press the Resistance increase and decrease buttons to adjust the con trast level 5 Deter...

Page 23: ...equipment does cause harmful interference to radio or television reception which can be determined by turning the equipment off and on try to correct the interference by one or more of the following m...

Page 24: ...sole does not display correct feedback the reed switch should be adjusted To adjust the reed switch you must first remove the Top Shield 20 Using a flat screwdriver release the tabs on the front and r...

Page 25: ...e front and rear of the Top Shield 20 and then remove the Top Shield Next remove the M4 x 16mm Round Head Screws 127 and the M4 x 42mm Screws 124 from the Right and Left Shields 18 19 Make sure to not...

Page 26: ...c Exercise If your goal is to strengthen your cardiovascular system you must perform aerobic exercise which is activity that requires large amounts of oxygen for prolonged periods of time For aerobic...

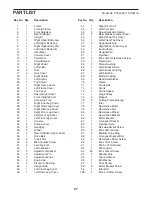
Page 27: ...Adjustment Knob 46 2 Knob Cap 47 4 Pivot Arm Bushing 48 1 Upright Axle 49 1 Left Inner Leg Cover 50 1 Left Outer Leg Cover 51 1 Right Pivot Arm 52 1 Left Pivot Arm 53 2 Adjustment Arm Spring 54 2 Rear...

Page 28: ...m x 1mm Washer 111 10 M6 x 12mm Screw 112 1 M5 Washer 113 2 Adjustment Bracket Cover 114 2 Pedal Plate 115 2 Short Pedal Arm Axle 116 2 Large Bumper 117 4 Pivot Arm Bushing 118 2 Wave Washer 119 4 Ped...

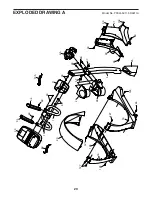
Page 29: ...29 EXPLODED DRAWING A 93 93 5 24 26 11 10 34 59 25 93 93 93 93 93 57 57 34 33 23 93 93 93 22 93 21 102 20 124 124 18 19 124 124 127 127 127 132 135 Model No PFEL55911 0 R0911A...

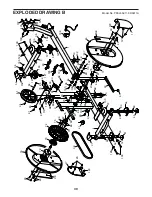
Page 30: ...0 110 102 65 102 66 64 108 107 64 63 108 107 86 86 87 76 73 74 75 75 76 87 71 122 100 133 4 72 93 56 70 69 60 38 16 39 40 17 16 1 17 39 40 40 102 102 102 37 37 100 40 120 120 120 120 36 55 58 105 105...

Page 31: ...116 117 117 115 102 111 111 117 117 116 115 102 126 123 126 102 123 119 126 102 126 102 106 126 102 126 102 57 35 9 15 12 43 53 44 111 111 45 47 47 44 52 46 53 43 47 51 45 111 111 12 14 47 46 28 27 6...

Page 32: ...direct special or consequential damages arising out of or in con nection with the use or performance of the product damages with respect to any economic loss loss of property loss of revenues or profi...

Reviews: