background image

11

OPERATION AND ADJUSTMENT

THE PRE-LUBRICATED WALKING BELT

Your treadmill features a walking belt coated with high-

performance lubricant.

IMPORTANT: Never apply sil-

icone spray or other substances to the walking

belt or the walking platform. Such substances will

cause excessive wear.

HOW TO PLUG IN THE POWER CORD

Your treadmill, like other electronic equipment, can be

damaged by sudden voltage changes in your homeʼs

power.

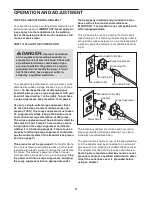
To decrease the risk of damaging your

treadmill, always use a surge suppressor with your

treadmill (see drawing 1 at the right). To purchase

a surge suppressor, see precaution 12 on page 3.

Use only a single-outlet surge suppressor that is

UL 1449 listed as a transient voltage surge sup-

pressor (TVSS). The surge suppressor must have a

UL suppressed voltage rating of 400 volts or less

and a minimum surge dissipation of 450 joules.

The surge suppressor must be electrically rated for

120 volts AC and 15 amps. There must be a moni-

toring light on the surge suppressor to indicate

whether it is functioning properly. Failure to use a

properly functioning surge suppressor could dam-

age the control system of the treadmill (see precau-

tion 13 on page 3).

This product must be grounded.

If it should malfunc-

tion or break down, grounding provides a path of least

resistance for electric current to reduce the risk of elec-

tric shock. This productʼs power cord has an equip-

ment-grounding conductor and a grounding plug.

Plug

the power cord into a surge suppressor, and plug

the surge suppressor into an appropriate outlet

that is properly installed and grounded in accor-

dance with all local codes and ordinances.

IMPORTANT: The treadmill is not compatible with

GFCI-equipped outlets.

This product is for use on a nominal 120-volt circuit

(see drawing 1). A temporary adapter may be used to

connect the surge suppressor to a 2-pole receptacle if

a properly grounded outlet is not available (see draw-

ing 2).

The temporary adapter should be used only until a

properly grounded outlet (see drawing 1) can be in-

stalled by a qualified electrician.

The green-colored rigid ear, lug, or the like extending

from the adapter must be connected to a permanent

ground such as a properly grounded outlet box cover.

The adapter must be held in place by a metal screw.

Some 2-pole receptacle outlet box covers are not

grounded. Contact a qualified electrician to deter-

mine if the outlet box cover is grounded before

using an adapter.

DANGER:

Improper connection

of the equipment-grounding conductor in-

creases the risk of electric shock. Check with

a qualified electrician or serviceman if you

are unsure whether the product is properly

grounded. Do not modify the plug—if it will

not fit the outlet, have a proper outlet in-

stalled by a qualified electrician.

1

2

Grounded Outlet Box

Grounded Outlet Box

Grounding Plug

Surge Suppressor

Surge Suppressor

Grounding Pin

Adapter

Lug

Metal Screw

Grounded Outlet

Grounding Pin

Grounding Plug

Summary of Contents for 1205 Cst Treadmill

Page 1: ...number in the space above for reference QUESTIONS If you have questions or if parts are damaged or missing DO NOT CON TACT THE STORE please contact Customer Care IMPORTANT Please register this produc...

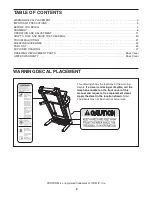
Page 2: ...D DRAWING 27 ORDERING REPLACEMENT PARTS Back Cover LIMITED WARRANTY Back Cover 2 This drawing shows the locations of the warning decals If a decal is missing or illegible call the telephone number on...

Page 3: ...rge sup pressor not included and plug the surge suppressor into a grounded circuit capable of carrying 15 or more amps No other appli ance should be on the same circuit Do not use an extension cord 12...

Page 4: ...fely lift 45 lbs 20 kg to raise lower or move the treadmill 22 Do not change the incline of the treadmill by placing objects under the treadmill 23 Inspect and properly tighten all parts of the treadm...

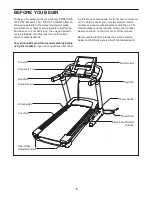
Page 5: ...he treadmill If you have questions after read ing this manual please see the front cover of this man ual To help us assist you note the product model number and serial number before contacting us The...

Page 6: ...n top of the walking belt simply wipe off the lubricant with a soft cloth and a mild non abrasive cleaner Assembly requires the included hex keys and your own Phillips screwdriver and adjustable wrenc...

Page 7: ...8 Star Washers 6 Note It may be neces sary to tip the top of the Right Upright forward slightly as you thread the Patch Bolts into it Do not tighten the Patch Bolts yet Attach the Left Upright 91 in...

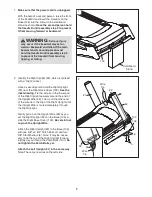
Page 8: ...THE POWER Next remove the wire tie from the Upright Wire Insert the connectors down into the Right Upright 92 114 Console Assembly 4 92 93 91 114 Wire Tie 93 3 With the help of a second person lower...

Page 9: ...3 8 x 1 1 4 Patch Bolts 2 91 92 2 2 6 6 6 7 Slide the Right Upright Sleeve 90 up against the console assembly Attach the Right Upright Sleeve with two 8 x 3 4 Tek Screws 24 Attach the Left Upright Sle...

Page 10: ...o move the Frame back and forth to align the Storage Latch with the bracket Lower the Frame 67 see HOW TO LOWER THE TREADMILL FOR USE on page 20 7 7 Large Barrel 103 4 67 3 87 8 10 Make sure that all...

Page 11: ...power cord has an equip ment grounding conductor and a grounding plug Plug the power cord into a surge suppressor and plug the surge suppressor into an appropriate outlet that is properly installed an...

Page 12: ...ed workouts create your own workouts track your work out results and access many other features To pur chase an iFit Live module at any time go to www iFit com or call the telephone number on the fron...

Page 13: ...UAL MODE 1 Insert the key into the console See HOW TO TURN ON THE POWER at the left 2 Select the manual mode Each time the key is in serted the main menu will appear To select the manual mode use the...

Page 14: ...step 6 on this page Regardless of which display mode you select the speed and incline settings will appear in the speed and incline displays 6 Measure your heart rate if desired Before using the handg...

Page 15: ...ile represents the cur rent segment of the workout The height of the flashing segment indicates the speed setting for the current segment At the end of each segment a series of tones will sound If a n...

Page 16: ...d for each segment 3 Start the walking belt and program the desired speed and incline settings Press the Enter button to start the workout A mo ment after you press the button the walking belt will be...

Page 17: ...t of the workout a series of tones will sound If a different speed and or incline setting is programmed for the second segment the speed and or incline setting will appear in the display for a moment...

Page 18: ...he optional iFit Live module To select the information mode hold down the Stop button insert the key into the console and then re lease the Stop button When the information mode is selected the follow...

Page 19: ...the console If you are using a personal CD player and the CD skips set the CD player on the floor or another flat surface instead of on the console HOW TO ADJUST THE CUSHIONING SYSTEM Remove the key...

Page 20: ...latch knob is locked in the storage position Moving the tread mill may require two people 1 Hold the frame and one of the handrails and place one foot against a wheel 2 Pull back on the handrail unti...

Page 21: ...a Check the power switch see the drawing above If the switch has tripped wait for five minutes and then press the switch back in b Make sure that the power cord is plugged in If the power cord is plug...

Page 22: ...king belt slows when walked on SOLUTION a Use only a single outlet surge suppressor that meets all of the specifications described on page 11 b If the walking belt is overtightened treadmill perfor ma...

Page 23: ...urn When the walking belt is correctly tight ened you should be able to lift each edge of the walking belt 3 to 4 in 8 to 10 cm off the walking platform Be careful to keep the walking belt cen tered T...

Page 24: ...If your goal is to strengthen your cardiovascular system you must perform aerobic exer cise which is activity that requires large amounts of oxygen for prolonged periods of time For aerobic ex ercise...

Page 25: ...t Pulse Grip 40 4 Handrail Cover Fastener 41 1 Left Foot Insert 42 2 Rear Wheel Axle 43 4 Rear Wheel 44 4 Caution Decal 45 1 Right Foot Insert 46 1 Rear Foot 47 2 Platform Cushion 48 2 Cushion Track 4...

Page 26: ...e 107 2 Console Ground Wire 108 1 Console Plate 109 2 Handrail Cap 110 1 Handrail 111 2 Handrail Grip 112 2 Console Clamp 113 1 Speaker Cover 114 1 Console Wire User s Manual Note Specifications are s...

Page 27: ...54 1 1 1 1 24 1 20 21 55 56 57 20 52 14 38 32 67 34 30 62 16 35 66 65 70 30 34 23 23 30 34 61 53 63 32 15 15 38 64 71 23 43 43 1 1 72 1 1 42 42 46 41 45 44 24 24 47 47 48 12 12 12 12 12 96 12 12 12 4...

Page 28: ...77 7 11 76 13 7 79 80 1 75 37 37 84 81 82 19 19 19 87 3 7 4 7 83 78 95 85 19 19 19 1 1 1 74 28 EXPLODED DRAWING B Model No PFTL13810 0 R1010A...

Page 29: ...101 22 44 44 101 22 7 2 44 7 7 29 105 29 105 89 90 93 93 1 1 29 105 1 1 1 1 1 100 102 24 6 5 5 64 33 33 33 2 2 2 6 6 6 6 6 6 23 23 29 105 33 24 24 24 24 98 97 99 29 EXPLODED DRAWING C Model No PFTL138...

Page 30: ...110 111 40 40 26 26 28 1 1 1 1 108 25 112 112 25 28 107 9 16 1 16 26 26 1 109 109 111 107 9 1 1 30 EXPLODED DRAWING D Model No PFTL13810 0 R1010A...

Page 31: ...86 36 1 106 26 1 1 1 39 31 27 114 94 16 113 1 1 16 16 16 16 26 1 1 88 31 EXPLODED DRAWING E Model No PFTL13810 0 R1010A...

Page 32: ...rip charge This warranty does not extend to any damage to a product caused by or attributable to freight damage abuse misuse improper or abnormal usage or repairs not provided by an ICON authorized se...

Reviews: