background image

4

BEFORE YOU BEGIN

Thank you for selecting the new PROFORM XP 160

elliptical exerciser. The PROFORM XP 160 elliptical

exerciser provides a wide array of features designed

to make your workouts at home more effective and

enjoyable.

For your benefit, read this manual carefully before

you use the elliptical exerciser. If you have ques-

tions after reading this manual, please see the front

cover of this manual. To help us assist you, note the

product model number and serial number before con-

tacting us. The model number is 831.28645.0. The

serial number can be found on a decal attached to the

elliptical exerciser (see the front cover of this manual

for the location of the decal).

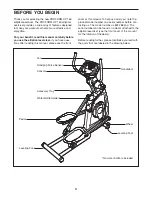
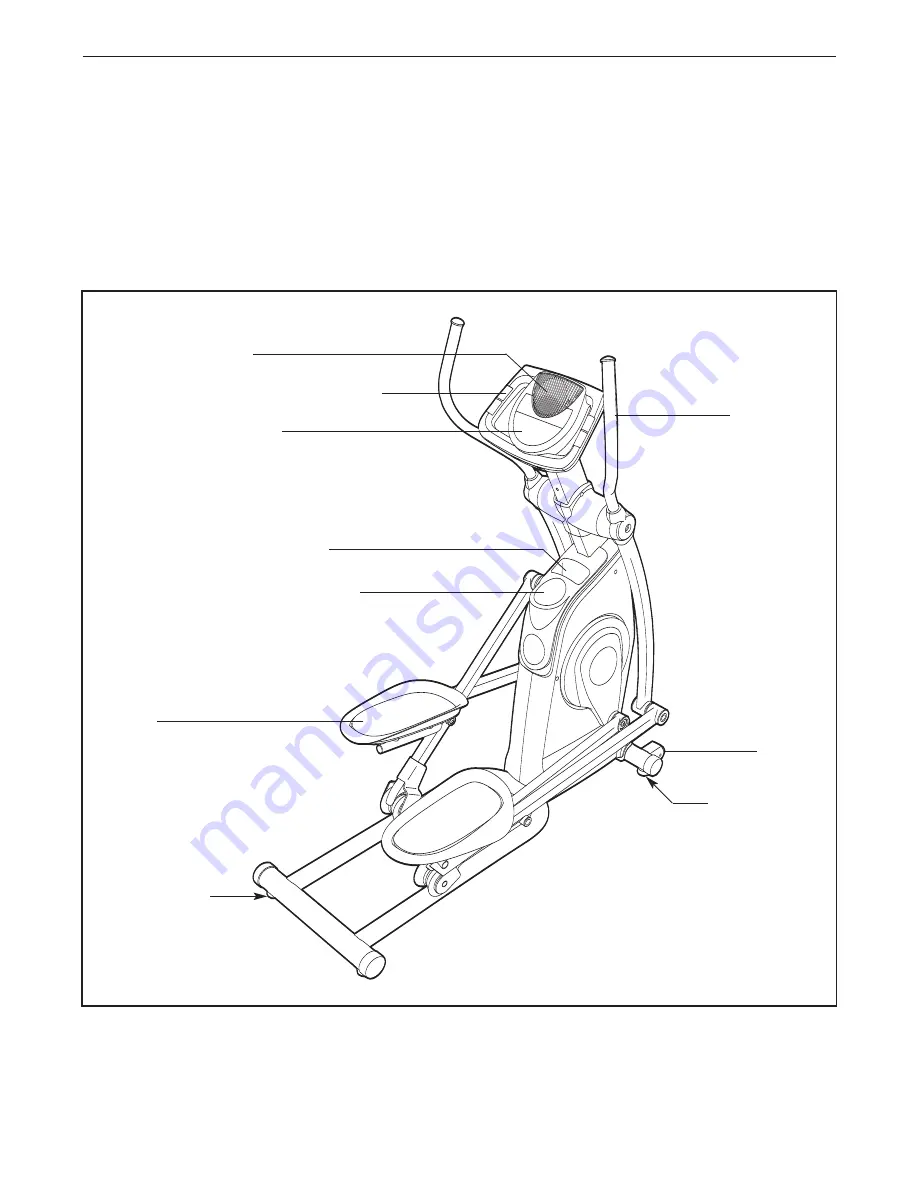
Before reading further, please familiarize yourself with

the parts that are labeled in the drawing below.

Handgrip Pulse Sensor

Handlebar

Wheel

Pedal 

Console

Water Bottle Holder*

Accessory Tray

Leveling Foot

Leveling Foot

Fan

*No water bottle is included

Summary of Contents for 160 Elliptical

Page 1: ...instruc tions in this manual before using this equipment Keep this manu al for future reference Serial Number Decal on underside of frame Model No 831 28645 0 Serial No Assembly Operation Maintenance...

Page 2: ...YOU BEGIN 4 ASSEMBLY 5 HOW TO USE THE ELLIPTICAL EXERCISER 12 MAINTENANCE AND TROUBLESHOOTING 21 CONDITIONING GUIDELINES 22 PART LIST 24 EXPLODED DRAWING 26 ORDERING REPLACEMENT PARTS Back Cover LIMIT...

Page 3: ...ghing more than 275 lbs 124 kg 8 Wear appropriate exercise clothes while using the elliptical exerciser Always wear athletic shoes for foot protection while exer cising 9 Hold the handgrip pulse senso...

Page 4: ...please see the front cover of this manual To help us assist you note the product model number and serial number before con tacting us The model number is 831 28645 0 The serial number can be found on...

Page 5: ...r follow ing the parentheses is the quantity needed for assembly Note Some small parts may have been preassem bled If a part is not in the parts bag check to see if it has been preassembled M8 Split W...

Page 6: ...wo M10 x 78mm Button Screws 90 97 26 26 1 2 2 89 89 25 25 35 90 35 To make assembly easier read the information on page 5 before you begin assembling the elliptical exerciser 3 Orient the Base 1 near...

Page 7: ...0 48 5 Identify the Left Roller Leg 12 which is marked with a Left sticker Orient the Left Roller Leg as shown near the left Crank Arm 36 Apply a small amount of the included grease to both sides of a...

Page 8: ...semble the Right Handlebar not shown and the other Handlebar Leg not shown in the same way 11 71 8 96 6 Hexagonal Hole Hexagonal Hole 7 Position an Inner Handlebar Cover 18 and an Outer Handlebar Cove...

Page 9: ...2 Grease 9 Apply a small amount of grease to both sides of a Wave Washer 98 Slide the Wave Washer onto the left side of the Pivot Axle 65 Next slide the Left Handlebar 8 onto the Pivot Axle as shown A...

Page 10: ...11 Insert the other Pedal Leg Axle into the left Roller Leg 21 Apply a small amount of grease to both sides of two Wave Washers 98 Place a Wave Washer on each Pedal Leg Axle 32 Orient the Left Pedal...

Page 11: ...pply instead of batteries To purchase a power supply call the toll free telephone number on the front cover of this manual Plug one end of the power supply into the jack on the console Plug the other...

Page 12: ...rocking motion is eliminated HOW TO EXERCISE ON THE ELLIPTICAL EXERCISER To mount the elliptical exerciser hold the handlebars and step onto the pedal that is in the lower position Then step onto the...

Page 13: ...an exercise ball call the toll free telephone number on the front cover of this manual You can also use four calorie goal programs designed to help you burn 300 or 400 calories in 25 30 or 45 minute...

Page 14: ...of the elapsed time An exception is the heart rate control program which shows the elapsed time The left side of the display will also show your heart rate when you use the handgrip pulse sen sor see...

Page 15: ...excessively or to squeeze the metal contacts too tightly For opti mal performance clean the metal contacts using a soft cloth never use alcohol abrasives or chemicals to clean the contacts Change the...

Page 16: ...is completed all resis tance settings will move one column to the left The resistance setting for the second segment will then be shown in the flashing Current Segment column and the resistance of th...

Page 17: ...alf the repetitions with your right arm and half the repetitions with your left arm The strength exercises require the use of dumbbells and an inflatable exercise ball not included To pur chase dumbbe...

Page 18: ...u will be prompted to keep your pedaling pace near the target rpm setting for the current segment When the words PEDAL FASTER appear in the display increase your pace When the words PEDAL SLOWER appea...

Page 19: ...6 As you exercise you will be prompted to keep your pedaling pace near the target rpm setting for the current segment When the words PEDAL FASTER appear in the display increase your pace When the word...

Page 20: ...ll regularly compare your heart rate to the target heart rate If your heart rate is too far below or above the target heart rate the resistance of the pedals will auto matically increase or decrease t...

Page 21: ...igh or too low see step 5 on page 15 HOW TO LEVEL THE ELLIPTICAL EXERCISER If the elliptical exerciser rocks slightly on your floor during use see HOW TO LEVEL THE ELLIPTICAL EXERCISER on page 12 HOW...

Page 22: ...e for you first find your age at the bottom of the chart ages are rounded off to the nearest ten years Next find the three numbers above your age The three numbers are your training zone The lowest nu...

Page 23: ...epetition and inhale during the return phase never hold your breath To increase the size and strength of your muscles you must work your muscles at a level close to their maximum capacity Your muscles...

Page 24: ...cap 50 1 Reed Switch Wire 51 1 Belt 52 1 Flywheel 53 1 C Magnet 54 2 Outer Bearing Set 55 1 Magnet 56 1 Spring 57 1 Idler 58 1 Flywheel Pulley 59 1 Clamp 60 2 Inner Bearing Set 61 1 Motor 62 1 Resista...

Page 25: ...3 Star Washer 3 Hex Key 1 Grease 1 User s Manual Key No Qty Description Key No Qty Description Note indicates a non illustrated part Specifications are subject to change without notice See the back co...

Page 26: ...49 49 26 26 33 33 33 33 36 38 38 39 40 43 44 44 45 47 47 48 50 51 52 53 55 56 57 59 61 62 63 64 65 66 66 36 41 41 77 77 41 41 58 20 20 67 68 73 73 74 74 74 74 75 75 89 69 47 96 96 47 90 97 97 89 89 79...

Page 27: ...4 24 27 27 27 27 34 34 34 34 32 32 37 41 41 41 41 41 41 41 41 42 42 46 46 46 46 46 46 91 94 82 82 83 83 82 83 83 82 94 91 94 91 80 80 80 80 88 86 79 79 79 79 80 87 91 80 94 87 85 88 88 88 92 92 92 92...

Page 28: ...protection agreement U S A or maintenance agreement Canada on a product serviced by Sears 1 800 827 6655 U S A 1 800 361 6665 Canada Para pedir servicio de reparaci n a domicilio y para ordenar piezas...

Reviews: