background image

15

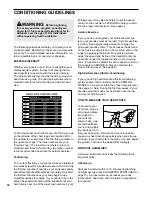
Training Zone Exercise

After warming up, increase the intensity of your exer-
cise until your pulse is in your training zone for 20 to
60 minutes. (During the first few weeks of your exer-
cise program, do not keep your pulse in your training
zone for longer than 20 minutes.) Breathe regularly
and deeply as you exercise—never hold your breath. 

A Cool-down

Finish each workout with 5 to 10 minutes of stretching

to cool down. This will increase the flexibility of your
muscles and will help to prevent post-exercise problems.

Exercise Frequency

To maintain or improve your condition, complete three
workouts each week, with at least one day of rest be-
tween workouts. After a few months, you may com-
plete up to five workouts each week if desired. 

The key to success is to make exercise a regular and
enjoyable part of your everyday life.

SUGGESTED STRETCHES

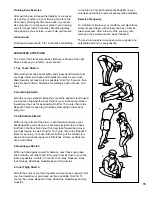
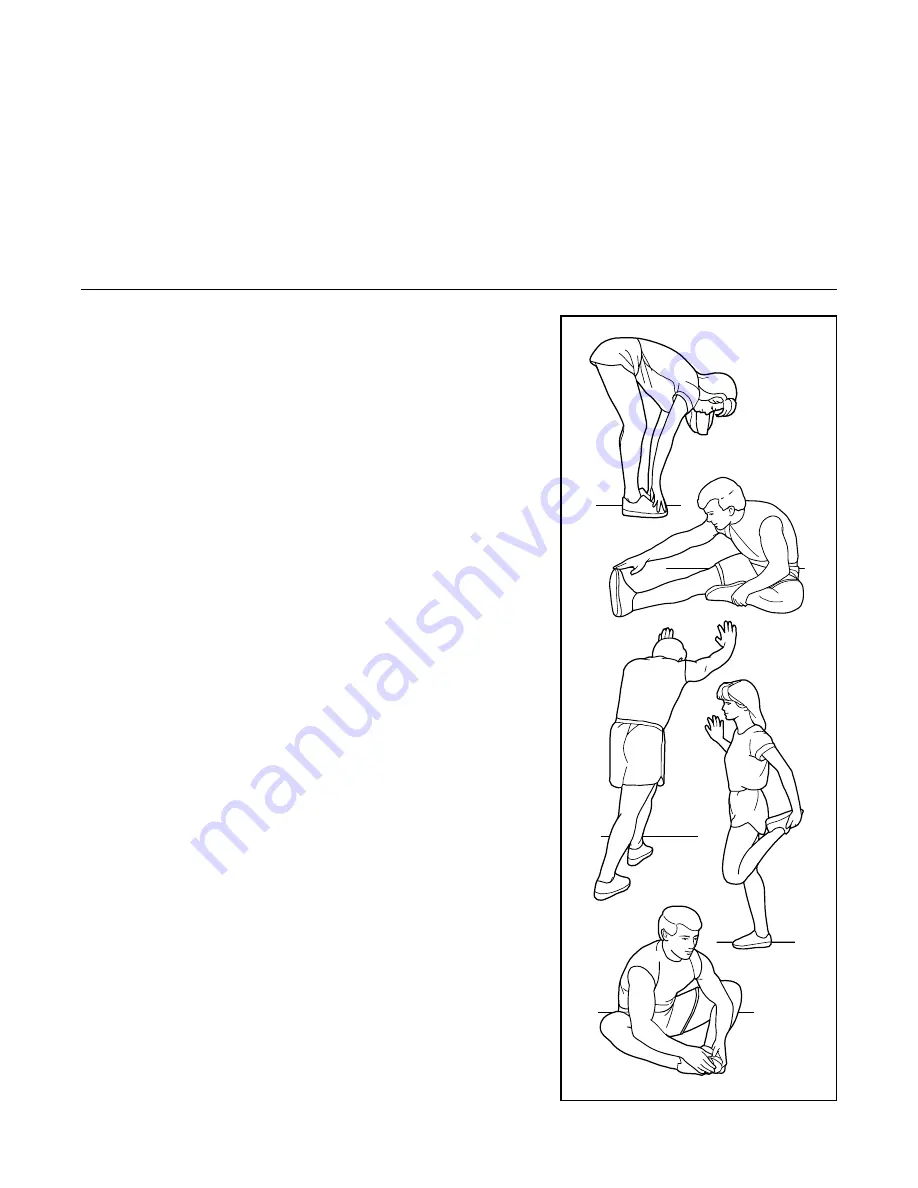
The correct form for several basic stretches is shown at the right.
Move slowly as you stretch—never bounce.

1. Toe Touch Stretch

Stand with your knees bent slightly and slowly bend forward from
your hips. Allow your back and shoulders to relax as you reach
down toward your toes as far as possible. Hold for 15 counts, then
relax. Repeat 3 times. Stretches: Hamstrings, back of knees, and
back.

2. Hamstring Stretch

Sit with one leg extended. Bring the sole of the opposite foot toward
you and rest it against the inner thigh of your extended leg. Reach
toward your toes as far as possible. Hold for 15 counts, then relax.
Repeat 3 times for each leg. Stretches: Hamstrings, lower back,
and groin.

3. Calf/Achilles Stretch

With one leg in front of the other, reach forward and place your
hands against a wall. Keep your back leg straight and your back
foot flat on the floor. Bend your front leg, lean forward and move
your hips toward the wall. Hold for 15 counts, then relax. Repeat 3
times for each leg. To cause further stretching of the achilles ten-
dons, bend your back leg as well. Stretches: Calves, achilles ten-
dons, and ankles.

4. Quadriceps Stretch

With one hand against a wall for balance, reach back and grasp
one foot with your other hand. Bring your heel as close to your but-
tocks as possible. Hold for 15 counts, then relax. Repeat 3 times
for both legs. Stretches: Quadriceps and hip muscles.

5. Inner Thigh Stretch

Sit with the soles of your feet together and your knees outward. Pull
your feet toward your groin area as far as possible. Hold for 15
counts, then relax. Repeat 3 times. Stretches: Quadriceps and hip
muscles.

1

2

3

4

5

Summary of Contents for 390pi Treadmill

Page 1: ...fitness tips and much more QUESTIONS As a manufacturer we are com mitted to providing complete customer satisfaction If you have questions or if there are missing or damaged parts we will guarantee co...

Page 2: ...products are used or where oxygen is being administered 6 Keep children under the age of 12 and pets away from the treadmill at all times 7 The treadmill should be used only by persons weighing 250 p...

Page 3: ...Never drop or insert any object into any opening 21 DANGER Always unplug the power cord immediately after use before cleaning the treadmill and before performing the maintenance and adjustment procedu...

Page 4: ...800 999 3756 Monday through Friday 6 a m until 6 p m Mountain Time excluding holidays To help us assist you please note the product model number and serial number before calling The model number of t...

Page 5: ...Leg 34 in the same way Extension Leg Screw Handrail Screw 53 4 Latch Screw 35 2 11 1 ASSEMBLY Assembly requires two people Set the treadmill in a cleared area and remove all packing materials Do not d...

Page 6: ...Thread a Handrail Screw 53 two turns into the Upright and the Handrail at the angle shown in drawing 4b It may be helpful to lift up and push down on the Handrail as you thread the Handrail Screw 1 53...

Page 7: ...a grounding plug Plug the power cord into a surge suppressor and plug the surge suppressor into an appropriate outlet that is properly installed and grounded in accordance with all local codes and or...

Page 8: ...thing Next insert the key into the console Test the clip by carefully taking a few steps back ward until the key is pulled from the console If the key is not pulled from the console adjust the posi ti...

Page 9: ...eadmill press the top or bottom of the in cline control until the desired incline level is reached Monitor your progress with the two displays TIME DISTANCE dis play This display shows the elapsed tim...

Page 10: ...is fully engaged over the catch To protect the floor or carpet from damage place a mat under the treadmill Keep the treadmill out of direct sunlight Do not leave the treadmill in the stor age position...

Page 11: ...ur left thumb press the storage latch and hold it Pivot the treadmill until the frame and foot rail are past the storage latch 2 Hold the treadmill firmly with both hands and lower the treadmill to th...

Page 12: ...circuit breaker has tripped To reset the circuit breaker wait for five minutes and then press the switch back in 2 SYMPTOM THE POWER TURNS OFF DURING USE a Check the circuit breaker located on the tr...

Page 13: ...RD Using the allen wrench turn the left rear roller adjustment bolt clockwise and the right bolt counterclockwise 1 4 of a turn each Be careful not to over tighten the walking belt Plug in the power c...

Page 14: ...is to strengthen your cardiovascular sys tem your exercise must be aerobic Aerobic exercise is activity that requires large amounts of oxygen for prolonged periods of time This increases the demand o...

Page 15: ...s far as possible Hold for 15 counts then relax Repeat 3 times Stretches Hamstrings back of knees and back 2 Hamstring Stretch Sit with one leg extended Bring the sole of the opposite foot toward you...

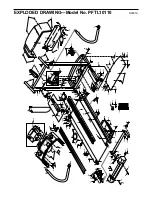
Page 16: ...PART LIST FROM THE MANUAL Save this EXPLODED DRAWING and PART LIST for future reference Note Specifications are subject to change without notice For information about ordering replacement parts see t...

Page 17: ...atch Catch 43 1 Reed Switch Clip 44 1 Reed Switch 45 1 Magnet 46 1 Console Base 47 1 Frame Pivot Spacer Right Key No Qty Description 48 4 Platform Screw 49 4 Isolator 50 1 Front Roller Pulley 51 1 Fro...

Page 18: ...1 23 81 25 58 70 53 36 37 38 40 33 33 33 60 33 33 26 73 61 63 64 70 47 53 34 69 68 67 48 5 5 74 84 83 39 83 39 66 7 40 57 28 62 16 38 38 75 13 13 13 13 4 13 13 55 54 71 80 25 25 33 71 13 61 81 66 49 7...

Page 19: ...nied by sufficient proof of pur chase All returns must be pre authorized by ICON This warranty does not extend to any product or damage to a product caused by or attributable to freight damage abuse m...

Reviews: