background image

22

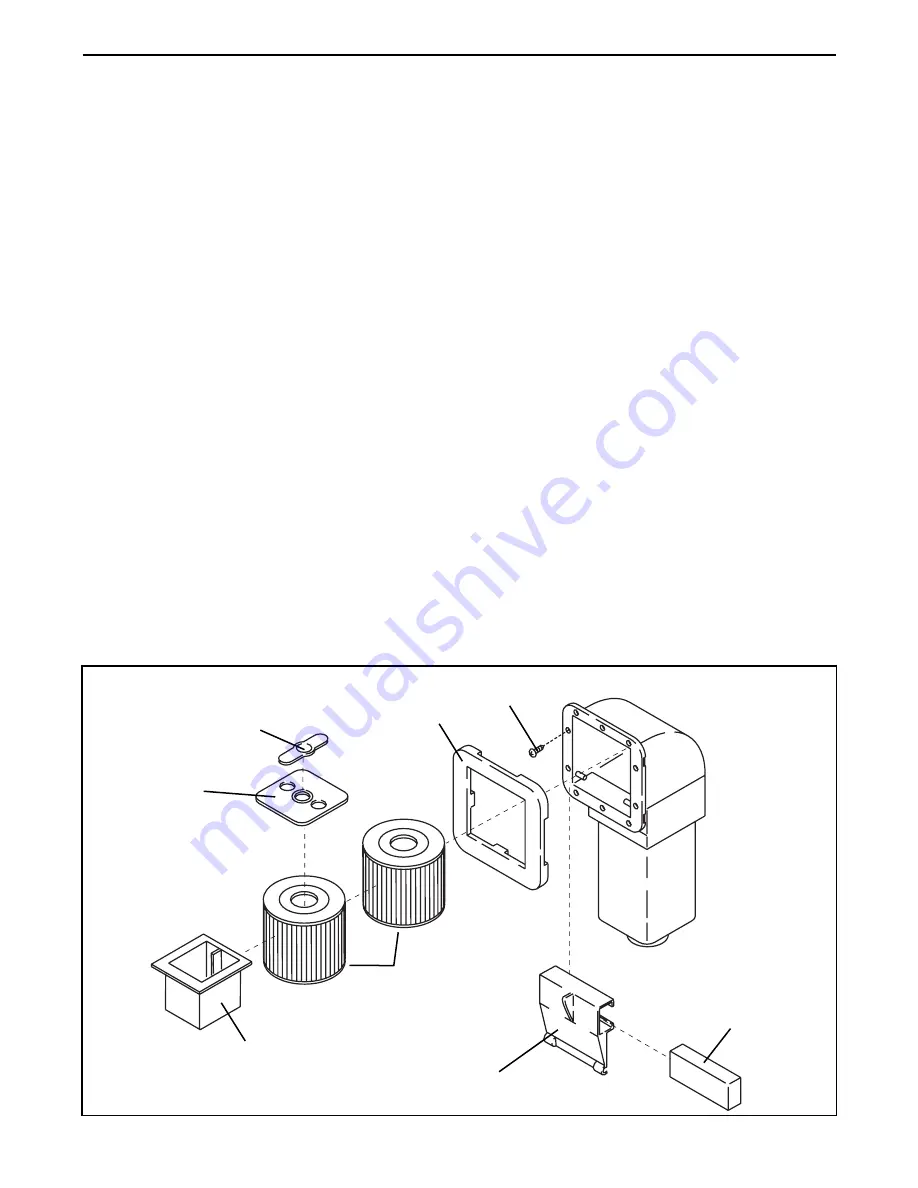
PART LISTÑModel No. 831.210051

R0698A

Note: Ò#Ó indicates a non-illustrated part. Specifications are subject to change without notice. 

Key No. Qty.

Description

1

8

Buckle Screw

2

4

Buckle

3

6

Motor Screw

4

4

Motor Washer

5

4

Rubber Insulator

6

1

Blue Lens

7

1

Heater Switch

8

4

Small Star Washer

9

1

Heat Sensor

10

2

Filter Cartridge

11

1

Hose Cap

12

1

Rubber Damper

13

1

Pump Motor

14

1

Control Unit

15

1

Spa Unit

16

1

Console

17

1

Control Knob

18

1

Spa Cover

19

4

Control Unit Screw

20

2

Small Index Nut

21

2

Adjustment Bracket

22

2

1/4Ó x 1/2Ó Screw

23

2

Small Bracket Screw

24

2

Sensor Fitting

25

6

Multidirectional Jet

Key No. Qty.

Description

26

1

Red Lens

27

2

Large Star Washer

28

1

Console Wire Harness

29

2

Wing Nut

30

1

Console Bracket

31

2

Cover Screw

32

2

Suction Cover

33

2

1/4Ó Nut

34

6

Rubber Washer

35

1

Rubber Gasket

36

1

1/2Ó Elbow Pipe

37

1

2Ó O-Ring

38

1

Weir Door

39

1

Foam, Weir

40

1

Trim Plate

41

1

Diverter Valve

42

1

Diverter

43

1

Basket

44

10

#8 x 1 1/2Ó Screw

#

4

Access Cover Screw

#

1

Access Cover

#

2

Key

#

1

Starter Chemical Pack

#

1

UserÕs Manual

#

1

Light Bulb

38

39

40

41

10

43

42

44

Summary of Contents for 831.210051

Page 1: ...ave this manual for future reference SEARS ROEBUCK AND CO HOFFMAN ESTATES IL 60179 QUESTIONS PLEASE CALL DIRECT TO OUR TOLL FREE CUSTOMER HOT LINE The trained technicians on our customer hot line will...

Page 2: ...erior attributable to freight mishandling damage resulting from improper winterization damage to the spa shell resulting from improper chemical treatment damage to the spa shell resulting from exposur...

Page 3: ...The surface of the spa shell can reach temperatures as high as 150 F in a matter of minutes if exposed to the sun while it is empty These high temperatures can cause significant damage such as blister...

Page 4: ...drotherapy spa at all times Always replace and lock the spa cover when the hydrotherapy spa is not in use 27 DANGER Risk of drowning Exercise extreme caution to prevent unauthorized and unsupervised u...

Page 5: ...s to consult their physician before using this product 36 If you feel pain or dizziness at any time while using the hydrotherapy spa discontinue use and contact a physician 37 The included warning sig...

Page 6: ...throughout the body The RESTORA TION 5 1 hydrotherapy spa gives you the specialized treatment you need to feel your best For your safety and benefit read this manual care fully before using the PROFO...

Page 7: ...deck system that is built flush with the top of the spa provided you leave access to the motor for service 8 Be sure to note any other considerations such as aesthetics or privacy concerns which may a...

Page 8: ...s Remove the four access cover screws from the access cover Remove the access cover from the Spa Unit 15 by sliding the access cover down and pulling the bottom of access cover away from the Spa Unit...

Page 9: ...e of the Spa Cover tight The Spa Cover must be tight Do not place the Buckle over one of the grooves in the wood panels Remove the latch Attach the Buckle to the side of the spa with two Buckle Screws...

Page 10: ...2 and 3 on the power board and leave the other jumpers at the factory settings as shown at the right At 30 amps there is not enough amperage to operate the heater and the pump at high speed simultaneo...

Page 11: ...40 volt power cord is routed through the notch in the cover Slide the cover into place and secure the cover with the four access cover screws 7 Close the cover on the Control Unit and secure the cover...

Page 12: ...ays keep the chemi cals away from children and pets The first time you use the spa you should test and treat the water You must also treat the water each time you refill the spa Once you have verified...

Page 13: ...on your lower or middle back The filter C can be removed for replacement and cleaning see CHECKING AND CLEANING THE FIL TER on page 19 The suction vents D located near the floor of the spa brings the...

Page 14: ...en the Set Temp light will turn off and the display will return to the actual water temperature The water heats at 6 0 to 8 0 F per hour with the cover on Heat On This LED indicator is lit when the sp...

Page 15: ...a few The number of daily cycles as well as the length of the cycle can be adjusted The pump can run one to three filter cycles daily To change the number of cycles press the pump and up buttons at t...

Page 16: ...er sealant Contact your local spa and pool supplier for advice on which sealants work best in your climate CLEANING THE SPA SHELL The spa shell should be cleaned with a mild soap solution Do not use s...

Page 17: ...een 7 2 and 7 8 If the level is too low add a pH increaser usually soda ash If the level is too high add a pH reducer usually sodium bisulfate Test the water again after five minutes See the instructi...

Page 18: ...h the handles into the closed position and turn the handles until they lock into place If you are planning to work on the pump motor you will also need to drain the pump see this page To open the valv...

Page 19: ...turn the diverter towards you and pull it out In this process the diverter may come out of the filter cartridge If so reach into the housing and lift the filter cartridge out 4 Lift the lower filter c...

Page 20: ...er The spa cover must be tight for the water to heat Set the air control to low Set the temperature to the desired setting The water will heat at 6 0 to 8 0 F an hour If you are using the spa indoors...

Page 21: ...mbing If you can identify the location of the leak inside the spa jet unit tight en the clamp or replace the damaged seal 10 SYMPTOM THE SPA CONTINUES TO RUN AFTER IT HAS BEEN SHUT OFF a To turn the s...

Page 22: ...pa Cover 19 4 Control Unit Screw 20 2 Small Index Nut 21 2 Adjustment Bracket 22 2 1 4 x 1 2 Screw 23 2 Small Bracket Screw 24 2 Sensor Fitting 25 6 Multidirectional Jet Key No Qty Description 26 1 Re...

Page 23: ...1 2 2 3 4 5 6 9 12 13 14 15 16 17 18 32 31 29 30 25 26 11 8 19 19 8 8 7 28 21 27 33 3 23 23 22 20 25 34 37 36 35 24 19 EXPLODED DRAWING Model No 831 210051 R0698A 23...

Page 24: ...e to you CUSTOMER HOT LINE 1 800 999 3756 Mon Fri 6 a m 6 p m MST ORDERING REPLACEMENT PARTS To order replacement parts simply call our Customer Service Department toll free at 1 800 999 3756 Monday t...

Reviews: