background image

Summary of Contents for 831.283521

Page 1: ... o Assembly Operation Maintenance Part List and Drawing Read aH precautions and instruc tions in this manual before using this equipment Keep this manu al for future reference User s Manual Patent Pending Sears Roebuck and Co Roffman Estates IL 60179 ...

Page 2: ... BEFORE YOU BEGIN 4 ASSEMBLY 5 HOW TO USE THE ELLiPTiCAL CROSSTRAINER 9 MAINTENANCE AND TROUBLESHOOTING 20 CONDiTiONiNG GUiDELiNES 21 PART LiST 22 EXPLODED DRAWING 23 HOW TO ORDER REPLACEMENT PARTS Back Cover FULL 90 DAY WARRANTY Back Cover 2 ...

Page 3: ...perly tighten eli parts regu larly Replace any worn parts immed ate y 6 Keep children under 12 and pets away from the elliptical croeetrainer at a times 7 The elliptical crosstrainer should not be used by persons weighing more than 250 pounds 8 Wear appropriate exercise clothes when using the elliptical crosetrainer Always wear athletic shoes for foot protection whiJe exer cising 9 Hold the handgr...

Page 4: ...al crosstrainer if you have questions after reading this manual call 1 800 4 MYo HOME 1o800o469o4663 To help us assist you please note the product model number and serial number before calling The model number is 831 283521 The serial number can be found on a decal attached to the elliptical crosstrainer see the front cover of this manual for the location of the decal Before reading further please...

Page 5: ...s used in assembHy The number in parenthesis bellow each drawing refers to the key number of the part from the PART LHSTon page 22 The second number refers to the quantity needed for assembHy Note Some small parts may have been pre assemMed if a part is not in the parts bag check to see if it has been pre assemMed if a part is missing call toil free 1 888 533 1333 MIO SpHit Wave Washer M8 5 Washer...

Page 6: ...t into the Frame 1 Do not pinch the Wire Harnesses Slide an MIO Split Washer 70 and a Frame Spacer 83 onto an MIO x 88mm Button Screw 63 Insert the Button Bolt into the Frame 1 and the Upright 2 Make sure that the concave end of the Frame Spacer is turned toward the Frame Do not tighten the Button Bolt yet Attach the Water Bottle Holder 91 to the Upright 2 with two M4 x 22mm Screws 93 While anothe...

Page 7: ...Handlebar Spacer 25 onto the short tube on the Left Handlebar 9 and rotate the Handlebar Spacer so the arrow is pointing toward the floor Then slide the Left Handlebar onto the Pivot Axle 97 Make sure that the Left Handlebar is on the correct side Turn an M8 x 25mm Patch Screw 22 with an M8 5 Washer 53 and a Wave Washer 95 into the end of the Pivot AxHe Attach the Right HandHebarand the other Hand...

Page 8: ...tPedaU canbeattached inanyoffivepositions seeHOW TO ADJUST THEPEDALS onpage9 Attach theRightPedal notshown inthesameway MakesurethatbothPedals areinthesameposition 9 Makesurethat a partsof theellipticalcrosstrainerareproperlytightened Note Somehardware may beleftoverafterassembly iscompleted Toprotect thefloororcarpetfromdamage placea matunder the elliptical crosstrainer 8 ...

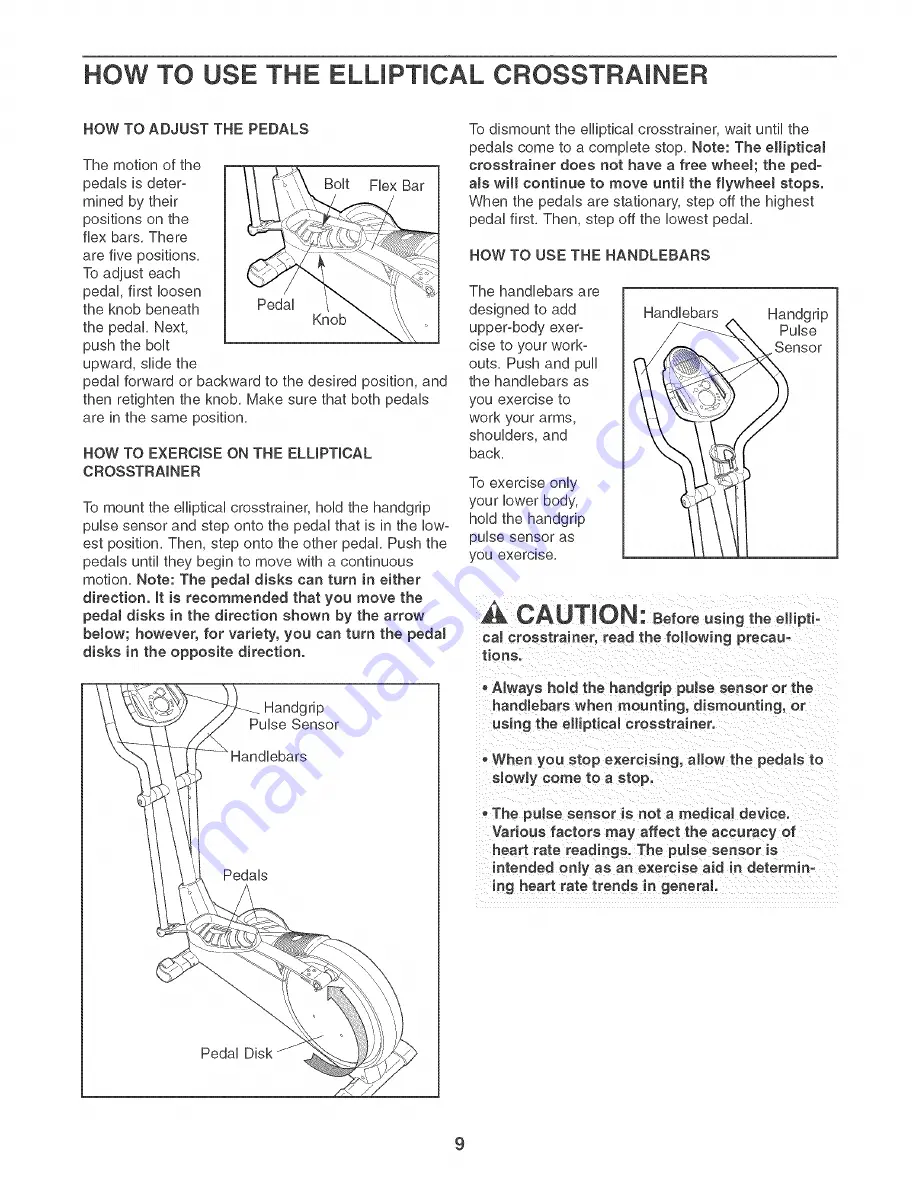
Page 9: ...Handgrip Pulse Sensor Pedals To dismount the elliptical crosstrainer wait until the pedals come to a complete stop Note The eHipticaJ crosstrainer does not have a free whee the ped als will continue to move until the flywheel stops When the pedals are stationary step off the highest pedal first Then step off the lowest pedal HOW TO USE THE HANDLEBARS The handlebars are designed to add upper body e...

Page 10: ...ise The console also features iFIT eom interactive technol ogy Having iFIT com technology is like having a per sonal trainer in your home Using a stereo audio cable available at electronics stores you can connect the elliptical crosstrainer to your home stereo portable stereo computer or VCR and play special iFIT com CD and video programs iFIT com CDs and videocassettes are available separately iF...

Page 11: ...how your heart rate see step 5 on page 12 To view only the distance you have pedaled or the number of calories or fat calories you have burned press the upper button on the left side of the large display until only the word DISTANCE CALORIES or FAT CALORIES appears in the upper section of the large display Make sure that the word SCAN does not appear To again view the distance you have pedaled and...

Page 12: ...ashes will appear and then your heart rate will be shown For the most accurate heart rate reading continue to hold the handgrips for about 30 seconds Note When you first hold the handgrips the large dis play will show your heart rate continuously for 30 seconds The display will then show your heart rate along with other feedback modes Turn on the fan if desired To turn on the fan at low speed pres...

Page 13: ...hen the current period is completed the resis tance of the pedals will automatically change if a different resistance level is programmed for the next period The target pace for the current period wiii be shown by the arrows in the small display To pedal at the target pace simply increase or decrease your pace until there is one arrow pointing to each segment of the indicator bar see the drawing a...

Page 14: ... your hands on the metaJ con tacts for at teast 30 seconds Note When you are not holding the handgrips the letters PLS will appear in the large display instead of your heart rate Begin pedaling to start the program To start the program simply begin pedaling Program 1 consists of 20 one minute periods One resistance level and one target heart rate are programmed for each period The same resis tance...

Page 15: ...ting instruc tions To use iFIT com programs directly from our Web site the elliptical crosstrainer must be connected to your computer See page 17 for connecting instructions HOW TO CONNECT YOUR PORTABLE CD PLAYER Note If your CD player has separate LINE OUT and PHONES jacks see instruction A below If your CD player has only one jack see instruction B A Hug one end of a 1 8 to 1 8 stereo audio cabl...

Page 16: ... Cable B See the drawing above Hug one end of a 1 8 to 1 8 stereo audio cable available at electronics stores into the jack beneath the console Hug the other end of the cable into the LiNE OUT jack on your stereo C Plug one end of a 1 8 to 1 8 stereo audio cable available at electronics stores into the jack beneath the console Hug the other end of the cable into a 1 8 Yoadapter available at electr...

Page 17: ...er side of the Y adapter Note if your VCR has an unused AUDIO OUT jack see instruction A below If the AUDIO OUT jack is being used see instruction B If you have a TV with a built in VOR see instruction B If your VOR is connected to your home stereo see HOW TO CONNECT YOUR HOME STEREO on page 16 A Hug one end of a 1 8 to RCA stereo audio cable available at electronics stores into the jack beneath t...

Page 18: ...o your VCR Press the play button on your CD player or VCR A moment after the play button is pressed your personal trainer wiii begin guiding you through your workout Simply follow your personal trainer s instructions The program wiii function in almost the same way as a Smart program see step 3 on page 13 However an electronic chirping sound will alert you when the resistance level and or the targ...

Page 19: ...n wiii light and the letters iF will appear in the small display Go to your computer and start an internet con nection Start your Web browser if necessary and go to our Web site at wwwJFIT com Follow the desired tinks on our Web site to select a program Follow the onqine instructions to start the program When you start the program an omscreen count down will begin Return to the elliptical crosstra...

Page 20: ...strainer has been moved to the location where it wiii be used make sure that the ends of both stabilizers are touching the floor if the ellipti cal crosstrainer rocks slightly during use turn one or both of the level ing feet under the front stabilizer until the rocking motion is eliminated HANDGRIP PULSE SENSOR TROUBLESHOOTING Avoid moving your hands while using the handgrip pulse sensor Excessiv...

Page 21: ... the first few minutes of exercise does your body begin to use stored fat calories for energy if your goal is to burn fat adjust the intensity of your exercise until your heart rate is near the lowest num ber in your training zone as you exercise For maximum fat burning adjust the intensity of your exercise until your heart rate is near the middle num ber in your training zone as you exercise Aero...

Page 22: ...M6 EyeboUt 26 2 Upright Spacer 76 1 Spring 27 2 MIO x 78mm Button BoUt 77 1 Reed Switch 28 4 Front FUexBushing 78 1 Reed Switch Bracket 29 6 MIO Nylon Locknut 79 2 Handlebar Leg 30 1 80 1 Side Shield Cover 31 1 Left Front Endcap 81 1 U Bracket 32 2 Wheel 82 1 Right Flex Bracket 33 2 M6 x 72mm Button Screw 83 1 Frame Spacer 34 4 MIO x 112mm Carriage Bolt 84 4 M4 x 12mm Tap Screw 35 2 Rear Stabilize...

Page 23: ...EXPLODED DRAWING Model No 831 283521 noso4A 95 22 23 66 24 25 87 91 93 68 L 79 62 8O 2 74 74 65 19 21 67 38 27 31 32 42 _ 81 44 46 8 92 59 37 59 38_ 15 39 19 J 48 35 34 23 ...

Page 24: ...roduct serviced by Sears 1 800 827o6655 U S A _ 1o800o361o6665 _ Canada_ Para pedir servicio de reparacion a domicilio y para ordenar piezas 1 888oSU HOGAR sM 1o888o784o6427 TM SM Registered Trademark Trademark Service Mark of Sears Roebuck and Co TM SM Marca Registrada Marca de F brica Marca de Servicio de Sears Roebuck and Co f FULL 90 DAY WARRANTY f For 90 days from the date of purchase if fail...

Reviews: