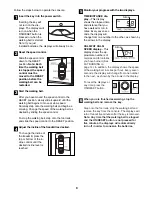
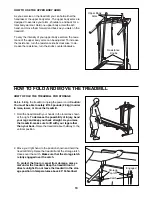
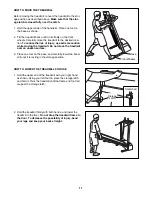
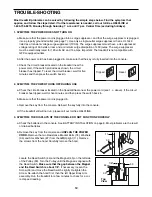
background image

CONDITIONING GUIDELINES

The following guidelines will help you to plan your ex-
ercise program. RememberÑthese are general guide-
lines only. For more detailed exercise information, ob-
tain a reputable book or consult your physician. 

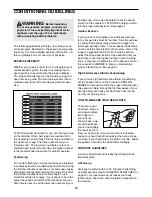
EXERCISE INTENSITY

Whether your goal is to burn fat or to strengthen your
cardiovascular system, the key to achieving the de-
sired results is to exercise with the proper intensity.
The proper intensity level can be found by using your
heart rate as a guide. The chart below shows recom-
mended heart rates for fat burning and aerobic exer-
cise. 

To find the proper heart rate for you, first find your age
on the left side of the chart (ages are rounded off to
the nearest ten years). Next, find the three numbers to
the right of your age. The three numbers are your
Òtraining zone.Ó The lower two numbers are recom-
mended heart rates for fat burning; the higher number
is the recommended heart rate for aerobic exercise.

Fat Burning

To burn fat effectively, you must exercise at a relatively
low intensity level for a sustained period of time. During
the first few minutes of exercise, your body uses easily
accessible 

carbohydrate calories

for energy. Only after

the first few minutes does your body begin to use
stored 

fat calories

for energy. If your goal is to burn fat,

adjust the speed and incline of the treadmill until your
heart rate is near one of the lower two numbers in your

training zone. It may also be helpful to set the speed
control on the console to FAT BURN to help you main-
tain the proper intensity level. (See page 9.)

Aerobic Exercise

If your goal is to strengthen your cardiovascular sys-
tem, your exercise must be Òaerobic.Ó Aerobic exercise
is activity that requires large amounts of oxygen for
prolonged periods of time. This increases the demand
on the heart to pump blood to the muscles, and on the
lungs to oxygenate the blood. For aerobic exercise,
adjust the speed and incline of the treadmill until your
heart rate is near the highest number in your training
zone. It may also be helpful to set the speed control on
the console to AEROBIC to help you maintain the
proper intensity level. (See page 9.)  

High Performance Athletic Conditioning

If your goal is high performance athletic conditioning,
set the speed control on the console to PERFOR-
MANCE to help you maintain the proper intensity level.
(See page 9.) Note: During the first few weeks of your
exercise program, keep your heart rate near the low
end of your training zone.

HOW TO MEASURE YOUR HEART RATE

To measure your
heart rate, stop ex-
ercising and place
two fingers on
your wrist as
shown. Take a six-
second heartbeat
count, and multiply
the result by ten to
find your heart rate. (A six-second count is used be-
cause your heart rate drops quickly when you stop ex-
ercising.) If your heart rate is too high or too low, adjust
the speed or incline of the treadmill accordingly.

WORKOUT GUIDELINES

A well-rounded workout includes the following three
important parts:

A Warm-up

Start each workout with 5 to 10 minutes of stretching
and light exercise (see SUGGESTED STRETCHES on
page 15). A proper warm-up increases your body 
temperature, heart rate, and circulation in preparation
for exercise.

WARNING:

Before beginning

this or any exercise program, consult your
physician. This is especially important for in-
dividuals over the age of 35 or individuals
with pre-existing health problems.

14

Summary of Contents for 831.299412

Page 1: ...Write the serial number in the space above for future reference CAUTION Read all precautions and in structions in this manual before using this equipment Save this manual for future reference SEARS ROEBUCK AND CO HOFFMAN ESTATES IL 60179 Visit our website at www proform com new products prizes fitness tips and much more ...

Page 2: ...weighing 250 pounds or less 8 Never allow more than one person on the treadmill at a time 9 Wear appropriate exercise clothing when using the treadmill Do not wear loose cloth ing that could become caught in the treadmill Athletic support clothes are recommended for both men and women Always wear athletic shoes Never use the treadmill with bare feet wearing only stockings or in sandals 10 When con...

Page 3: ...onths 20 Never drop or insert any object into any opening 21 DANGER Always unplug the power cord immediately after use before cleaning the treadmill and before performing the maintenance and adjustment procedures de scribed in this manual Never remove the motor hood unless instructed to do so by an authorized service representative Servicing other than the procedures in this manual should be perfo...

Page 4: ... through Saturday 7 a m until 7 p m Central Time excluding holidays To help us assist you please note the product model number and serial num ber before calling The model number of the treadmill is 831 299412 The serial number can be found on a decal attached to the treadmill see the front cover of this manual for the location Before reading further please review the drawing below and familiarize ...

Page 5: ... 34 in the same way Extension Leg Screw 53 Ð2 Latch Screw 35 Ð2 Handrail Screw 33 Ð2 11 1 ASSEMBLY Assembly requires two people Set the treadmill in a cleared area and remove all packing materials Do not dispose of the packing materials until assembly is completed Assembly requires the included allen wrench and your own phillips screwdriver and wire cutters Note The underside of the treadmill walk...

Page 6: ...Upright 11 Tighten a Handrail Screw 33 into the Upright and the Handrail at the angle shown in drawing 4b It may be helpful to lift up and push down on the Handrail as you thread the Handrail Screw Attach the other Handrail to the left Upright not shown 1 33 33 11 4a 4b Bottom View 3 Insert one of the Handrails 1 into the tube at the upper end of the right Upright 11 11 1 3 5 Attach the Storage La...

Page 7: ...a grounding plug Plug the power cord into a surge suppressor and plug the surge suppressor into an appropriate outlet that is properly installed and grounded in accordance with all local codes and ordinances Important The treadmill is not compatible with GFCI equipped outlets This product is for use on a nominal 120 volt circuit and has a grounding plug that looks like the plug illus trated in dra...

Page 8: ...thing Next insert the key into the console Test the clip by carefully taking a few steps back ward until the key is pulled from the console If the key is not pulled from the console adjust the posi tion of the clip as needed CAUTION Before operating the console read the following precautions Do not stand on the walking belt when turn ing on the power Always wear the clip see the drawing at the low...

Page 9: ...admill press the top or bottom of the in cline control until the desired incline level is reached Monitor your progress with the two displays TIME DISTANCE dis playÑThis display shows the elapsed time and distance that you have walked or run in miles Every seven sec onds the display will change from one number to the other as shown by the arrows in the display CALS FAT CALS SPEED displayÑThis disp...

Page 10: ...e that the storage latch is fully engaged over the catch To protect the floor or carpet from damage place a mat under the treadmill Keep the treadmill out of direct sunlight Do not leave the treadmill in the stor age position in temperatures above 85 Fahrenheit Storage Latch Catch Engaged HOW TO USE THE UPPER BODY ARMS As you exercise on the treadmill you can hold either the handrails or the upper...

Page 11: ... MOVE THE TREADMILL Before moving the treadmill convert the treadmill to the stor age position as described above Make sure that the stor age latch is closed fully over the catch 1 Hold the upper ends of the handrails Place one foot on the base as shown 2 Tilt the treadmill back until it rolls freely on the front wheels Carefully move the treadmill to the desired loca tion To reduce the risk of in...

Page 12: ...nd then press the switch back in 2 SYMPTOM THE POWER TURNS OFF DURING USE a Check the circuit breaker located on the treadmill frame near the power cord see 1 c above If the circuit breaker has tripped wait for five minutes and then press the switch back in b Make sure that the power cord is plugged in c Remove the key from the console Reinsert the key fully into the console d If the treadmill sti...

Page 13: ...has shifted to the right first remove the key and UNPLUG THE POWER CORD Using the allen wrench turn the left rear roller adjustment bolt counterclockwise and the right bolt clockwise 1 4 of a turn each Be careful not to over tighten the walking belt Plug in the power cord insert the key and run the treadmill for a few minutes Repeat until the walking belt is centered c If the walking belt slips wh...

Page 14: ...s to strengthen your cardiovascular sys tem your exercise must be Òaerobic Ó Aerobic exercise is activity that requires large amounts of oxygen for prolonged periods of time This increases the demand on the heart to pump blood to the muscles and on the lungs to oxygenate the blood For aerobic exercise adjust the speed and incline of the treadmill until your heart rate is near the highest number in...

Page 15: ... far as possible Hold for 15 counts then relax Repeat 3 times Stretches Hamstrings back of knees and back 2 Hamstring Stretch Sit with one leg extended Bring the sole of the opposite foot toward you and rest it against the inner thigh of your extended leg Reach toward your toes as far as possible Hold for 15 counts then relax Repeat 3 times for each leg Stretches Hamstrings lower back and groin 3 ...

Page 16: ... 50 1 Front Roller Pulley 51 1 Front Roller Adj Bolt 52 2 Incline Wheel 53 2 Extension Leg Screw Key No Qty Description 54 1 Power Cord 55 1 Power Cord Grommet 56 1 Circuit Breaker 57 6 3 8Ó Washer 58 2 Frame Pivot Bolt 59 1 Latch Decal 60 1 Motor Belly Pan 61 2 Cable Tie Clamp 62 4 Rear Platform Screw 63 3 Releasable Tie 64 1 Choke 65 2 Belt Guide 66 4 Belly Pan Fastener 67 1 Walking Belt 68 1 Wa...

Page 17: ...25 25 26 70 61 63 64 70 47 53 34 69 68 67 48 5 5 74 84 83 39 83 39 66 7 40 57 28 62 16 38 38 75 13 13 13 13 4 13 13 55 54 70 81 25 25 25 71 35 61 70 66 49 73 49 14 35 3 52 82 38 77 52 79 3 38 17 6 31 32 38 72 39 33 33 49 73 73 49 73 62 85 86 79 25 39 1 41 90 91 92 98 95 57 97 96 93 89 88 98 92 93 57 96 97 95 90 91 88 94 57 57 1 41 87 87 39 39 39 39 39 39 78 39 EXPLODED DRAWINGÑModel No 831 299412 ...

Page 18: ...al Model No 831 299412 QUESTIONS If you find that you need help assembling or operating the PROFORM 395CW treadmill a part is missing or you need to schedule repair service call our toll free HELPLINE 1 800 736 6879 MondayÐSaturday 7 amÐ7 pm Central Time excluding holidays REPLACEMENT PARTS If parts become worn and need to be replaced call the following toll free number 1 800 FON PART 1 800 366 72...

Reviews: