background image

7

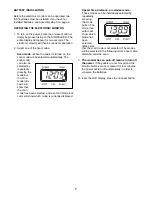
BATTERY INSTALLATION

Before the electronic monitor can be operated, two
ÒAAÓ batteries must be installed. If you have not
installed batteries, see assembly step 3 on page 4. 

OPERATING THE ELECTRONIC MONITOR

1.  To turn on the power, press the on/reset button or

simply begin exercising on the AIR WALKER. The
entire display will appear for two seconds. The
electronic monitor will then be ready for operation. 

2.  Select one of the five modes:

Scan mode

ÑWhen the power is turned on, the

scan mode will be selected automatically. The
scan mode
can also be
selected by
repeatedly
pressing the
mode but-
ton. One
mode indi-
cator will
show that
the scan
mode has been selected, and a second mode indi-
cator will show which mode is currently displayed.  

Speed, time, distance, or calories mode

Ñ

These modes can be individually selected by
repeatedly
pressing
the mode
button. The
mode indi-
cators will
show which
mode has
been
selected.
(Make sure
that the scan mode is not selected.) The modes
will be selected in the following order: speed, time,
distance, calories, scan.  

3.  

The monitor has an auto-off feature to turn off
the power.

If the pedals are not moved and the

monitor buttons are not pressed for four minutes,
the power will turn off automatically in order to
conserve the batteries.

To reset the LCD display, press the on/reset button. 

Summary of Contents for AIR WALKER PFAW75070

Page 1: ...SE CALL DIRECT TO OUR TOLL FREE CUS TOMER HOT LINE The trained technicians on our customer hot line will provide immediate assistance free of charge CUSTOMER HOT LINE 1 800 999 3756 Mon Fri 6 a m 6 p...

Page 2: ...e clothing that could become caught on the AIR WALKER 11 Always wear athletic shoes for foot protec tion when exercising on the AIR WALKER 12 When mounting and dismounting the AIR WALKER adjust the re...

Page 3: ...s manual carefully before using the AIR WALKER If you have questions after reading the manual call our Customer Service Department toll free at 1 800 999 3756 Monday through Friday 6 a m until 6 p m M...

Page 4: ...attery cover and remove the battery cover from the Monitor Insert two batteries into the Monitor Make sure that the negative ends of the batteries are touching the springs in the Monitor Close the bat...

Page 5: ...f it is not legible call our Customer Service Department toll free to order a free replacement decal see ORDER ING REPLACEMENT PARTS on the back of this manual Apply the decal in the location shown Fi...

Page 6: ...hot during use Allow the resistance cylinders to cool before touching them When adjusting the resistance touch only the resistance dials ELECTRONIC MONITOR MODES The simple to operate electronic monit...

Page 7: ...repeatedly pressing the mode but ton One mode indi cator will show that the scan mode has been selected and a second mode indi cator will show which mode is currently displayed Speed time distance or...

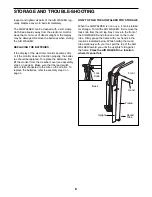
Page 8: ...tep 4 on page 5 Make sure that the reed switch wire is fully connected to the wire on the monitor To replace the batteries refer to assembly step 3 on page 4 HOW TO FOLD THE AIR WALKER FOR STORAGE Whe...

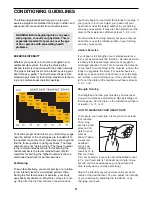
Page 9: ...he dials on the resistance cylinders at level 1 2 3 or 4 For maximum fat burning adjust your pace until your heart rate is near the middle number in your training zone as you exercise Aerobic Exercise...

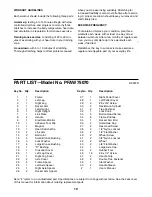
Page 10: ...crew 41 2 3 8 Nylon Locknut 42 2 Wheel 43 2 3 8 Flat Washer 44 1 Large Axle Cap 45 2 Rubber Foot 46 16 8 x 1 2 Screw 47 2 Handle Grip 48 2 Double Tree Fastener 49 1 Star Washer 50 2 Handle Sleeve 1 Us...

Page 11: ...4 26 38 34 12 10 34 29 17 29 46 17 22 33 8 47 36 38 30 30 40 16 14 13 25 15 44 6 34 15 3 21 31 32 28 20 42 29 41 43 45 16 24 15 43 14 42 40 23 37 39 34 2 13 15 7 5 34 46 46 27 1 45 11 49 50 50 46 46...

Page 12: ...N This warranty does not extend to any product or damage to a product caused by or attributable to freight damage abuse misuse improper or abnormal usage or repairs not provided by an ICON authorized...

Reviews: