background image

Part No. 230808 R0805A

Printed in USA © 2005 ICON IP, Inc.

ICON OF CANADA, INC., (ICON), warrants all mechanical and electrical components to be covered for
one (1) year after the date of purchase. The motor is covered for one (1) year after the date of purchase.
Labor is covered for one (1) year after the date of purchase. This warranty extends only to the original
purchaser. ICON's obligation under this warranty is limited to replacing or repairing, at ICON's option, the
product through one of its authorized service centers. All repairs for which warranty claims are made
must be pre-authorized by ICON. This warranty does not extend to any product or damage to a product
caused by or attributable to freight damage, abuse, misuse, improper or abnormal usage or repairs not
provided by an ICON authorized service center, to products used for commercial or rental purposes, or
to products used as store display models. No other warranty beyond that specifically set forth above is
authorized by ICON.

ICON is not responsible or liable for indirect, special or consequential damages arising out of or in con-
nection with the use or performance of the product or damages with respect to any economic loss, loss
of property, loss of revenues or profits, loss of enjoyment or use, costs of removal, installation or other
consequential damages of whatsoever nature. Some provinces do not allow the exclusion or limitation of
incidental or consequential damages. Accordingly, the above limitation may not apply to you. The war-
ranty extended hereunder is in lieu of any and all other warranties and any implied warranties of  mer-
chantability or fitness for a particular purpose is limited in its scope and duration to the terms set forth
herein. Some provinces do not allow limitations on how long an implied warranty lasts. Accordingly, the
above limitation may not apply to you.

This warranty gives you specific legal rights. You may also have other rights which vary from province to
province or so specified by the retailer of your equipment.

ICON OF CANADA, INC., 900 de l’Industrie, St. Jerôme, QC J7Y 4B8

LIMITED WARRANTY

ORDERING REPLACEMENT PARTS

To order replacement parts, please see the front cover of this manual. When ordering parts, please be prepared
to give the following information:

• The MODEL NUMBER OF THE PRODUCT (PCTL95235.0)

• The NAME OF THE PRODUCT (PROFORM 495Pi treadmill)

• The SERIAL NUMBER OF THE PRODUCT (see the front cover of this manual)

• The KEY NUMBER AND DESCRIPTION OF THE PART(S) (see the EXPLODED DRAWING and PART LIST

attached in the center of this manual)

Summary of Contents for colling breeze 495Pi

Page 1: ...pment Save this manual for future reference TREADMILL EXERCISER User s Manual QUESTIONS As a manufacturer we are com mitted to providing complete customer satisfaction If you have questions or if ther...

Page 2: ...LY 6 OPERATION AND ADJUSTMENT 10 HOW TO FOLD AND MOVE THE TREADMILL 13 TROUBLESHOOTING 15 CONDITIONING GUIDELINES 17 ORDERING REPLACEMENT PARTS Back Cover LIMITED WARRANTY Back Cover Note An EXPLODED...

Page 3: ...an exten sion cord 12 Failure to use a properly functioning surge suppressor could result in damage to the con trol system of the treadmill If the control sys tem is damaged the walking belt may chan...

Page 4: ...tative only 25 This treadmill is intended for in home use only Do not use this treadmill in a commer cial rental or institutional setting WARNING Before beginning this or any exercise program consult...

Page 5: ...ions please see the front cover of this manual To help us assist you please note the product model number and serial number before calling The model number of the treadmill is PCTL95235 0 The serial n...

Page 6: ...eaner Assembly requires the included allen wrenches and your own phillips screwdriver rubber mallet and adjustable wrench For help identifying the assembly hardware see the drawings below If a part is...

Page 7: ...of the Left Handrail 71 as de scribed above Do not tighten the Bolt yet Note There is not a wire harness on the left side 42 Hole 72 37 37 71 69 Hole 2 3 With the help of another person carefully lowe...

Page 8: ...tor and then insert it Slide the sleeve back over the connector 72 47 5 6 4 Attach each Extension Leg 63 with two 1 Tek Screws 39 and a Base Pad 57 as shown Attach the lower Tek Screw without the Base...

Page 9: ...Ground Wire 36 34 47 8 Press the Upright Wire 42 into the slot in the underside of the Console Base 47 in the indicated area Cover the Upright Wire with the Right Grip Plate 36 Be careful not to pinc...

Page 10: ...grounding provides a path of least resistance for electric current to reduce the risk of elec tric shock This product is equipped with a cord having an equipment grounding conductor and a grounding pl...

Page 11: ...king belt A moment after the button is pressed the walking belt will begin to move Hold the handrails and begin walking As you exercise change the speed of the walking belt as desired by pressing the...

Page 12: ...the Speed display Press the Speed button to change the unit of measurement When the de sired unit of measurement is selected remove the key and then reinsert it To reset the displays press the Stop bu...

Page 13: ...l until the storage latch closes over the catch Make sure that the storage latch is fully engaged over the catch To protect the floor or carpet from damage place a mat under the treadmill Keep the tre...

Page 14: ...to the left Pivot the treadmill down until the frame and foot rail are past the storage latch 2 Hold the treadmill firmly with both hands and lower the tread mill to the floor Do not drop the treadmil...

Page 15: ...e SOLUTION a Check the circuit breaker located on the treadmill frame near the power cord see the drawing above If the circuit breaker has tripped wait for five minutes and then press the switch back...

Page 16: ...center or slips when walked on SOLUTION a If the walking belt is off center first remove the key and UNPLUG THE POWER CORD If the walking belt has shifted to the left use the allen wrench to turn the...

Page 17: ...be aerobic Aerobic exercise is activity that requires large amounts of oxygen for prolonged periods of time This increases the demand on the heart to pump blood to the muscles and on the lungs to oxyg...

Page 18: ...les Stretch With one leg in front of the other reach forward and place your hands against a wall Keep your back leg straight and your back foot flat on the floor Bend your front leg lean forward and m...

Page 19: ...19 NOTES...
Page 20: ...economic loss loss of property loss of revenues or profits loss of enjoyment or use costs of removal installation or other consequential damages of whatsoever nature Some provinces do not allow the ex...

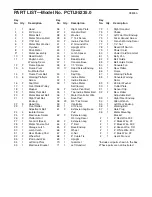
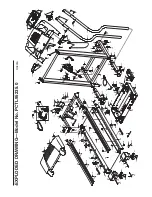
Page 21: ...Specifications are subject to change without notice For information about ordering replacement parts see the back cover of the User s Manual REMOVE THIS EXPLODED DRAWING AND PART LIST FROM THE MANUAL...

Page 22: ...onsole Base 48 6 1 2 Screw 49 17 Hood Screw Endcap Screw 50 1 Key Clip 51 1 Incline Motor 52 1 Incline Bracket 53 1 Incline Motor Bolt lower 54 2 Incline Pivot Bolt 55 1 Top Incline Motor Bolt 56 1 Mo...

Page 23: ...3 53 57 39 39 57 51 55 13 62 63 64 32 66 25 41 68 85 65 25 15 94 58 11 56 71 35 33 3 6 7 8 9 98 20 58 30 42 75 58 61 58 61 83 25 59 37 37 2 47 46 57 36 34 88 67 67 50 52 43 1 5 54 5 54 45 58 31 73 25...

Reviews: