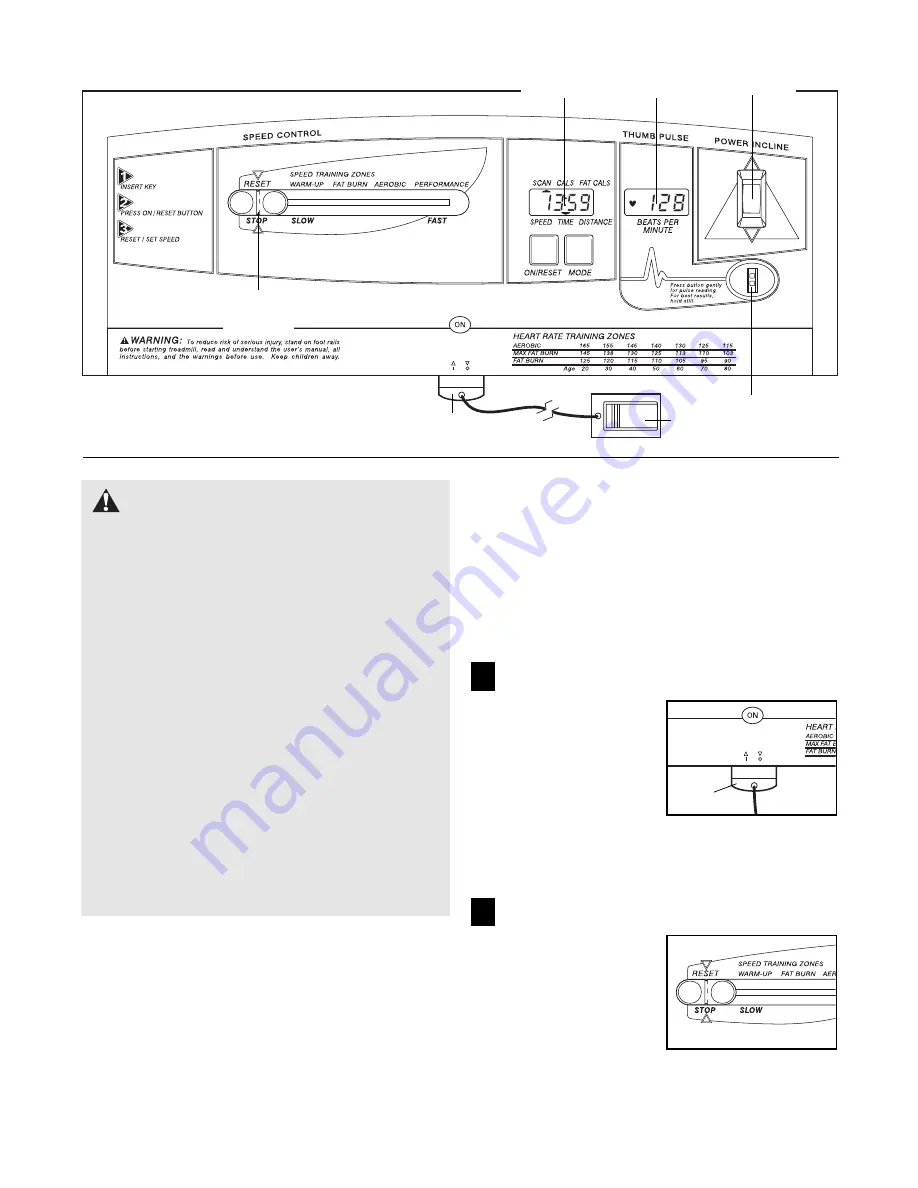
DIAGRAM OF THE CONSOLE
Clip
Key
Speed
Control
Pulse
Sensor
STEP-BY-STEP CONSOLE OPERATION
Make sure there are batteries in the console (see as-
sembly step 5 on page 6). In addition, make sure the
power cord is properly plugged in (see HOW TO PLUG
IN THE POWER CORD on page 7).
When you are ready to begin exercising, step onto the
foot rails of the treadmill. Find the clip attached to the
key (see the drawing above), and slide the clip onto
the waistband of your clothing.
Test the clip by care-
fully taking a few steps backward until the key is
pulled from the console. If the key is not pulled
from the console, adjust the position of the clip as
needed.
Follow the steps below and on page 9 to operate the
console.
Insert the key fully into the power switch.
Note: Inserting the
key will not turn on
the displays. The
displays will turn on
when the ON/
RESET button is
pressed or when the
walking belt is
started. (If you just installed batteries, the displays
will already be on.)
Reset the console and start the walking belt.
Slide the speed control
to the RESET position.
Note: Each time the
walking belt is
stopped, the speed
control must be
moved to the RESET
position before the
walking belt can be restarted.
2
1
Key
CAUTION:
Before operating the
console, read the following important precau-
tions.
¥ Do not stand on the walking belt when turning
on the power.
¥ Always wear the clip while operating the tread-
mill. When the key is removed from the con-
sole, the power will shut off.
¥ After the speed control is moved, there will be
a pause before the walking belt begins to move.
¥ Adjust the speed in small increments until you
are familiar with the treadmill.
¥ The training zones marked above the speed
control are guidelines only.
¥ To reduce the risk of electric shock, keep the
console dry. Avoid spilling liquid on the con-
sole and use only a sealed water bottle.
Main
Display
Heart Rate
Display
Incline
Control
If there is a thin sheet of clear plastic on
the face of the console, remove it.
8


