background image

10

HOW TO PLUG IN THE POWER CORD 

This product must be grounded. 

If it should mal-

function or break down, grounding provides a path of
least resistance for electric current to reduce the risk
of electric shock. This product is equipped with a cord
having an equipment-grounding conductor and a
grounding plug. 

Plug the power cord into an appro-

priate outlet that is properly installed and
grounded in accordance with all local codes and
ordinances. This product is for use on a nominal
120-volt circuit. IMPORTANT: The elliptical exer-
ciser is not compatible with GFCI-equipped out-
lets.

A temporary
adapter may
be used to
connect the
power cord to
a 2-pole
receptacle as
shown at the
right if a prop-
erly grounded
outlet is not
available. The
temporary adapter should be used only until a prop-
erly grounded outlet can be installed by a qualified
electrician. 

The green-colored rigid ear, lug, or the like extending
from the adapter must be connected to a permanent
ground such as a properly grounded outlet box cover.
Whenever the adapter is used, it must be held in
place by a metal screw. 

Some 2-pole receptacle out-

let box covers are not grounded. Contact a quali-
fied electrician to determine if the outlet box cover
is grounded before using an adapter.

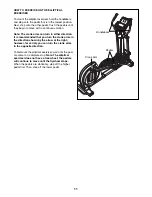
HOW TO MOVE THE ELLIPTICAL EXERCISER

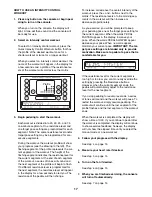
Due to the size and weight of the elliptical exer-
ciser, moving it requires two persons.

Stand in

front of the elliptical exerciser, hold the upright, and
place one foot against one of the front wheels. Pull on
the upright and have a second person lift the handle
on the rear of the frame until the elliptical exerciser will
roll on the front wheels. Carefully move the elliptical
exerciser to the desired location, and then lower it to
the floor.

HOW TO LEVEL THE ELLIPTICAL EXERCISER

If the elliptical exerciser rocks slightly on your floor
during use, turn one or both of the leveling feet
beneath the rear stabilizer until the rocking motion is
eliminated.

DANGER:

Improper connection

of the equipment-grounding conductor can
result in an increased risk of electric shock.
Check with a qualified electrician or service-
man if you are in doubt as to whether the
product is properly grounded. Do not modify
the plug provided with the product—if it will
not fit the outlet, have a proper outlet 
installed by a qualified electrician.

Grounded Outlet Box

Adapter

Lug

Metal Screw

HOW TO USE THE ELLIPTICAL EXERCISER

Place

your foot

here

Lift here

Pull on
upright

Summary of Contents for EPIC 1200 PRO

Page 1: ...proform com new products prizes fitness tips and much more QUESTIONS As a manufacturer we are commit ted to providing complete customer satisfaction If you have questions or if parts are damaged PLEA...

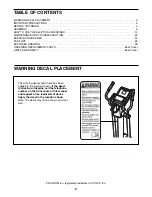
Page 2: ...ORDERING REPLACEMENT PARTS Back Cover LIMITED WARRANTY Back Cover WARNING DECAL PLACEMENT 2 PROFORM is a registered trademark of ICON IP Inc The warning decal shown here has been applied in the locati...

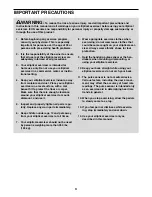
Page 3: ...0 lbs 159 kg 8 Wear appropriate exercise clothes when exercising do not wear loose clothes that could become caught on your elliptical exer ciser Always wear athletic shoes for foot protection 9 Hold...

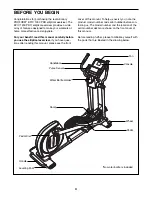
Page 4: ...ciser If you have ques tions after reading this manual please see the front cover of this manual To help us assist you note the product model number and serial number before con tacting us The model n...

Page 5: ...all parts of the elliptical exerciser in a cleared area and remove the packing materials Do not dispose of the packing materials until assembly is completed Assembly requires the included tools and y...

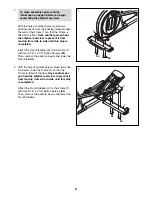
Page 6: ...e the packing inserts and lower the Rear Stabilizer 1 2 With the help of another person place two pack ing inserts under the Frame 1 so that the Frame is lifted off the floor Have another per son hold...

Page 7: ...rew 81 a Large Axle Cover 94 and a 5 16 Washer 104 Attach the other Upper Body Arm 12 in the same way 4 3 Tip Be careful not to pinch the Wire Harnesses 97 54 during this step Start all screws before...

Page 8: ...hard time working the Link Arms 10 11 all the way into the Upper Body Arms 12 and the Pedal Arms 8 9 try working them in halfway and then tight ening the 5 16 x 1 Patch Screws 81 to pull them the res...

Page 9: ...rature before plug ging in the power cord If you do not do this the console displays or other electronic components may become damaged The ramp will calibrate automatically when the elliptical exercis...

Page 10: ...covers are not grounded Contact a quali fied electrician to determine if the outlet box cover is grounded before using an adapter HOW TO MOVE THE ELLIPTICAL EXERCISER Due to the size and weight of the...

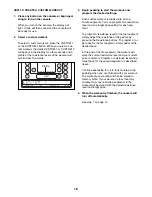
Page 11: ...ction It is recommended that you turn the crank arms in the direction shown by the arrow at the right however for variety you can turn the crank arms in the opposite direction To dismount the elliptic...

Page 12: ...a variety of exercise instructions while automatically changing the resistance of the pedals and the incline of the ramp The console also offers sixteen intensity control work outs Each intensity cont...

Page 13: ...ncline level 4 Follow your progress with the display The far left section of the display This section of the display will show your pedaling pace in revolutions per minute and the ramp incline level f...

Page 14: ...tightly For optimal performance clean the metal contacts using a soft cloth never use alcohol abrasives or chemi cals to clean the contacts 6 Turn on the fan if desired The fan has high and low speed...

Page 15: ...e flashing segment indicates the resistance level for the cur rent segment At the end of each segment of the workout a series of tones will sound and the next segment of the profile will begin to flas...

Page 16: ...s a series of tones will sound and the workout will pause To restart the workout simply resume pedaling The workout will continue until the last segment of the profile flashes and the last segment of...

Page 17: ...hen change To increase or decrease the overall intensity of the workout press the and buttons next to the matrix The resistance levels of all remaining seg ments in the workout will then increase or d...

Page 18: ...evel and one target pace setting for each seg ment To program a resistance level for the first segment simply adjust the resistance of the pedals by pressing the Resistance buttons To program a tar ge...

Page 19: ...you will be prompted to keep your pedaling pace near the target pace setting for the current segment When the words PEDAL FASTER appear in the display increase your pace When the words PEDAL SLOWER a...

Page 20: ...t press the Start button once and then press the Ramp increase button The ramp will move upward and downward as it calibrates When the ramp stops moving the ramp is calibrated Then press the Start but...

Page 21: ...ur goal is to strengthen your cardiovascular system you must perform aerobic exercise which is activity that requires large amounts of oxygen for prolonged periods of time For aerobic exercise adjust...

Page 22: ...illes Stretch With one leg in front of the other reach forward and place your hands against a wall Keep your back leg straight and your back foot flat on the floor Bend your front leg lean forward and...

Page 23: ...23 NOTES...

Page 24: ...Pivot Bushing 47 1 Reed Switch Wire 48 4 Stabilizer Endcap 49 2 Leveling Foot 50 2 Foot 51 2 Wheel 52 1 Left Pivot Cover 53 1 Right Pivot Cover 54 1 Lower Wire Harness 55 1 Power Cord 56 1 Left Pedal...

Page 25: ...Patch Screw 109 1 Left Pedal Plate 110 6 M10 Split Washer 111 10 M6 Split Washer 10 Ground Wire 14 White Jumper Wire F F 14 Black Jumper Wire F F 60 Wire Harness 60 Jumper Wire Harness 70 Wire Harnes...

Page 26: ...6 9 11 10 8 62 94 94 63 63 81 93 71 67 67 89 89 93 81 71 68 32 95 68 70 70 100 94 94 63 63 93 81 71 68 32 95 67 67 89 89 81 71 93 68 70 70 100 81 46 46 94 46 46 81 46 46 59 80 79 79 80 79 80 94 106 10...

Page 27: ...39 40 40 41 41 43 42 44 45 74 74 75 91 91 78 78 78 78 78 78 78 78 87 84 84 98 98 75 86 101 99 76 76 54 97 55 57 69 103 92 92 21 77 1 3 48 48 49 49 88 8 8 82 82 2 48 48 50 50 51 51 78 78 96 85 85 96 8...

Page 28: ...e for a mini mal trip charge This warranty does not extend to any product or damage to a product caused by or attrib utable to freight damage abuse misuse improper or abnormal usage or repairs not pro...

Reviews: