background image

Follow your progress with the LED track and the
four monitor displays.
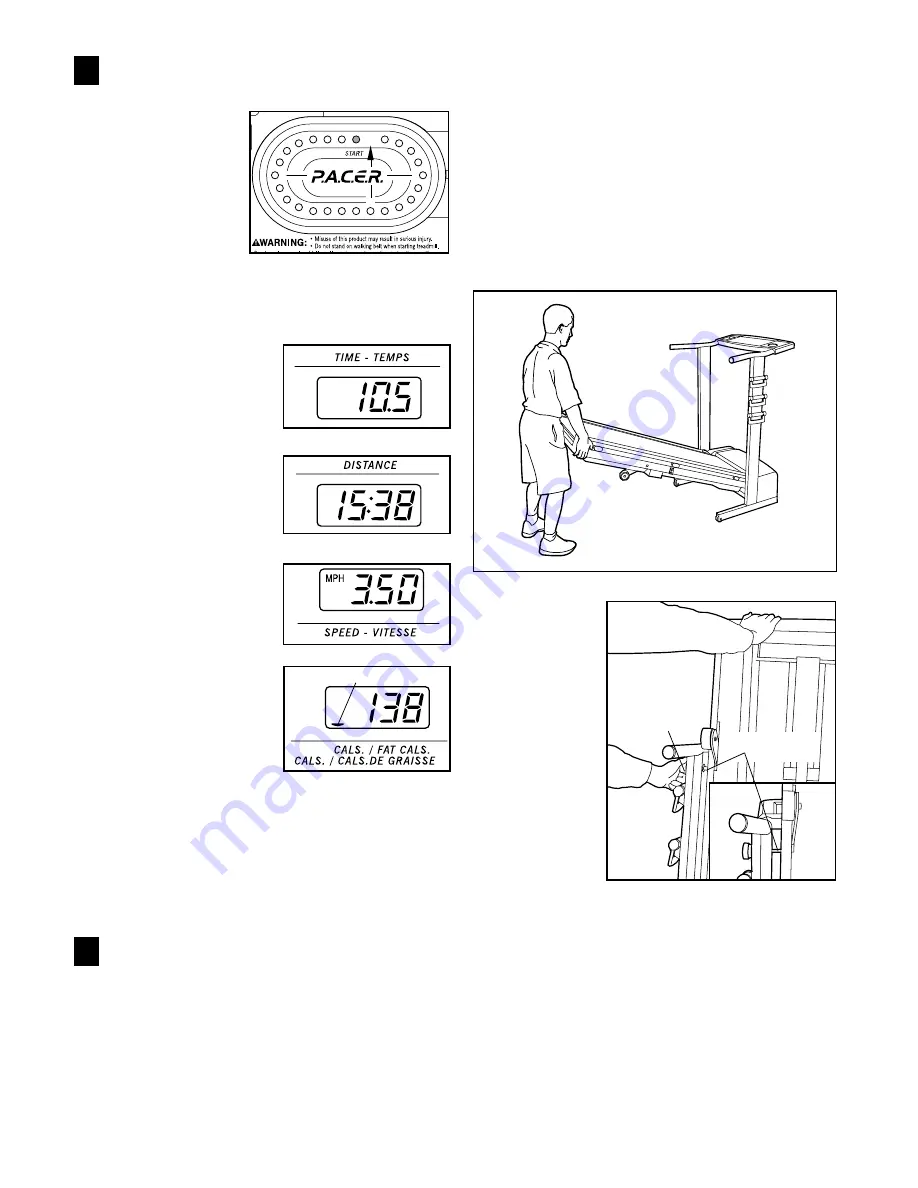
The LED
Track—
The LED
track in the cen-
tre of the console
represent a dis-
tance of 1/4 mile.
As you exercise,
the indicators
around the track
will light one at a time until you have completed 1/4
mile. The first indicator above the word START will
then light and another lap will begin. 

The TIME display
This display shows the
total time that you
have walked or run on
the treadmill.

The DISTANCE dis-
play
—This display
shows the total dis-
tance that you have
walked or run, in miles.

The SPEED display
This display shows the
speed of the walking
belt, in miles per hour. 

The CALORIES/
FAT CALORIES 
display
—This display
shows the approximate
numbers of calories and
fat calories you have
burned. (See FAT
BURNING on page 12.) Every seven seconds, the
display will change from one number to the other.
Arrows in the display will indicate which number is
currently shown.     

Note: The displays can be reset by pressing the
ON/RESET button.  

When you are finished exercising, stop the
walking belt and remove the key.

Step onto the foot rails, stop the walking belt, and
remove the key from the console. Store the key in a
secure place. After the key is removed, the dis-
plays will remain on for about five minutes. 
Note: Any time that the walking belt is stopped
and no console buttons are pressed for five
minutes, the displays will automatically turn off.

HOW TO FOLD THE TREADMILL TO THE STORAGE
POSITION

Before folding the treadmill, unplug the power cord.
Caution: You must be able to safely lift 45 pounds
(20 kg) in order to raise the treadmill. 

Hold the treadmill in the locations shown below. To de-
crease the possibility of injury, bend your legs and
keep your back straight. As you raise the treadmill,
make sure to lift with your legs rather than your
back. 
Raise the treadmill until it is almost vertical. 

Next, hold the
upper end of
the treadmill
with your right
hand as shown.
Using your left
hand, pull the
treadmill knob
to the left. Pivot
the treadmill
until the lock
pin is aligned
with the hole in
the side of the
treadmill frame
(refer to the
inset drawing).
Slowly release the knob. Make sure that the lock pin is
inserted into the hole in the treadmill frame.

Note: To protect the floor or carpet from damage,
place a mat under the CROSSTRAINER. Keep the
CROSSTRAINER out of direct sunlight. Do not leave
the CROSSTRAINER in the storage position in tem-
peratures above 85° Fahrenheit.

Lock Pin

Treadmill

Knob

11

Arrow

6

5

Summary of Contents for PCTL50070

Page 1: ...gh direct assis tance from our factory TO AVOID UNNECESSARY DELAYS PLEASE CALL DIRECT TO OUR TOLL FREE CUS TOMER HOT LINE The trained technicians on our Customer Hot Line will provide immediate assist...

Page 2: ...HOW TO OPERATE THE WEIGHT BENCH 14 HOW TO EXERCISE ON THE WEIGHT BENCH 15 MAINTENANCE AND TROUBLE SHOOTING 16 HOW TO MOVE THE CROSSTRAINER 18 PART LIST 19 CUSTOMER RECORD 20 ORDERING REPLACEMENT PARTS...

Page 3: ...plug the power cord into a surge suppressor not included and plug the surge suppressor into a grounded circuit ca pable of carrying 15 or more amps No other appliance should be on the same circuit Do...

Page 4: ...dures in this manual should be performed only by an authorised service representative 26 The CROSSTRAINER is intended for in home use only Do not use the CROSSTRAINER in any commercial rental or insti...

Page 5: ...ice Department at 1 800 936 4266 To help us assist you please note the product model number and serial number before calling The model number of the treadmill is PCTL50070 The serial number can be fou...

Page 6: ...carefully lay the treadmill on its right side as shown refer to the drawing on page 4 to identify the right side Insert the Extension Legs 137 into the treadmill Make sure that the Extension Legs are...

Page 7: ...sure that all parts of the CROSSTRAINER are properly tightened To protect the floor or car pet from damage place a mat under the CROSSTRAINER 6 7 79 80 81 99 116 102 129 5 Slide the Lock Pin Collar 84...

Page 8: ...erly installed and grounded in accordance with all local codes and ordinances This product is for use on a nominal 120 volt circuit and has a grounding plug that looks like the plug illus trated in dr...

Page 9: ...essive wear BATTERY INSTALLATION The console requires three AA batteries not included for operation Alkaline batteries are recom mended To install batteries first open the bat tery cover under the con...

Page 10: ...is stopped the speed control must be moved to the RESET position be fore the walking belt can be restarted Start the walking belt After you have moved the speed control to the RESET position slide it...

Page 11: ...from the console Store the key in a secure place After the key is removed the dis plays will remain on for about five minutes Note Any time that the walking belt is stopped and no console buttons are...

Page 12: ...s tem your exercise must be aerobic Aerobic exercise is activity that requires large amounts of oxygen for prolonged periods of time This increases the demand on the heart to pump blood to the muscles...

Page 13: ...es as far as possible Hold for 15 counts then relax Repeat 3 times Stretches Hamstrings back of knees and back 2 Hamstring Stretch Sit with one leg extended Bring the sole of the opposite foot toward...

Page 14: ...djust the backrest to one of the inclined positions first raise the backrest and lower the support see the draw ing below Rest the end of the support against either of the backrest stops as shown Make...

Page 15: ...xercise such as one sit up A set is a series of repetitions per formed without pausing As your fitness level in creases perform 2 sets of 12 repetitions for each exer cise that you do When you are rea...

Page 16: ...erhead 7 Lateral Raise Raise the weights to the side until they are even with your shoulders 8 Front Raise Raise the weights to the front until your arms are in a horizontal position 9 Upright Row Kee...

Page 17: ...cuit breaker has tripped To reset the circuit breaker wait for five minutes and then press the switch back in PROBLEM The power turns off during use SOLUTION a Check the circuit breaker located on the...

Page 18: ...ld be able to lift each side of the walk ing belt 3 to 4 inches off the walking platform The centre of the walking belt should just touch the walking platform Be careful to keep the walking belt centr...

Page 19: ...heel 71 1 Incline Leg 72 1 Latch Spring 73 4 Tie Clamp 74 2 Spring Screw 75 2 Releasable Tie 76 4 7 1 2 Cable Tie 77 12 Weight Rack Screw 78 2 Lock Knob 79 2 2 lb Weight 80 2 4 lb Weight 81 2 6 lb Wei...

Page 20: ...CUSTOMER RECORDS Model No Serial No Retailer Name Purchase Date Retailer Address 20...

Page 21: ...rdering parts please be prepared to give the following information The MODEL NUMBER OF THE PRODUCT PCTL50070 The NAME OF THE PRODUCT PROFORM CROSSTRAINER treadmill The SERIAL NUMBER OF THE PRODUCT see...

Page 22: ...anties and any implied warranties of merchantability or fitness for a particular purpose is limited in its scope and duration to the terms set forth herein Some provinces do not allow limitations on h...

Page 23: ...27 26 26 25 27 24 25 22 21 76 75 53 73 17 31 29 17 17 66 67 68 54 69 57 71 66 67 58 53 64 65 63 62 61 60 72 74 59 56 57 55 54 53 53 35 17 17 17 53 35 43 57 50 50 49 57 53 46 45 44 42 39 54 30 32 33 53...

Page 24: ...1 54 105 106 107 103 112 53 111 110 113 114 109 53 117 137 117 118 119 128 120 128 53 123 53 53 53 125 124 98 96 93 94 95 53 53 92 81 80 79 80 108 119 118 130 69 70 53 34 34 53 34 134 136 135 141 142...

Reviews: