background image

18

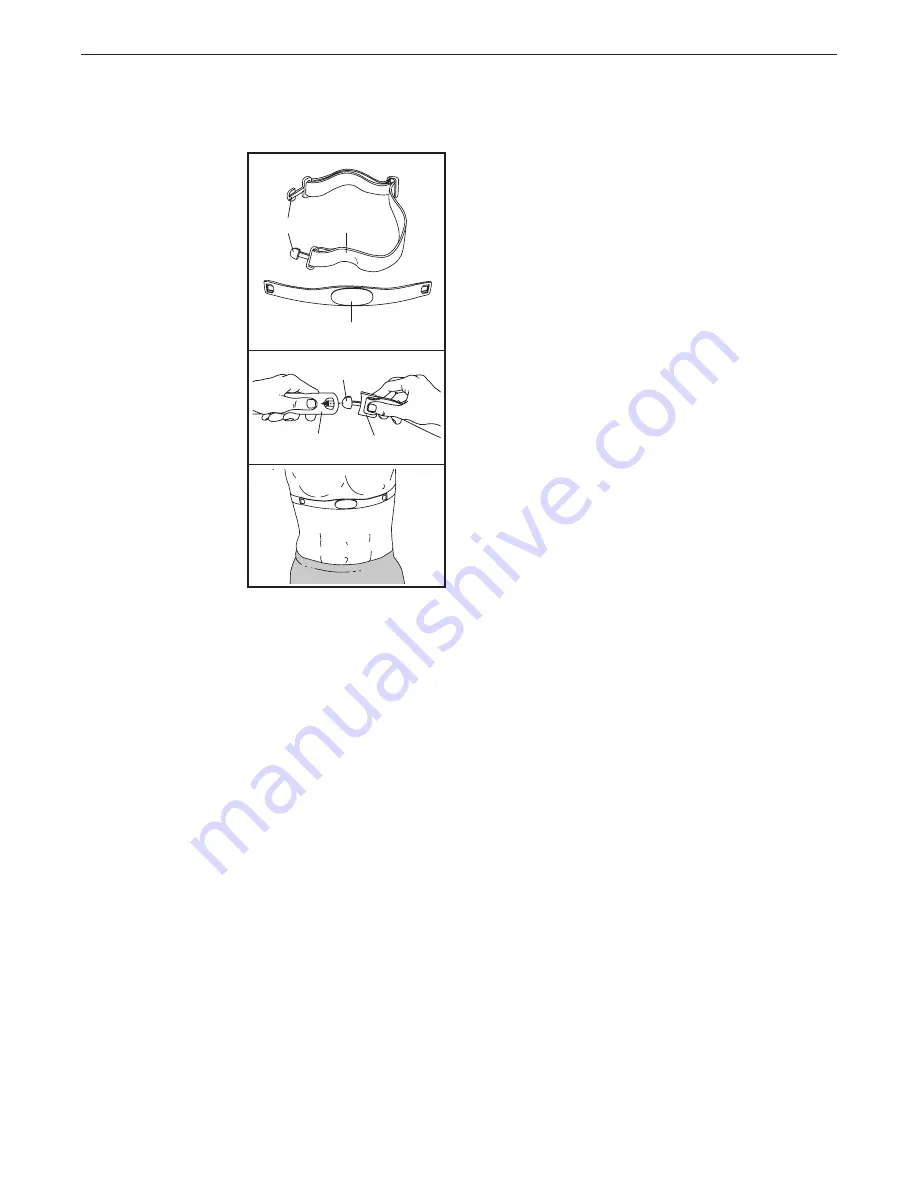
HOW TO PUT ON THE HEART RATE MONITOR

The heart rate 
monitor consists of 
a chest strap and a 
sensor. Insert the 
tab on one end of 
the chest strap into 
the hole in one end 
of the sensor as 
shown. Then, press 
the end of the sen-
sor under the buckle 
on the chest strap. 
The tab should be 
flush with the front of 
the sensor.

The heart rate moni-
tor must be worn 
under your clothes, 
tight against your 
skin. Wrap the heart 
rate monitor around 
your chest in the 
location shown. 
Make sure that 
the logo is right-
side-up. Then, attach the other end of the chest strap 
to the sensor. Adjust the length of the chest strap, if 
necessary.

Pull the sensor away from your body a few inches and 
locate the two electrode areas, which are covered by 
shallow ridges. Using saline solution such as saliva or 
contact lens solution, wet the electrode areas. Then, 
return the sensor to a position against your chest.

CARE AND MAINTENANCE

••   Thoroughly dry the sensor with a soft towel after 

each use. Moisture may keep the sensor activated, 
shortening the life of the battery.

••   Store the heart rate monitor in a warm, dry place. Do 

not store the heart rate monitor in a plastic bag or 
other container that may trap moisture.

••   Do not expose the heart rate monitor to direct sun-

light for extended periods of time; do not expose it to 
temperatures above 122° F (50° C) or below 14° F 
(-10° C).

••   Do not excessively bend or stretch the sensor when 

using or storing the heart rate monitor.

••   To clean the sensor, use a damp cloth and a small 

amount of mild soap. Then, wipe the sensor with a 
damp cloth and thoroughly dry it with a soft towel. 
Never use alcohol, abrasives, or chemicals to clean 
the sensor. Hand wash and air dry the chest strap.

TROUBLESHOOTING

If the heart rate monitor does not function properly, try 
the steps below.

••   Make sure that you are wearing the heart rate moni-

tor as described at the left. If the heart rate monitor 
does not function when positioned as described, 
move it slightly lower or higher on your chest.

••   If heart rate readings are not displayed until you 

begin perspiring, rewet the electrode areas.

••   For the console to display heart rate readings, you 

must be within arm’’s length of the console.

••   If there is a battery cover on the back of the sensor, 

replace the battery with a new battery of the same 
type.

••   The heart rate monitor is designed to work with 

people who have normal heart rhythms. Heart rate 
reading problems may be caused by medical condi-
tions such as premature ventricular contractions 
(pvcs), tachycardia bursts, and arrhythmia.

••   The operation of the heart rate monitor can be 

affected by magnetic interference from high power 
lines or other sources. If you suspect that magnetic 
interference is causing a problem, try relocating the 
fitness equipment.

 THE CHEST HEART RATE MONITOR

Sensor Buckle

Tab

Chest 

Strap

Tabs

Sensor

Summary of Contents for PFTL17112.0

Page 1: ...ual before using this equipment Save this manual for future reference ACTIVATE YOUR WARRANTY To register your product and activate your warranty today go to www proformservice com registration CUSTOME...

Page 2: ...T 35 EXPLODED DRAWING 36 ORDERING REPLACEMENT PARTS Back Cover LIMITED WARRANTY Back Cover WARNING DECAL PLACEMENT PROFORM is a registered trademark of ICON IP Inc TABLE OF CONTENTS This drawing shows...

Page 3: ...es sor into an appropriate outlet see page 19 To avoid overloading the circuit do not plug other electrical devices except for low power devices such as cell phone chargers into the surge suppressor o...

Page 4: ...W TO MOVE THE TREADMILL on page 30 You must be able to safely lift 45 lbs 20 kg to move the treadmill 23 Never insert any object into any opening on the treadmill 24 Inspect and properly tighten all p...

Page 5: ...5...

Page 6: ...6 all STANDARD SERVICE PLANS...

Page 7: ...of this manual To help us assist you please note the product model number and serial number before contacting us The model number and the location of the serial num ber decal are shown on the front c...

Page 8: ...this manual The number following the key number is the quantity used for assembly Note If a part is not in the hardware kit check to see if it is preat tached Extra parts may be included 3 8 Star Was...

Page 9: ...th and a mild non abrasive cleaner Left parts are marked L or Left and right parts are marked R or Right To identify small parts see page 8 Assembly requires the following tools the included hex key o...

Page 10: ...e end of the Bolt do not fully tighten the Bolt yet Attach the Left Upright not shown in the same way Note There are no wires on the left side 51 81 2 1 3 8 9 2 Make sure that the power cord is unplug...

Page 11: ...e 78 into the large hole in the bottom of the right handrail and pull it out of the front of the right handrail Set the right handrail assembly B onto the Right Upright 81 and attach the right handrai...

Page 12: ...3 8 x 4 1 4 Screws 2 only one side is shown Attach the Pulse Bar Bottom 77 with four 10 x 3 4 Screws 7 Start all four Screws and then tighten them Remove the wire tie from the Upright Wire 78 7 7 7 77...

Page 13: ...81 and the Left Upright not shown Insert the Upright Wire 78 through the looped plastic ties on the bottom of the console assembly Connect the Upright Wire 78 to the console wire See the inset drawing...

Page 14: ...3 and four 5 16 Star Washers 10 Start all four Screws and then tighten them Then tighten the four other 5 16 x 5 8 Screws 3 11 10 3 Console Assembly 3 10 3 10 Tighten four 8 x 3 4 Screws 5 into the bo...

Page 15: ...x 3 4 Screws 5 Start all four Screws and then tighten them 13 5 81 79 5 80 12 Attach the Right Handrail Bottom 74 to the bot tom of the right handrail assembly B with two 8 x 3 4 Screws 5 Attach the L...

Page 16: ...ight 81 Press the Right Outside Cover 83 against the Right Inside Cover 85 and the Right Upright 81 until the two Covers snap together Repeat this step on the left side with the Left Inside and Outsid...

Page 17: ...ghtened before you use the treadmill If there are sheets of plastic on the treadmill decals remove the plastic To protect the floor or carpet place a mat under the treadmill Note Extra parts may be in...

Page 18: ...tures above 122 F 50 C or below 14 F 10 C Do not excessively bend or stretch the sensor when using or storing the heart rate monitor To clean the sensor use a damp cloth and a small amount of mild soa...

Page 19: ...into a surge suppressor and plug the surge suppressor into an appropriate outlet that is properly installed and grounded in accordance with all local codes and ordinances The outlet must be on a nomi...

Page 20: ...ts create your own workouts track your workout results race against other iFit users and access many other features You can even listen to your favorite workout music or audio books with the console s...

Page 21: ...MANUAL MODE 1 Insert the key into the console See HOW TO TURN ON THE POWER at the left 2 Select the manual mode Press the Manual Control button on the console If you are not connected to iFit the manu...

Page 22: ...line set tings of the workout A new segment will appear at the end of each minute The Speed tab will show a pro le of the speed set tings of the workout The My Trail tab will show a track that represe...

Page 23: ...When you are finished exercising remove the key from the console Step onto the foot rails and press the Stop button Next remove the key from the console and put it in a secure place When you are finis...

Page 24: ...ed and or incline setting is programmed for the next segment the speed and or incline will change when the next segment begins The workout will continue in this way until the last segment of the pro l...

Page 25: ...Start button to start the workout A moment after you press the button the walking belt will begin to move Hold the handrails and begin walking The workout will function in the same way as the manual m...

Page 26: ...ay will show the duration of the workout the distance you will walk or run and the approximate number of calories you will burn The display may also show the name of the workout 5 Start the workout Se...

Page 27: ...change the unit of mea surement press the Enter button To view distance in miles select ENGLISH To view distance in kilometers select METRIC Default Menu The default menu will appear when you insert t...

Page 28: ...ect the letter number or symbol When you have finished entering the password press the Done button A numerical code and a web address will appear in the matrix Go to the web address on your internet c...

Page 29: ...URL bar in your browser Example http 192 168 0 1 8080 Your browser will load a web page If the web page does not appear double check the IP address and the previous instructions of this step Follow t...

Page 30: ...Raise the tread mill until the treadmill rolls freely on the wheels Carefully roll the treadmill to the desired location and then lower it to the level position CAUTION To reduce the risk of injury us...

Page 31: ...during use a Check the power switch see the drawing above If the switch has tripped wait for five minutes and then press the switch back in b Make sure that the power cord is plugged in If the power c...

Page 32: ...ted remove the key from the console SYMPTOM The walking belt slows when walked on a Use only a surge suppressor that meets all of the specifications described on page 19 b If the walking belt is overt...

Page 33: ...r screws clockwise 1 4 of a turn When the walk ing belt is correctly tightened you should be able to lift each edge of the walking belt 2 to 3 in 5 to 7 cm off the walking platform Be careful to keep...

Page 34: ...c Exercise If your goal is to strengthen your cardiovascular system you must perform aerobic exercise which is activity that requires large amounts of oxygen for prolonged periods of time For aerobic...

Page 35: ...Base 50 1 Right Foot Rail Pad 51 1 Frame 52 2 Rear Leveling Foot 53 2 1 2 Rear Leveling Foot Nut 54 2 Rear Leveling Foot Cover 55 1 Warning Decal 56 1 Rear Frame Cover 57 1 Incline Motor 58 2 Incline...

Page 36: ...55 53 52 14 54 30 28 24 36 13 34 11 22 37 35 30 23 39 38 12 11 12 32 5 41 19 40 8 11 43 22 11 42 12 33 12 14 14 11 30 28 24 52 53 14 54 12 12 37 11 51 12 37 50 49 12 48 5 19 11 41 23 35 27 22 8 35 30...

Page 37: ...37 11 11 67 70 69 68 64 66 4 63 21 62 102 17 60 8 15 8 61 57 62 65 21 17 102 60 8 59 58 58 16 8 31 5 31 31 5 5 EXPLODED DRAWING B Model No PFTL17112 0 R1212A...

Page 38: ...38 71 5 5 73 7 3 10 75 77 5 5 7 5 3 10 76 72 74 5 78 5 5 2 9 1 9 78 81 1 9 9 2 80 83 84 85 82 87 88 86 86 5 5 79 3 3 10 10 3 3 10 10 5 4 4 29 29 EXPLODED DRAWING C Model No PFTL17112 0 R1212A...

Page 39: ...39 91 6 92 4 97 4 4 99 4 4 98 5 96 4 26 4 94 95 26 94 26 94 18 26 94 90 89 93 4 4 100 101 EXPLODED DRAWING D Model No PFTL17112 0 R1212A...

Page 40: ...that speci cally set forth above is authorized by ICON ICON is not responsible or liable for indirect special or consequential damages arising out of or in con nection with the use or performance of t...

Reviews: