9
To dismount the REBEL, allow the pedals to slowly
come to a stop. Important: The REBEL does not
have a free wheel; the pedals will continue to
move until the flywheel stops. When the pedals are
stationary, step off the highest pedal first. Then, step
off the lowest pedal.
HOW TO ADJUST THE TOE PEDALS
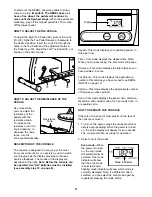
To adjust the Right Toe Pedal (89), pull out the Lock
Pin (90). Slide the Toe Pedal forward or backward to
the desired position. Insert the Lock Pin through the
holes in the Toe Pedal and the adjustment holes in
the Pedal Leg (70). Adjust the Left Toe Pedal (36, not
shown) in the same manner.
HOW TO ADJUST THE RESISTANCE OF THE
PEDALS
As you exercise,
you can adjust the
resistance of the
pedals with the
resistance knob.
To increase the
resistance, turn the
knob clockwise; to
decrease the resis-
tance, turn the
knob counterclockwise.
DESCRIPTION OF THE CONSOLE
The console is designed to help you get the most
from your workouts. As you exercise, you can watch
your progress as the display provides continuous
exercise feedback. The modes of the display are
described at the right. Note: Before the console can
be operated, two “AA” batteries must be installed
(see assembly step 10 on page 8).
Speed—This mode displays your pedaling speed, in
miles per hour.
Time—This mode displays the elapsed time. Note:
When you stop exercising, the time mode will pause.
Distance—This mode displays the total distance you
have pedaled, in miles.
Fat Calorie—This mode displays the approximate
number of fat calories you have burned (see BURN-
ING FAT on page 12).
Calorie—This mode displays the approximate number
of Calories you have burned.
Scan—This mode displays the speed, time, distance,
fat calorie, and calorie modes, for 5 seconds each, in
a repeating cycle.
HOW TO OPERATE THE CONSOLE
If there is a thin sheet of clear plastic on the face of
the console, remove it.
1. To turn on the power, press the on/reset button or
simply begin pedaling. When the power is turned
on, the entire display will appear for two seconds.
The console will then be ready for operation.
2. Select one of the modes:
Scan mode—When
the power is turned
on, the scan mode
will automatically be
selected. One mode
indicator will show
that the scan mode
is selected, and a
flashing mode indicator will show which mode is
currently displayed. Note: If a different mode is
selected, you can select the scan mode again by
repeatedly pressing the mode button.
Display
90
89
70
Mode Indicators
Resistance
Knob


