6.
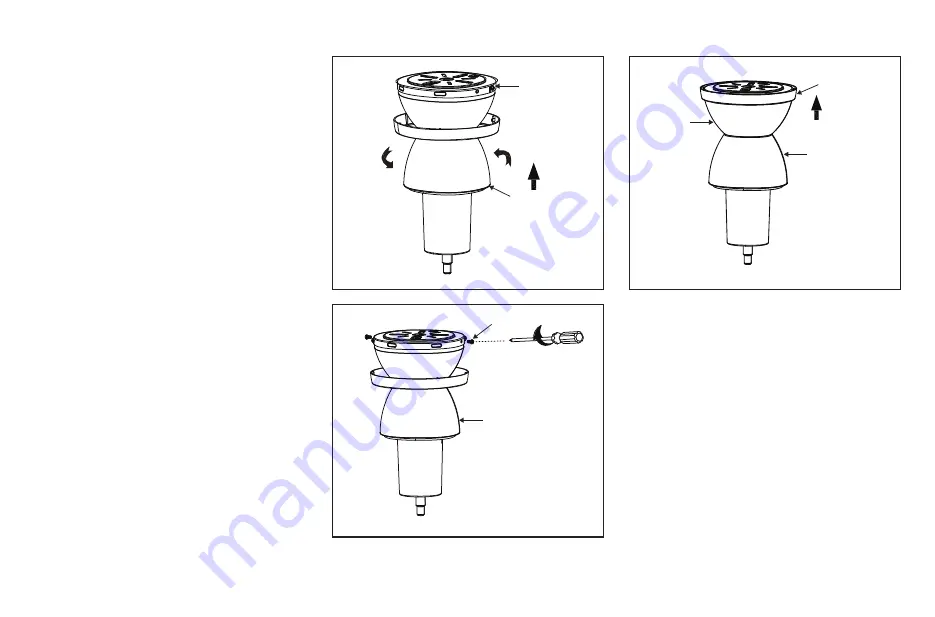
Figure 8
Figure 10
Figure 9
Finishing the Installation
Step 1.
After wire connections, take the motor
assembly off the hook.Raise the motor assembly
up to the ceiling bracket assembly.Align two
remained screws on the motor assembly to the
keyholes on the ceiling bracket assembly, rotate
clockwise until the screw heads engage the
keyhole slots fully. Make sure not to break any
wire connections (Figure 8).
Step 2.
Re-install two mounting screws to the
round holes, securely tighten four (4) mounting
screws (Figure 9).
Step 3.
Lift the trim ring up, aligning four
notches on the canopy of motor assembly with
raised areas on the inner side of trim ring and
pop it into the canopy (Figure 10).
Ceiling bracket
assembly
Motor assembly
Canopy
Trim ring
Mounting screws
Motor assembly
Motor assembly
Summary of Contents for AirPro Willacy P250063
Page 1: ...Ceiling Fan Installation Manual P250063 93133628_A ...
Page 14: ...11 Wifi Control Setup Smart Device Control ...
Page 15: ...Wifi Control Setup Smart Speaker Voice Control 12 ...
Page 18: ...Manuel d installation du ventilateur de plafond P250063 93133628_A ...
Page 31: ......
Page 32: ......
Page 35: ...Manual de Instalación del Ventilador de Techo P250063 93133628_A ...
Page 48: ...11 Configuration du contrôle WIFI Contrôle des appareils intelligents ...
Page 49: ...Configuration du contrôle WIFI Contrôle vocal intelligent du haut parleur 12 ...


