background image

Problem

Possible cause

Solution


The lamp is defective.

Refer to "Replacing the lamp".

The compressor oper-
ates continually.

The temperature is not set cor-
rectly.

Set a higher temperature.


The door is not closed correctly.

Refer to "Closing the door".


The door has been opened too
frequently.

Do not keep the door open longer
than necessary.


The product temperature is too
high.

Let the product temperature de-
crease to room temperature be-
fore storage.


The room temperature is too
high.

Decrease the room temperature.

Water flows on the rear
plate of the refrigerator.

During the automatic defrosting
process, frost defrosts on the
rear plate.

This is correct.

Water flows into the re-
frigerator.

The water outlet is clogged.

Clean the water outlet.


Products prevent that water
flows into the water collector.

Make sure that products do not
touch the rear plate.

Water flows on the
ground.

The melting water outlet does
not flow in the evaporative tray
above the compressor.

Attach the melting water outlet to
the evaporative tray.

The temperature in the
appliance is too low.

The temperature regulator is not
set correctly.

Set a higher temperature.

The temperature in the
appliance is too high.

The temperature regulator is not
set correctly.

Set a lower temperature.

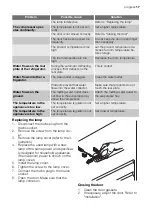
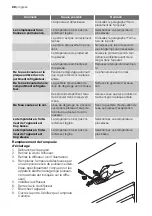
Replacing the lamp

1. Disconnect the mains plug from the

mains socket.

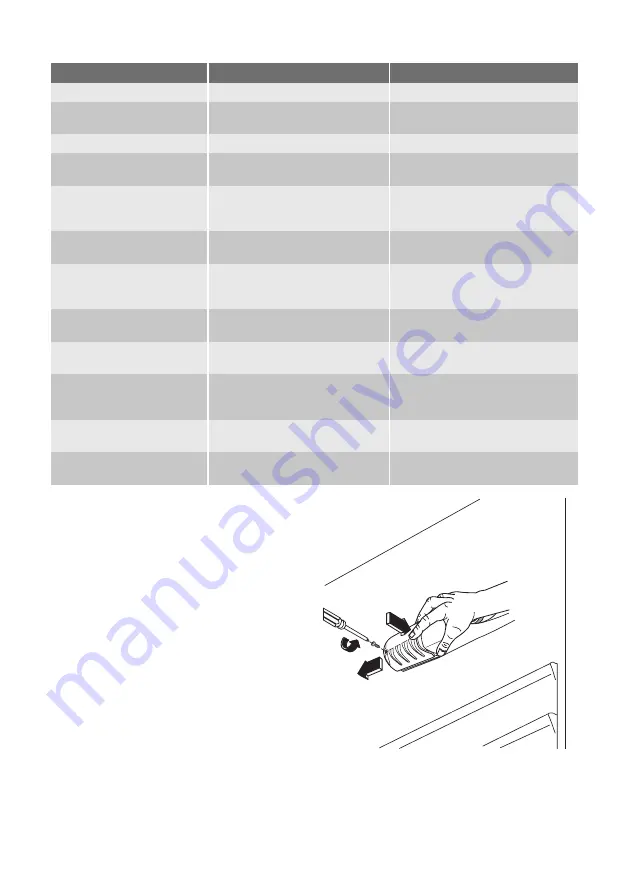
2. Remove the screw from the lamp cov-

er.

3. Remove the lamp cover (refer to the il-

lustration).

4. Replace the used lamp with a new

lamp of the same power and specifical-
ly designed for household appliances.
(the maximum power is shown on the
lamp cover).

5. Install the lamp cover.
6. Tighten the screw to the lamp cover.
7. Connect the mains plug to the mains

socket.

8. Open the door. Make sure that the

lamp comes on.

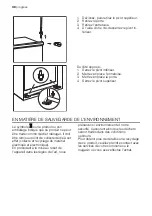
Closing the door

1. Clean the door gaskets.
2. If necessary, adjust the door. Refer to

"Installation".

progress 

17

Summary of Contents for PK0802

Page 1: ...gebruiksaanwijzing user manual notice d utilisation benutzerinformation Koelkast Refrigerator R frig rateur K hlschrank PK0802...

Page 2: ...verant woordelijke persoon of tenzij zij van een dergelijke persoon instructie hebben ont vangen over het gebruik van het appa raat Houd kinderen uit de buurt om te voorko men dat ze met het apparaat...

Page 3: ...araten De lampjes zijn niet geschikt voor de verlichting van ruimtes Dagelijks gebruik Zet geen hete potten op de kunststof on derdelen in het apparaat Bewaar geen brandbare gassen of vloei stoffen in...

Page 4: ...stand Uitschakelen Draai de thermostaatknop op de stand O om het apparaat uit te schakelen Temperatuurregeling De temperatuur wordt automatisch gere geld Ga als volgt te werk om het apparaat in werki...

Page 5: ...ien van een variabel be waarvak dat is aangebracht onder een deurschap wat naar de zijkant kan worden geschoven Belangrijk Dit apparaat wordt in Frankrijk verkocht In overeenstemming met de regelgevin...

Page 6: ...aardappelen uien en knoflook indien niet verpakt mogen niet in de koel kast bewaard worden ONDERHOUD EN REINIGING Let op Voordat u welke onderhoudshandeling dan ook verricht de stekker uit het stopcon...

Page 7: ...lijft staan vraag dan iemand om het zo nu en dan te controleren om te voorkomen dat het bewaarde voed sel bederft als de stroom uitvalt PROBLEMEN OPLOSSEN Waarschuwing Voordat u storingen opspoort de...

Page 8: ...r De dooiwaterafvoer loopt niet in de verdamperbak boven de compressor Maak de dooiwaterafvoer vast op de verdamperbak De temperatuur in het apparaat is te laag De thermostaatknop is niet goed ingeste...

Page 9: ...evingstemperatuur SN 10 C tot 32 C N 16 C tot 32 C ST 16 C tot 38 C T 16 C tot 43 C Elektrische aansluiting Zorg er v r het aansluiten voor dat het vol tage en de frequentie op het typeplaatje overeen...

Page 10: ...roduct niet als huishoudafval mag worden behandeld maar moet worden afgegeven bij een verzamelpunt waar elektrische en elektronische apparatuur wordt gerecycled Als u ervoor zorgt dat dit product op d...

Page 11: ...ull the plug out of the socket cut the con nection cable as close to the appliance as you can and remove the door to pre vent playing children to suffer electric shock or to close themselves into it I...

Page 12: ...e maintenance switch off the appli ance and disconnect the mains plug from the mains socket Do not clean the appliance with metal objects Regularly examine the drain in the refrig erator for defrosted...

Page 13: ...the maximum coldness A medium setting is generally the most suitable However the exact setting should be chos en keeping in mind that the temperature in side the appliance depends on room temperature...

Page 14: ...variable stor age box which is fitted under a door shelf compartment and can be slide sideways Important this appliance is sold in France In accordance with regulations valid in this country it must b...

Page 15: ...ecial drawer s provided Butter and cheese these should be placed in special airtight containers or wrapped in aluminium foil or polythene bags to exclude as much air as possible Milk bottles these sho...

Page 16: ...li ance and all accessories leave the door doors ajar to prevent un pleasant smells If the cabinet will be kept on ask some body to check it once in a while to prevent the food inside from spoiling in...

Page 17: ...ts do not touch the rear plate Water flows on the ground The melting water outlet does not flow in the evaporative tray above the compressor Attach the melting water outlet to the evaporative tray The...

Page 18: ...lass Ambient temperature SN 10 C to 32 C N 16 C to 32 C ST 16 C to 38 C T 16 C to 43 C Electrical connection Before plugging in ensure that the voltage and frequency shown on the rating plate correspo...

Page 19: ...old waste Instead it should be taken to the appropriate collection point for the recycling of electrical and electronic equipment By ensuring this product is disposed of correctly you will help preven...

Page 20: ...ct de l environnement vous devez d abord li re attentivement les pr conisations sui vantes avant toute utilisation de votre appareil Attention Pour viter tout risque de d t rioration de l appareil tra...

Page 21: ...de s curit Avertissement Veillez ce que les orifices de ventilation situ s dans l enceinte de l appareil ou la structure int gr e ne soient pas obstru s Les appareils sont destin s uniquement la conse...

Page 22: ...ct s mati res grasses fromages frais Zone la plus froide Viandes volailles poissons charcuteries plats pr par s salades compos es pr parations et p tisseries base d ufs ou de cr me p tes fra ches p te...

Page 23: ...ce cas gardez l emballage Il est conseill d attendre au moins quatre heures avant de brancher l appareil pour que le circuit frigorifique soit stabilis Veillez ce que l air circule librement au tour...

Page 24: ...d maximum lorsque la temp rature ambiante est lev e et que l appareil est plein il est possible que le compresseur fonctionne en r gime continu Dans ce cas il y a un risque de formation excessive de g...

Page 25: ...la clayette positionn e la m me hauteur que le symbole Pour un bon stockage des aliments assu rez vous que l indicateur de temp rature affiche OK Si OK n est pas affich r glez le ther mostat sur une...

Page 26: ...de terre oignons et ail ne se conservent pas au r frig rateur s ils ne sont pas correctement emball s ENTRETIEN ET NETTOYAGE Attention d brancher l appareil avant toute op ration d entretien Cet appar...

Page 27: ...faites v ri fier r guli rement son bon fonctionnement pour viter la d t rioration des aliments en cas de panne de courant EN CAS D ANOMALIE DE FONCTIONNEMENT Avertissement Avant de r soudre les probl...

Page 28: ...ettoyez la goutti re d vacua tion Des produits emp chent l eau de s couler dans le r servoir d eau Assurez vous que les produits ne touchent pas la plaque arri re De l eau coule sur le sol L eau de d...

Page 29: ...enu des autres appareils d j branch s Calibre des fusibles en ligne un par phase 10 A 230 V Important L installation doit tre r alis e conform ment aux r gles de l art aux prescriptions de la norme NF...

Page 30: ...e indique que ce produit ne peut tre trait comme d chet m nager Il doit tre remis au point de collecte d di cet effet collecte et recyclage du mat riel lectrique et lectronique En proc dant la mise au...

Page 31: ...ie sicherstellt dass sie sich der Gefah ren des Gebrauchs bewusst sind Kinder m ssen beaufsichtigt werden da mit sie nicht am Ger t herumspielen k n nen Halten Sie das Verpackungsmaterial un bedingt v...

Page 32: ...keine hei en T pfe auf die Kunststoffteile des Ger tes Lagern Sie keine feuergef hrlichen Gase oder Fl ssigkeiten in dem Ger t Explosi onsgefahr Die Lagerempfehlungen des Ger tehers tellers sind strik...

Page 33: ...s Ger ts in die Position O Temperaturregelung Die Temperatur wird automatisch geregelt Bedienen Sie das Ger t wie folgt drehen Sie den Temperaturregler auf eine niedrigere Einstellung um die minimal m...

Page 34: ...einer T rablage befestigt ist und sich seitlich verschieben l sst Wichtig Das Ger t wird in Frankreich verkauft Entsprechend den Vorschriften in diesem Land muss das Ger t mit einer speziellen Vorric...

Page 35: ...uminiumfolie bzw in lebensmitte lechte T ten eingepackt werden um so wenig Luft wie m glich in der Verpackung zu haben Milchflaschen bitte bewahren Sie Milchfla schen stets mit Deckel im Flaschenregal...

Page 36: ...inigungswerkzeug das sich bereits in der Ablauf ffnung befindet Stillstandzeiten Bei l ngerem Stillstand des Ger tes m s sen Sie folgenderma en vorgehen trennen Sie das Ger t von der Netz versorgung e...

Page 37: ...r Wasser flie t an der R ckwand des K hl schranks hinunter Beim automatischen Abtauen flie t das abgetaute Wasser an der R ckwand des K hl schranks hinunter Das ist normal Wasser flie t in den K hlsch...

Page 38: ...Typenschild innen links im Ge r t sowie auf der Energieplakette MONTAGE Lesen Sie bitte die Sicherheitshinweise sorgf ltig vor der Aufstellung des Ger ts durch um Gefahren f r Sie selbst zu vermeiden...

Page 39: ...nen Sie den oberen Bolzen 2 H ngen Sie die T r aus 3 Nehmen Sie das Distanzst ck ab 4 L sen Sie den unteren Bolzen mit ei nem Schl ssel Auf der gegen berliegenden Seite 1 Ziehen Sie den unteren Bolzen...

Page 40: ...www progress hausgeraete de 211621696 A 162012...

Reviews: