background image

Contents

Safety information  

 18

Operation  

 20

First use  

 20

Daily use  

 20

Helpful hints and tips  

 22

Care and cleaning  

 22

What to do if…  

 24

Technical data  

 26

Installation  

 26

Environmental concerns  

 31


Subject to change without notice

 Safety 

information

In the interest of your safety and to ensure
the correct use, before installing and first us-
ing the appliance, read this user manual
carefully, including its hints and warnings. To
avoid unnecessary mistakes and accidents,
it is important to ensure that all people using
the appliance are thoroughly familiar with its
operation and safety features. Save these in-
structions and make sure that they remain
with the appliance if it is moved or sold, so
that everyone using it through its life will be
properly informed on appliance use and safe-
ty.
For the safety of life and property keep the
precautions of these user's instructions as
the manufacturer is not responsible for dam-
ages caused by omission.

Children and vulnerable people safety

• This appliance is not intended for use by

persons (including children) with reduced
physical, sensory or mental capabilities, or
lack of experience and knowledge, unless
they have been given supervision or in-
struction concerning use of the appliance
by a person responsible for their safety.
Children should be supervised to ensure
that they do not play with the appliance.

• Keep all packaging well away from chil-

dren. There is risk of suffocation.

• If you are discarding the appliance pull the

plug out of the socket, cut the connection
cable (as close to the appliance as you
can) and remove the door to prevent play-
ing children to suffer electric shock or to
close themselves into it.

• If this appliance featuring magnetic door

seals is to replace an older appliance hav-
ing a spring lock (latch) on the door or lid,
be sure to make that spring lock unusable
before you discard the old appliance. This
will prevent it from becoming a death trap
for a child.

General safety

Caution!

 Keep ventilation openings

clear of obstruction.

• The appliance is intended for keeping

foodstuff and/or beverages in a normal
household as explained in this instruction
booklet.

• Do not use a mechanical device or any ar-

tificial means to speed up the thawing
process.

• Do not use other electrical appliances

(such as ice cream makers) inside of re-
frigerating appliances, unless they are ap-
proved for this purpose by the manufac-
turer.

• Do not damage the refrigerant circuit.
• The refrigerant isobutane (R600a) is con-

tained within the refrigerant circuit of the
appliance, a natural gas with a high level of
environmental compatibility, which is nev-
ertheless flammable.
During transportation and installation of
the appliance, be certain that none of the
components of the refrigerant circuit be-
come damaged.
If the refrigerant circuit should become
damaged:
– avoid open flames and sources of igni-

tion

– thoroughly ventilate the room in which

the appliance is situated

18 

 progress

Summary of Contents for PKG1640

Page 1: ...benutzerinformation user manual gebruiksaanwijzing notice d utilisation K hl Gefrierschrank Fridge Freezer Koelkast Vriezer R frig rateur cong lateur PKG1640...

Page 2: ...ter Aufsicht oder nach ausreichender Einweisung durch eine verantwortungsbe wusste Person benutzt werden die sicher stellt dass sie sich der Gefahren des Ge brauchs bewusst sind Kinder m ssen beaufsic...

Page 3: ...ren nungen f hren kann Das Ger t nicht direkter Sonneneinstrah lung aussetzen T glicher Gebrauch Stellen Sie keine hei en T pfe auf die Kunststoffteile des Ger tes Lagern Sie keine feuergef hrlichen G...

Page 4: ...muss gem den geltenden Vorschriften entsorgt werden sie erhal ten diese bei Ihrer Gemeindeverwaltung Nicht das K lteaggregat besch digen insbesondere nicht in der N he des W rmetauschers Die Material...

Page 5: ...Leistung zu erhalten Warnung Bitte achten Sie unbedingt darauf die Beladungsgrenze nicht zu berschreiten die seitlich im oberen Teil angegeben ist wo zutreffend Wichtig Kam es zum Beispiel durch einen...

Page 6: ...ste Ergebnisse legen Sie bitte keine warmen Lebensmittel oder dampfende Fl ssigkeiten in den K hlschrank decken Sie die Lebensmittel ab oder ver packen Sie diese entsprechend beson ders wenn diese sta...

Page 7: ...das Einfrierdatum auf je der einzelnen Packung zu notieren um ei nen genauen berblick ber die Lagerzeit zu haben Warnung legen Sie keine kohlens ure haltigen Getr nke Limonaden usw in das Gefrierfach...

Page 8: ...otorkompres sor wo es verdampft Reinigen Sie deshalb regelm ig die Abfluss ffnung des Tauwassers in der Mitte des K hlschrankkanals damit das Wasser nicht berflie t und auf die gelagerten Lebensmit te...

Page 9: ...ntstehen unangenehmer Ger che zu vermeiden M chten Sie bei einer l ngeren Abwesenheit den Gefrierschrank weiter laufen lassen bit ten Sie jemanden gelegentlich die Tempe ratur zu pr fen damit das Gefr...

Page 10: ...here Temperatur ein Die Temperatur im Ger t ist zu hoch Der Temperaturregler ist nicht richtig eingestellt Stellen Sie eine niedrigere Tempe ratur ein Die T r ist nicht richtig geschlos sen Siehe hier...

Page 11: ...nischen Informationen befinden sich auf dem Typenschild innen links im Ger t so wie auf der Energieplakette Ger t aufstellen Lesen Sie bitte die Sicherheitshinweise sorgf ltig vor der Aufstellung des...

Page 12: ...gen Sie daf r einen qualifizierten Elektriker Der Hersteller bernimmt keinerlei Haftung f r Sch den oder Verletzungen die durch Missachtung der vorstehenden Sicherheits hinweise entstehen Das Ger t en...

Page 13: ...charnier fest 6 Installieren Sie die obere T r 7 Setzen Sie das obere Distanzst ck ein 8 Ziehen Sie den oberen Bolzen fest Anforderungen an die Bel ftung Die Luftzirkulation hinter dem Ger t muss ausr...

Page 14: ...ie den Dichtungsstreifen b Bringen Sie den Dichtungsstreifen wie in der Abbildung gezeigt am Ge r t an 2 Installieren Sie das Ger t in der Einbau nische a Schieben Sie das Ger t in Pfeilrich tung 1 bi...

Page 15: ...seitlich wie folgt an das K chenm bel an a L sen Sie die Schrauben von Teil G und verschieben Sie Teil G zur K chenm bel Seitenwand b Ziehen Sie die Schrauben von Teil G erneut fest c Befestigen Sie T...

Page 16: ...Sie die Bohrungen Ha Hb 8 mm 11 Entfernen Sie die Halter Setzen Sie den Nagel K 8 mm von der Au enkante der T r ein Ha K 8 mm 12 Setzen Sie das kleine Viereck erneut auf die F hrung und schrauben Sie...

Page 17: ...andeln ist sondern an einem Sammelpunkt f r das Recycling von elektrischen und elektronischen Ger ten abgegeben werden muss Durch Ihren Beitrag zum korrekten Entsorgen dieses Produkts sch tzen Sie die...

Page 18: ...all packaging well away from chil dren There is risk of suffocation If you are discarding the appliance pull the plug out of the socket cut the connection cable as close to the appliance as you can an...

Page 19: ...as it creates pressure on the container which may cause it to explode resulting in damage to the appliance Ice lollies can cause frost burns if con sumed straight from the appliance Care and cleaning...

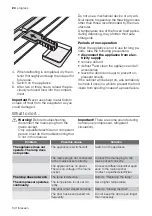
Page 20: ...inside the appliance depends on room temperature how often the door is opened the quantity of food stored the location of the appliance Important If the ambient temperature is high or the appliance is...

Page 21: ...rage time is valid depends on the quality of the foods and treating before freezing Thawing Deep frozen or frozen food prior to being used can be thawed in the refrigerator com partment or at room tem...

Page 22: ...maximum quantity of food which can be frozen in 24 hrs is shown on the rating plate the freezing process takes 24 hours No further food to be frozen should be added during this period only freeze top...

Page 23: ...partment every time the motor compressor stops dur ing normal use The defrost water drains out through a trough into a special container at the back of the appliance over the motor compressor where it...

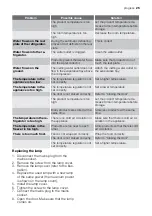
Page 24: ...ent the food inside from spoiling in case of a power failure What to do if Warning Before troubleshooting disconnect the mains plug from the mains socket Only a qualified electrician or competent pers...

Page 25: ...d correctly Refer to Closing the door The product temperature is too high Let the product temperature de crease to room temperature before storage Many products are stored at the same time Store less...

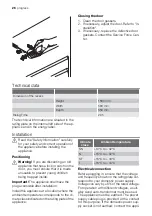
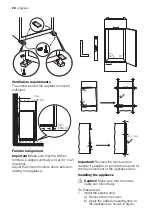
Page 26: ...e that it is made unusable to prevent young children being trapped inside Important The appliance shall have the plug accessible after installation Install this appliance at a location where the ambie...

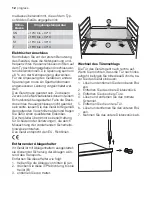
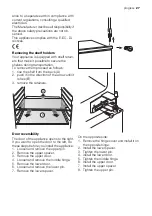
Page 27: ...e arrow until it is free B 3 remove the retainers A B Door reversibility The door of the appliance opens to the right If you want to open the door to the left do these steps before you install the app...

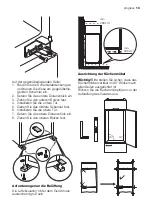
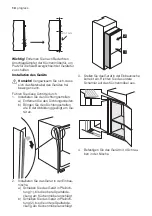
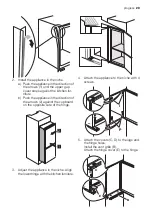
Page 28: ...he kitchen furniture doors before in stalling the appliance 90 90 min 1 mm Important Remove the furniture door damper if possible to provide free space for the free movement of the appliance door Inst...

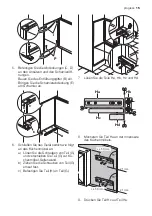
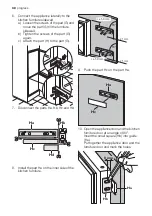
Page 29: ...e in the direction of the arrows 2 against the cupboard on the opposite side of the hinge 1 2 3 Adjust the appliance in the niche Align the lower hinge with the kitchen furniture 4 Attach the applianc...

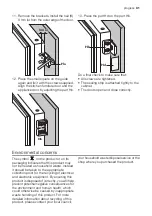
Page 30: ...part G G H 7 Disconnect the parts Ha Hb Hc and Hd Ha Hb Hc Hd 8 Install the part Ha on the inner side of the kitchen furniture ca 50 mm ca 50 mm 21 mm 90 90 21 mm 9 Push the part Hc on the part Ha Ha...

Page 31: ...ntal concerns The symbol on the product or on its packaging indicates that this product may not be treated as household waste Instead it should be taken to the appropriate collection point for the rec...

Page 32: ...ke persoon instructie hebben ontvangen over het gebruik van het apparaat Houd kinderen uit de buurt om te voorko men dat ze met het apparaat gaan spelen Houd alle verpakkingsmateriaal buiten het berei...

Page 33: ...ingen van de fabrikant U dient zich strikt te houden aan de aan bevelingen van de fabrikant van het appa raat met betrekking tot het bewaren van voedsel Raadpleeg de betreffende aan wijzingen Leg geen...

Page 34: ...stopcontact Draai de thermostaatknop op een gemiddel de stand Uitschakelen Draai de thermostaatknop op de stand O om het apparaat uit te schakelen Temperatuurregeling De temperatuur wordt automatisch...

Page 35: ...als de stroom langer is uitgevallen dan de duur die op de kaart met technische kenmerken onder tijdsduur is vermeld moet het ontdooide voedsel snel geconsumeerd worden of onmiddellijk bereid worden e...

Page 36: ...ken en op het glazen schap leggen boven de groentelade Bewaar het voor de veiligheid slechts een of maximaal twee dagen op deze manier Gekookt voedsel koude schotels enz deze moeten afgedekt worden en...

Page 37: ...mag alleen uitgevoerd worden door bevoegde technici Periodieke reiniging Het apparaat moet regelmatig worden schoongemaakt maak de binnenkant en de accessoires schoon met lauw water en wat neutrale ze...

Page 38: ...een opvangbak onder om het dooiwater op te vangen Om het ontdooiproces te versnellen kunt u een bak warm water in het vriesvak zetten Verwijder bovendien stukken ijs die afbreken voordat het ontdooie...

Page 39: ...iet goed gesloten Raadpleeg De deur sluiten De deur is te vaak open gedaan Laat de deur niet langer open staan dan noodzakelijk De temperatuur van het product is te hoog Laat het product afkoelen tot...

Page 40: ...niet goed inge steld Stel een hogere temperatuur in Het lampje vervangen 1 Trek de stekker uit het stopcontact 2 Verwijder de schroef van de afdekking van het lampje 3 Verwijder de afdekking van het...

Page 41: ...3 C Elektrische aansluiting Zorg er v r het aansluiten voor dat het vol tage en de frequentie op het typeplaatje overeenkomen met de stroomtoevoer in uw huis De voltage kan 6 verschillen van het opgeg...

Page 42: ...uk Op de tegenoverliggende kant 1 Verwijder de afdekking van het scharnier en monteer het op het tegenoverliggende scharnier 2 Monteer het onderste afstandsstuk 3 Zet de onderste pen vast 4 Monteer de...

Page 43: ...htstrip a Verwijder de afdekking van de strip b Bevestig de zelfklevende afdichtstrip op het apparaat zoals aangegeven op de afbeelding 2 Installeer het apparaat in de nis a Duw het apparaat in de ric...

Page 44: ...Bevestig de afdekking van het scharnier E op het scharnier B E D C 6 Bevestig het apparaat tegen de zijkant van het keukenmeubel a Draai de schroeven van onderdeel G los en plaats onderdeel G tegen h...

Page 45: ...eine vierkantje Hb in de ge leider Ha Zet de deur van het apparaat en de deur van het keukenmeubel tegen elkaar en markeer de gaten Ha Hb 8 mm 11 Verwijder de beugels Installeer de spij ker K 8 mm van...

Page 46: ...orden behandeld maar moet worden afgegeven bij een verzamelpunt waar elektrische en elektronische apparatuur wordt gerecycled Als u ervoor zorgt dat dit product op de juiste manier wordt verwijderd vo...

Page 47: ...sance les emp chent d utiliser l appareil sans risque lorsqu ils sont sans surveillance ou en l absence d instruction d une personne responsable qui puisse leur assurer une utilisation de l appareil s...

Page 48: ...ou les produits con gel s la temp rature tr s basse laquelle ils se trouvent peut provoquer des br lures ou un arrachement de la peau vitez les expositions prolong es de l ap pareil aux rayons solair...

Page 49: ...ments applicables disponibles aupr s des autorit s loca les Veillez ne pas d t riorer les circuits frigorifiques notamment au niveau du condenseur Les mat riaux utilis s dans cet appareil identifi s p...

Page 50: ...efroidissantes pour obtenir les meilleures performances possibles Avertissement Assurez vous que la quantit d aliments ne d passe pas la charge limite indiqu e sur le c t de la section sup rieure le c...

Page 51: ...dans le r frig rateur couvrez ou enveloppez soigneusement les aliments surtout s ils sont aromatiques placez les aliments pour que l air puisse circuler librement autour Conseils pour la r frig ratio...

Page 52: ...liments se d t riorent rapidement et ne peuvent pas tre recongel s respecter la dur e de conservation indi qu e par le fabricant Entretien et nettoyage Attention d brancher l appareil avant toute op r...

Page 53: ...ais Attention Ne touchez pas d aliments surgel s avec des mains mouill es Vos mains risqueraient de rester coll es 3 Laissez la porte entrouverte et glissez la spatule en plastique dans le logement pr...

Page 54: ...s L ampoule est d fectueuse Consultez le paragraphe Rempla cement de l ampoule d clairage Le compresseur fonction ne en continu La temp rature n est pas bien r gl e Choisissez une temp rature plus lev...

Page 55: ...ckez les produits de fa on permettre la circulation de l air froid Il y a trop de givre Les aliments ne sont pas bien en velopp s Enveloppez les aliments correcte ment La porte n est pas bien ferm e C...

Page 56: ...2 C ST 16 38 C T 16 43 C Branchement lectrique Contr lez avant de brancher l appareil si la tension et la fr quence indiqu es sur la pla que signal tique correspondent celles de votre r seau Tol rance...

Page 57: ...l entretoise inf rieure Sur le c t oppos 1 Enlevez le cache charni re et installez le sur la charni re oppos e 2 Installez l entretoise inf rieure 3 Serrez le pivot inf rieur 4 Installez la porte inf...

Page 58: ...llez la bande isolante a Enlevez la protection b Appliquez la bande isolante adh sive sur l appareil comme indiqu dans la figure 2 Installez l appareil dans la niche a Poussez l appareil dans le sens...

Page 59: ...la charni re B E D C 6 Attachez lat ralement l appareil la pa roi lat rale du meuble de cuisine a Desserrez les vis de la pi ce G et d placez la pi ce G jusqu la paroi lat rale du meuble b Serrez de n...

Page 60: ...nissez la porte de l appareil et la por te du meuble et marquez les trous Ha Hb 8 mm 11 Sortez les rails de transport Installez le clou K 8 mm du bord ext rieur de la porte Ha K 8 mm 12 Placez de nouv...

Page 61: ...m nager Il doit tre remis au point de collecte d di cet effet collecte et recyclage du mat riel lectrique et lectronique En proc dant la mise au rebut de l appareil dans les r gles de l art nous pr s...

Page 62: ...62 progress...

Page 63: ...progress 63...

Page 64: ...222334683 00 082008 www progress hausgeraete de...

Reviews: