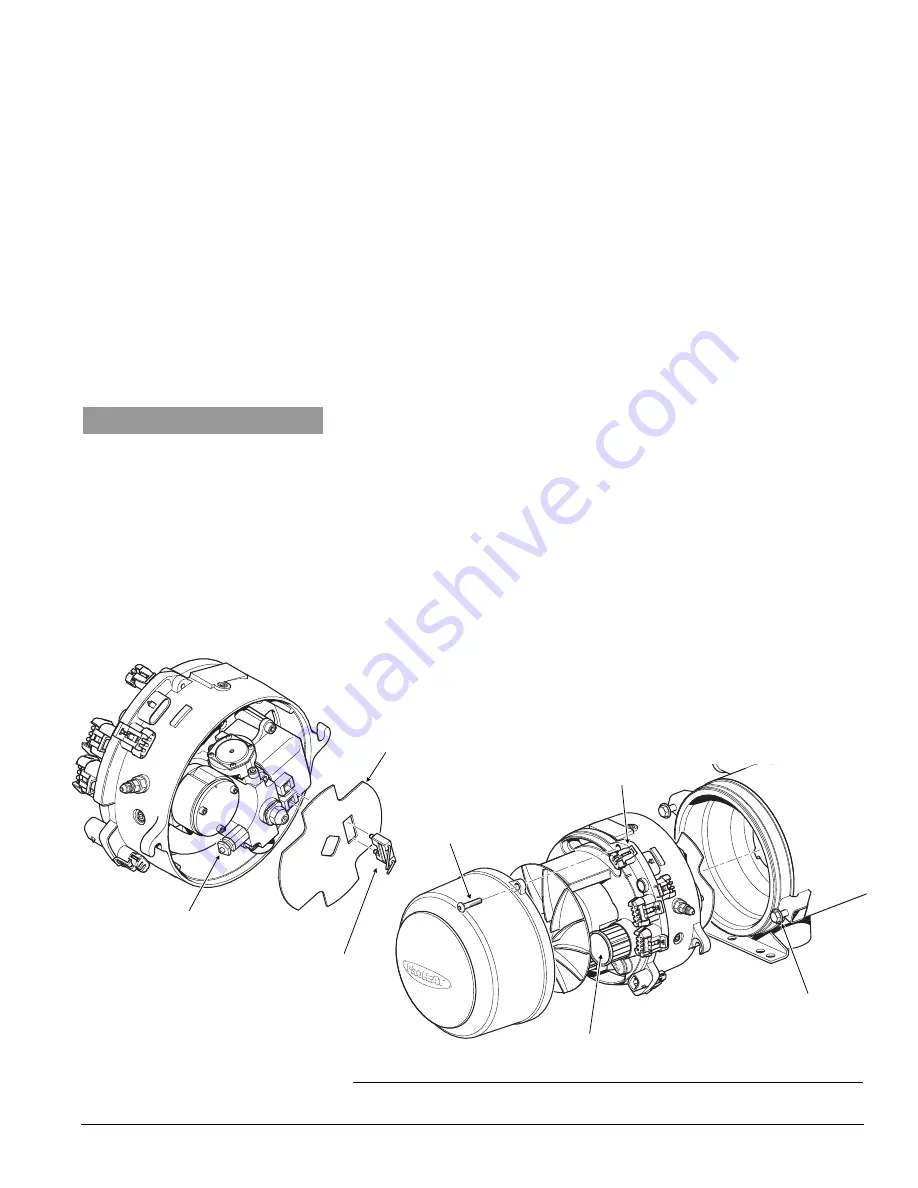
The rotary vane compressor may need service to clean and/or to replace the
vanes. This can be indicated by a lack of compressor pressure (page 4-11) or
noise. It is recommended to perform the following steps:
Step 1. Access the compressor and clean the air filter.
Step 2. Clean the rotary vane compressor.
Step 3. Test air compressor for proper pressure and operation. If pressure
and operation is not achieved, then proceed to Step 4.
Step 4. Replace vanes and test air compressor for proper pressure and
operation.
1.
Access the Compressor & Clean Air Filter
a) Disconnect all harnesses at the G-II PCM.
b) Disconnect the fuel supply line.
c) Disconnect the air intake hose (if required).
d) Loosen and back out the burner head mounting (2) bolts five to six
turns allowing enough room to rotate the burner head 15° counter-
clockwise and remove the Burner Head to a workbench.
e) Remove blower housing (2) screws and blower housing.
f)
Remove the Air Compressor filter. Inspect for contamination and replace if
necessary. Clean the filter cavity and the air passages using a dry cloth.
g) Remove ignition electrode assembly. Use a flat head screwdriver to
pry the electrode assembly out.
h) Remove the flame shield. Rotate to match the mounting square.
ROTARY VANE COMPRESSOR
SERVICE & VANES INSTALLATION
5.3
NOTICE
Prevent dirt and/or other contaminants
from entering into the compressor
intake port when cleaning.
AIR RELIEF
IGNITION
ELECTRODE
ASSEMBLY
AIR FILTER
MOUNTING BOLTS (2)
HOUSING
SCREWS (2)
G-II PCM
Figure 5-7: Access the Compressor and Air Filter.
FLAME SHIELD
5-7
PROHEAT M-SERIES G-II PCM SERVICE MANUAL
Summary of Contents for M105 G-II PCM
Page 7: ...PROHEAT M SERIES G II PCM SERVICE MANUAL B 2 ...
Page 11: ...PROHEAT M SERIES G II PCM SERVICE MANUAL D 2 ...
Page 25: ...PROHEAT M SERIES G II PCM SERVICE MANUAL 1 12 ...
Page 35: ...2 10 PROHEAT M SERIES G II PCM SERVICE MANUAL ...
Page 77: ...PROHEAT M SERIES G II PCM SERVICE MANUAL 4 40 ...
Page 89: ...6 2 PROHEAT M SERIES G II PCM SERVICE MANUAL ...


