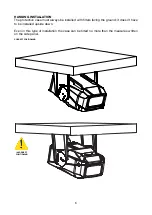
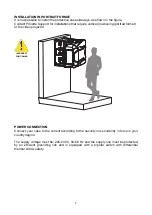
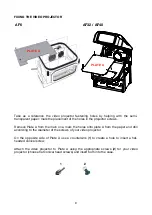
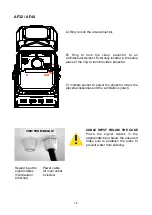
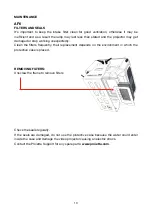
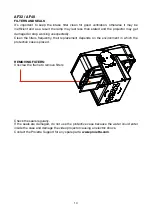
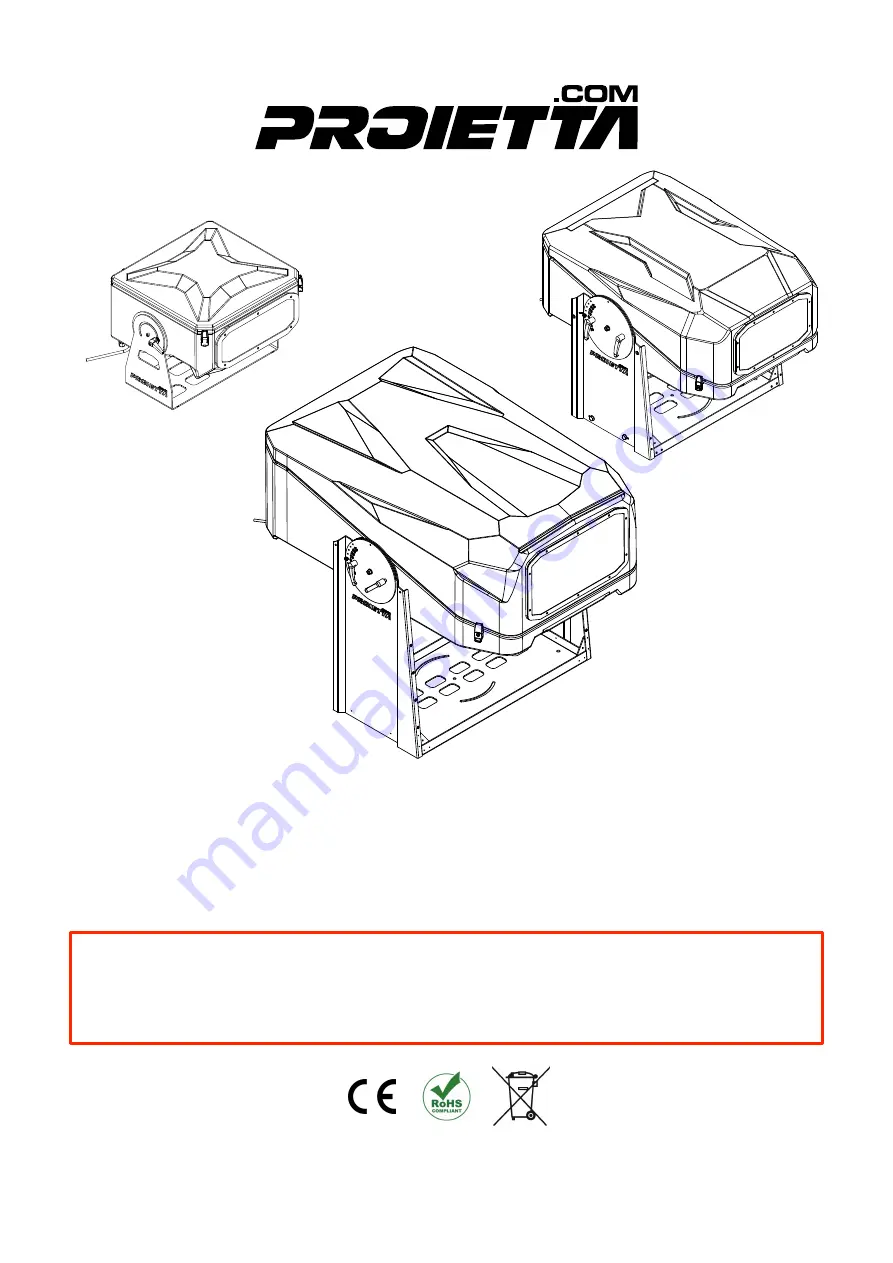
background image

INSTRUCTION MANUAL

CASE AF6 / AF32 / AF40 

WARNING:

Read this instruction manual carefully before using the 

product

Thank you for choosing a PROIETTA product

A-A 

A

A

592

25

5

12

7,

5

P

13

,5

312

552

700

30

2

48

6

48

0

2

0

0

38

0

31

8

2

14

1

402

A-A 

A

A

650

850

35

0

A-A

A

A

1300

800

48

5

Summary of Contents for AF32

Page 1: ...INSTRUCTION MANUAL CASE AF6 AF32 AF40 WARNING Read this instruction manual carefully before using the product Thank you for choosing a PROIETTA product 312 318 A A 650 850 350 ...

Page 2: ... 3 INSTALLATION IN PORTRAIT FORMAT 4 4 POWER CONNECTION 4 5 FIXING THE VIDEO PROJECTOR 5 MAINTENANCE 6 CAUSE AND SOLUTIONS OF POSSIBLE PROBLEMS 7 PROIETTA APP INSTALLATION 8 PROIETTA CONTROL BOARD LED SIGNALLING OPERATION 9 WARRANTY 10 DECLARATION OF CONFORMITY 11 DISPOSAL OF UNUSED PRODUCT 1 2 4 5 5 6 7 7 9 13 15 16 19 21 22 22 ...

Page 3: ...struction manual of the video projector that you plan to install inside The minimum temperature sustained by the protective case is 25 C The maximum temperature supported is 5 C lower than the maximum operating temperature shown in your projector s instruction manual e g A video projector with an operating temperature from 0 C to 45 C operating temperature insured by the protective case from 25 C ...

Page 4: ... 141 402 A A A A 650 850 350 970 77 240 460 615 944 1218 687 589 904 535 233 P 13 5 233 P 3 7 2 6 760 373 0 P 16x6 186 5 AF32 Maximum measurements of the video projector insertable in the CASE AF6 AF6 Maximum measurements of the video projector insertable in the CASE AF32 2 ...

Page 5: ... case compared to the video projector placed inside can result in insufficient ventilation and irreversible damage to the device itself A A A A 1300 800 485 744 233 1625 818 900 1364 1219 327 5 613 5 119 P 373 P 1 3 5 233 566 1153 1010 186 5 373 P16x6 AF40 3 Maximum measurements of the video projector insertable in the CASE AF40 ...

Page 6: ...inside T1 and is finally ejected on the back of the case at temperature T2 T2 T1 The rear fan of the protective case is necessary to extract the hot air emitted by the projector The fan on the front of the protective case in the bottom is to inject air to cool it down Only AF32 and AF40 models have this fan in the AF6 the air is automatically sucked inside the case by the internal ventilation syst...

Page 7: ... manual of use of the installed projector video The case can be tilted no more than 40 degrees up or 30 degrees down relative to the horizontal plane Contact Proietta Support in case you need to tilt it more WARNING Never unscrew the bolt A shown in the figure because it keeps the case assembled to the support bracket A 5 ...

Page 8: ...always be installed with filters facing the ground it doesn t have to be installed upside down Even in this type of installation the case can be tilted no more than the measures written on the side panel CORRECT POSITIONING INCORRECT POSITIONING 6 ...

Page 9: ...tioning portrait format of the video projector POWER CONNECTION Connect your case to the current according to the security rules currently in force in your country region The supply voltage must be 220 240 V 50 60 Hz and the supply line must be protected by an efficient grounding link and is equipped with a bipolar switch with differential thermal 0 03 A safety INCORRECT POSITIONING 7 ...

Page 10: ...For safety reasons it s essential to leave the film applied on top of the glass to avoid the fall of dangerous pieces of glass in case of rupture Cut only the area affected by the projection beam 8 ...

Page 11: ... mark the holes onto plate A from the paper and drill according to the diameter of the screws of your video projector On the opposite side of Plate A use a countersink 1 to create a hole to insert a flat headed conical screw Attach the video projector to Plate A using the appropriate screws 2 for your video projector choose flat conical head screws and insert both into the case 1 2 PLATE A AF6 AF3...

Page 12: ...Loose the knobs to adjust the tilt of the case then established them again to lock the desired position 10 ...

Page 13: ...he projector video the player accessories and the ventilation system CABLE INPUT BELOW THE CASE Place the signal cables in the appropriate input below the case and make sure to establish the press to prevent water from entering D Power cable for main outlet included E Sealed input for signal cables hdmi audio ethernet E D A B C 11 ...

Page 14: ...rojector C multiple socket to power the projector video the player accessories and the ventilation system CABLE INPUT BELOW THE CASE Place the signal cables in the appropriate input below the case and make sure to establish the press to prevent water from entering VIEW FROM BELOW Power cable for main outlet included Sealed input for signal cables hdmi audio ethernet A B C 12 ...

Page 15: ... unexpectedly Clean the filters frequently their replacement depends on the environment in which the protective case is placed REMOVING FILTERS Unscrew the frame to remove filters Check the seals regularly If the seals are damaged do not use the protective case because the water could enter inside the case and damage the video projector causing an electric shock Contact the Proietta Support for an...

Page 16: ...expectedly Clean the filters frequently their replacement depends on the environment in which the protective case is placed REMOVING FILTERS Unscrew the frame to remove filters Check the seals regularly If the seals are damaged do not use the protective case because the water could enter inside the case and damage the video projector causing an electric shock Contact the Proietta Support for any s...

Page 17: ...will act by emitting hot air otherwise do not use the product on days with temperatures below 5 C 41 F Both operating signals can be monitored by the application provided by Proietta under the heading Status You should contact the Proietta Support in case you have the following error messages TC INT ERROR internal temperature sensor anomaly TC EXT ERROR external temperature sensor anomaly Other me...

Page 18: ...PIN that coincides with the last 6 numbers of the serial e g 25K20200502 5 When you open the main screen to monitor your product a flashing red dot in the top right of the screen confirms that you have paired it with the app Model Serial Number Temperature inside the case Incoming Temperature Humidity Heating Status ON OFF Status reports any error Fan can work in automatic or manual mode AUTO auto...

Page 19: ... button down for two seconds until a red led lights up By stopping pressing the board restarts Reboot and the led shuts down again Holding down the button for 10 seconds the led turns off and when it is re lighting the board will be formatted to the factory settings Reset to Factory Reset to Factory resets the board account and IP to the default network parameters Configuring the case s network add...

Page 20: ...n password admin To configure the network address of the protective case to your network you have to select Configuration 2 Enter your network parameters 3 Server IoT should not be modified Time Int time interval between the publishing of the informations about the status of the case and the next one default 1s but it can be modified in a time interval between 1s and 300s In Maintenance you can do...

Page 21: ... 3 3V voltage for the power of the probes LED 2 Red LED reports an anomaly by flashing a slow flash Low CPU voltage two slow flashes High CPU voltage a fast flash External TC probe error two fast flashes Error probe TC Internal three fast flashes Error probe Humidity LED 3 Green LED reports how the CPU works a flash control board set for mode without external probe two flashes control board set fo...

Page 22: ...ce of 3 3V voltage for the power supply of the probes LED 8 Green LED reports the presence of 3 3V voltage for the power supply of the external modules e g Bluetooth LED 9 Red LED reports a malfunction of 3 3V voltage for the power supply of the external modules e g Bluetooth SWITCH FOR THE BOARD CONFIGURATION Configuration switch External probe mode configuration switch Placing the stick on 1 you...

Page 23: ...ed description of the issue It is essential to follow the safety instructions and warnings contained in this manual Any damage caused by non compliance with the manual causes the warranty to expire The manufacturer does not take any responsibility for damages or problems caused by non compliance with the manual The only maintenance operation allowed in warranty is the replacement of the filters An...

Page 24: ...ly VAT number IT09964950019 tel 39 011 9761039 info proietta com www proietta com 20 DICHIARAZIONE DI CONFORMITA PROIETTA s r l Sede legale e operativa Viale dei Mareschi 4 d 10051 Avigliana To Italy Dichiara che Il dispositivo proiettore Modello Impressive 1200 2500 È progettato e realizzato in accordo con i requisiti essenziali elencati nelle seguenti direttive Direttiva 2006 95 EC del Parlament...

Reviews: