background image

8

9

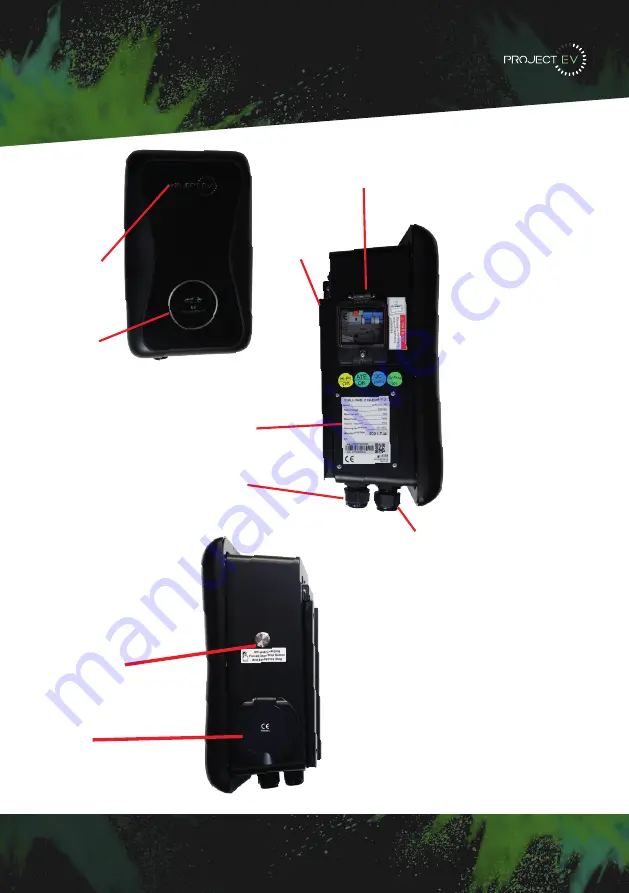
8. Emergency Stop / Force Charge Button

9. Type 2 Charging Socket 

Product Description

7KW

1. Charger ID Plate 

2. Mounting Bracket 

3. RCBO 

4. Comms Gland Entry 

5. Power Input Gland Entry 

6. Charger Status Indicator

7. Project EV Power Indicator 

3

4

5

6

7

4

1    

2

4    

5-8  


9    

10-13

14

15

16    

17-18 

19-21

22  

23-39


40-47

48-55

56-58  

59

60-63

64-65

66 


Summary of Contents for EVA-07S-PE-RFID

Page 1: ...EVA 07S S EVA 07S SE EVA 07S SE RFID EVA 07S PE RFID Single Phase AC Charger User Manual 7KW User Manual A Complete Guide From Installation To Operation ...

Page 2: ...wired Ethernet WIFI 4G is available for back office server connection We sincerely hope that this product can meet your needs and will continuously improve the quality of our products Disclaimer This user manual is copyrighted by Project EV Hereinafter referred to as ATESS Power Technology No company or person may extract or copy part or all of this user manual without the written permission of AT...

Page 3: ...ANT 5 YEAR WARRANTY ONBOARD RCBO ISOLATION DYNAMIC LOAD MANAGEMENT OFF PEAK TIME SHIFTING SOLAR COMPATIBLE Project EV are proud to be one of the most competitively priced electric vehicle charge point manufacturers on the market with a highly versatile range we are positive Project EV can solve all your charging needs Key Features Compact Design Attractive appearance simple but elegant Full Protec...

Page 4: ...ssioning Laptop Commissioning settings explained Choosing your app Project EV Standard App Using the App Creating a new account Commissioning Process EV Smart Charge Point Regulations App Status Charger Control Methods Scheduling a charge Making your unit bespoke Account Management Installer Miles Electric Miles Troubleshooting Further Support Warranty FAQ s Social Media 3 1 2 4 5 8 9 10 13 14 15 ...

Page 5: ...e Charge Button 9 Type 2 Charging Socket Product Description 7KW 1 Charger ID Plate 2 Mounting Bracket 3 RCBO 4 Comms Gland Entry 5 Power Input Gland Entry 6 Charger Status Indicator 7 Project EV Power Indicator 1 2 3 4 5 6 7 4 ...

Page 6: ...Protection Over voltage protection Under voltage protection Over load protection Short circuit protection Earth leakage protection Over temp protection Surge protection Function Accessory Yes Yes Opt Type 2 socket Ethernet WIFI 4G Outlet Type RCBO LED Indicator light Emergency stop button Intelligent power adjustment Opt CT Clamp Required Type A 6mA DC fault current protection Equivalent to Type B...

Page 7: ...socket Ethernet WIFI 4G Outlet Type RCBO LED Indicator light Emergency stop button Solar Compatible Dynamic Load Management CT Clamp Install Required Opt CT Clamp Required Type A 6mA DC fault current protection Equivalent to Type B CE UKCA SA8000 Accredited OZEV Approved Certification Mechanical 240 380 145mm 5KG Standard Opt EV FLRSTAND Opt EV GMEVA S 2 Wall mounting Floor pole Ground mounting Di...

Page 8: ...cket Ethernet WIFI 4G Outlet Type RCBO LED Indicator light Emergency stop button Solar Compatible RFID Dynamic Load Management CT Clamp Install Required CT Clamp Install Required Type A 6mA DC fault current protection Equivalent to Type B CE UKCA SA8000 Accredited OZEV Approved Certification Mechanical 240 380 145mm 5KG Standard Opt EV FLRSTAND Opt EV GMEVA S 2 Wall mounting Floor pole Ground moun...

Page 9: ...et WIFI 4G Outlet Type RCBO LED Indicator light Emergency stop button Solar Compatible RFID Dynamic Load Management Opt CT Clamp Install Required Opt CT Clamp Install Required Type A 6mA DC fault current protection Equivalent to Type B CE UKCA SA8000 Accredited OZEV Approved Certification Mechanical 220 375 145mm 5KG Standard Opt EV FLRSTAND Opt EV GMEVA S 2 Wall mounting Floor pole Ground mountin...

Page 10: ... socket version 7 for cable version 3 of the 7 screws are fo cable hook fixing 7 12x46 Plastic expansion plugs 4 7 4 for socket version 7 for cable version 3 of the 7 screws are fo cable hook fixing 8 User card 1 RFID function will be equipped user card 6 3DFNDJLQJ OLVW 1R 1DPH 4W 5HPDUN KDUJHU 8VHU PDQXDO 4XDOLW FHUWLILFDWH 0RXQWLQJ EUDFNHW DEOH KRRN 67 6WDLQOHVV VWHHO KH KHDG VHOI GULOOLQJ VFUHZ...

Page 11: ...ide 3 1 2 Remove the mounting bracket from the charge point use it as a template to mark the position of the drill holes Use the expansion bolts from the accessories bag and hammer these into the drilled holes Then fix the mounting bracket onto the wall 7 EOHG H JV QVWDOODWLRQ DQG ZLULQJ 0RXQW RQ D ZDOO 2SHQ WKH SDFNDJLQJ RX OO VHH D FKDUJH SRLQW D PRXQWLQJ EUDFNHW D XVHU PDQXDO DQG D EDJ RI PRXQW...

Page 12: ...ng is completed 8 11 3XW WKH FKDUJH SRLQW RQWR WKH EUDFNHW DQG IL LW ZLWK WKH VFUHZV DW WKH E WKH FKDUJH SRLQW 7KH LQVWDOODWLRQ LV GRQH ULPS WKH EHORZ VKRZQ LQVXODWHG IHUUXOH RU ULQJ WHUPLQDOV RQ WKH HQG RI WKH ZLUHV RQQHFW WKH ZLUHV LQWR WKH WHUPLQDO EORFN RI WKH FKDUJH SRLQW DV EHORZ ZLULQJ DQG WKHQ FORVH WKH 5 LQ WKH VLGH ZLQGRZ ORVH WKH VLGH ZLQGRZ ZLWK WK WKHQ WKH ZULQJ LV GRQH 3 1 3 Put the ...

Page 13: ...RQ D KDUG VXUIDFH FRQFUHWH VXUIDFH LV UHFRPPHQGHG LW FDQ DOVR EH PRXQWHG RQ D VROLG JURXQG ULOO KROHV DFFRUGLQJ WR WKH UHTXLUHPHQWV PDUNHG RQ WKH LOOXVWUDWLRQ IRU IL LQJ H SDQVLRQ EROWV L WKH SROH RQWR WKH KROHV ZLWK H SDQVLRQ EROWV 7KH LQSXW FDEOHV VKDOO JR LQWR WKH SROH IURP WKH ERWWRP PLGGOH DUHD DQG FRPH RXW RI LW IURP WKH DUHD EHORZ WKH FDEOH KRRNHU 3 2 2 The pole must be installed on a hard ...

Page 14: ... the inst configure par for use 4 1 Set com The Charger interface you between 1 an To set a static 1 Click Start higher searc 2 Click Chan 3 2 4 Fix the mounting bracket onto the pole 3 2 5 Position the charge point onto the bracket and secure it on the bracket with the 2 screws 3 2 6 Crimp the insulated ferrule or ring terminals on the end of the AC input wires Connect the wires into the terminal...

Page 15: ...RQ EROWV L WKH SROH RQWR WKH KROHV ZLWK H SDQVLRQ EROWV 7KH LQSXW FDEOHV VKDOO JR LQWR WKH SROH IURP WKH ERWWRP PLGGOH DUHD DQG FRPH RXW RI LW IURP WKH DUHD EHORZ WKH FDEOH KRRNHU 3 2 2 The pole must be installed on a hard surface concrete surface is recommended it can also be mounted on a solid ground Drill holes according to the requirements marked on the illustration for fixing expansion bolts ...

Page 16: ...n to the 3 modes for solar charge FAST Mode Charge at the rated power the car can be fully charged in the shortest time at this mode ECO Mode 1 The charge point uses only surplus solar power to charge car when the surplus solar power is greater than 1 76kw 6 amps 2 When surplus solar power is lower than 1 76kw the charge point will charge at 1 8kW and use grid power to offset the shortage part ECO...

Page 17: ...ad Management 7KW Dynamic Load Management For dynamic load management to work the CT clamp must be installed correctly and the following setting must be set Enable Power Allocation Enabled External current sampling method CT2000 External monitored max input power kw main fuse size External monitored max input power is measured in kw and must be set to the main fuse size so that if the load on the ...

Page 18: ... s 4GHz nect e the 7 4 Cannot access parameter setting page a Check if you have connected the charger to your computer b Check if you have changed the computer s IP to 192 168 1 x x can be any value between 1 and 255 except 5 To set a static IP on your Windows computer 1 Click Start Menu Control Panel Network and Sharing Center For Windows 8 and higher search for and open Control Panel and select ...

Page 19: ...perties 5 Select Use the following IP address and enter the IP address subnet mask default gateway Click OK and close the Local Area Connection properties window 6HOHFW QWHUQHW 3URWRFRO 9HUVLRQ 7 3 3Y DQG FOLFN RQ 3URSHUWLHV 6HOHFW 8VH WKH IROORZLQJ 3 DGGUHVV DQG HQWHU WKH 3 DGGUHVV 6XEQHW 0DVN HIDXOW DWHZD OLFN 2 DQG FORVH WKH RFDO UHD RQQHFWLRQ SURSHUWLHV ZLQGRZ F KH FDQQRW G KH DGGUHV H 6RP I I...

Page 20: ... the charger to access its parameter setting page ged the charger s IP to another value but cannot remember it you harger to factory setting by pressing and holding the reset button ess it using http 192 168 1 5 8080 r restoring the charger to factory setting you need to reset the rver url or the charger won t be connected to the back office server 33 19 Laptop commissioning settings explained Con...

Page 21: ...r to factory setting you ll need to reset the charger 4 Charger Subnet mask The default value is 255 255 255 0 It is not suggested to change If the subnet mask has been reset to other value and you have forgotten the new value you can restore the charger to factory setting by long press the reset button 5 Net MAC Address 6 Change the charger from static IP to DHCP It is recommended to use static t...

Page 22: ...ault gateway 33 Charger DNS server 34 Static hardmit output of the charger 35 Charging Mode 1 APP RFID mode 2 RFID Mode 3 Plug Charge Mode 36 RFID Default Pin 37 WIFI Password 38 Default charging cost for records for multi tariffs set up in the app 39 Daylight saving start end date 40 Plug charge allowed charge window 41 Heartbeat signal sent to the server time in seconds 42 Password required by s...

Page 23: ...OAD THE ELECTRIC MILES INSTALLER APP Static Dynamic Load management Pairs charger to network New Existing Builds Set spending caps Smart Charging Optimise based on tariff DOWNLOAD THE ELECTRIC MILES SMART CHARGING APP DOWNLOAD THE ELECTRIC MILES SMART CHARGING APP Electric Miles available on Save money and reduce your carbon footprint with reliable and smart EV charging Project EV are working with...

Page 24: ...d manage multiple accounts on a single app allowing for all users of a vehicle to have control over it s charging state The same can be done for multiple chargers which can be linked to a single app account to streamline control and simplify the process for the user Our simple intuitive UI means seamless guiding through multiple charging modes and time settings DOWNLOAD THE FREE APP TODAY DOWNLOAD...

Page 25: ...ing scheme and reserve charging 4 The user can modify the parameter settings of the charger 5 Users can authorise other users to use their own charger 6 The user can view the charging record 7 Users can manage and set up their own accounts Performance The APP is easy to use and reliable it guarantees information security and confidentiality Instructions APP download and install Android phone users...

Page 26: ...t register on the top right of the app and follow the required fields These are de noted with a next to them If an installer details are unknown please state unknown as they are a required field Once all the fields have been completed read and tick the user agreement before pressing register Installer details are used by Project EV to give assistance to installers and to contact them should an iss...

Page 27: ... the WiFi symbol in top right of the App a Go to WLAN settings b Connect to charger Serial Number c Enter password 12345678 d Go back into the App e Serial Number appears above connected next f Press Connected Next 6 Enter in the desired settings CAUTION Any WIFI details are case sensitive 26 HU WR IDFWRU VHWWLQJ RX OO QHHG WR UHVHW WKH FKDUJHU HU ZRQ W EH FRQQHFWHG WR WKH EDFN RIILFH VHUYHU 5HVHW...

Page 28: ...ions if you wish Demand Side Response DSR Any charge point with a DSR Agreement won t need to follow the default off peak charging regulations as a DSR Agreement will work in conjunction with the end user s electricity tariff enabling the user to save money Project EV has teamed up with Electric Miles who can provide this feature should you require it Randomised delay Please note when you set your...

Page 29: ...e two ways to do this The first way is to plug into the unit with a laptop and change setting 22 47 to 0 This will disable the pause in charging in peak hours The second way is once the unit is available on the app go into the settings into EV smart regulations and select the slider to the left 28 ...

Page 30: ...tings The slider to the left will turn off all time delays There are two options if you wish to keep the time delay default will operate and start the charge any time from 0 600 seconds whereas custom will start the charge after the set period of 1 1800 depending on the desired range Should you start a charge with the time delay enabled you can start the charge immediately by pressing the charge b...

Page 31: ...Project EV Standard App App Status Charger Offline Charger Faulted Car Plugged In Car Fully Charged Car Charging Schedule Charge Set 30 ...

Page 32: ... by swiping RFID card If applicable You can also use App for reservation and payment provided that the back office server supports such functions If you are using the Project EV App charging can be stopped by pressing the on off button on the App Always ensure you plug charger in vehicle then charger before using App or RFID 31 ...

Page 33: ...lug in vehicle then charger then tap RFID Charging can only be initiated or ceased by swiping RFID card Plug Charge Charging will start automatically after EV plugged in If you want to stop the charging just press the forced on off button on the side of the charger 32 ...

Page 34: ... You can make an appointment to charge according to the amount amount of electricity and duration For example if the preset power is 20kwh the charge point will automatically stop charging when the charging power reaches 20kwh Only one of the three charging schemes can be selected to take effect at 1 time Click the cost to set the preset amount When the preset amount is reached the charger stops c...

Page 35: ...want to start charging at 00 30 every day if the vehicle is connected to the chargepoint charging will start automatically The preset charging scheme and the reservation function can be used simultaneously However when using at the same time the lower reservation charging is only used as the start time and the reservation time period cannot be set 34 ...

Page 36: ...rger settings you can change charge rates which will be used to work out total cost in records The method of control App RFID Plug Charge can also be changed here along with the lead lock system solar modes On the setting page the user can view the charging station ID and the version number not modifiable in charger information Project EV Standard App Making your unit bespoke 35 ...

Page 37: ...your unit bespoke Charging Record Press Records found in charger settings to view past charge records this will include charger ID Gun A or B Time Energy Cost and many other great details to help you keep track of your EV charging 36 ...

Page 38: ...the chargepoint You can add a new chargepoint by adding a button Start and stop control of charger Press to turn on off Note when charger status is Preparing you can press to start charging Add charger When you use Project EV for the first time you need to add the charger in the APP to set up and control it The process of adding a charger is as follows Click Add to add a charger by scanning the co...

Page 39: ...nt If the person you want to authorise does not have an account you can register the new user by pressing the button in the upper right corner of the screen Users can manage their accounts set their avatars change their passwords and bind their mobile phone numbers and mailboxes Change password You need to verify the original password then enter and confirm the new password Modify the phone number...

Page 40: ...Project EV Standard App Account Management Forgotten Password For a forgotten password go to the login page click forgot password button and follow the instructions 39 ...

Page 41: ...itively With the Installer Miles App by Electric Miles you can Install and set up an EV charger at a new site or an existing build Configure the charger via hotspot to WIFI LAN or offline mode Set load management to either static or dynamic load based on customer needs Keep your customers easily informed about completed installations Get started Download Installer Miles today Just download Install...

Page 42: ...Installer Miles We re continuously innovating and improving this app Please scan the QR Code for an up to date version of this document SCAN ME 41 ...

Page 43: ...our charger The charger will go into pairing mode once plugged into the electrical circuit Please Note It is important to ensure the ethernet cable is unplugged if the charger is connected via a LAN cable Commission the charger via Installer Miles mobile app 1 Select the charger make and model 2 Configure the charger network and load management 42 ...

Page 44: ... near you Enter the name and password for the network the charger will be connected to and connect Note This step by step is IOS specific For Android phones a list of networks is shown To set up the charger with a LAN network Do not connect the charger ethernet cable before commissioning Installer Miles Network Setup 43 ...

Page 45: ...ect Make sure load management is set to CT clamp when a CT clamp is installed Turn off load management if no CT clamp or meter is present Note the charger output will be six amps if the setting is set to CT clamp and no CT clamp is installed If you set the Load Management to Meter ensure the correct meter address is entered 44 ...

Page 46: ...to connect to the charger once the charger is set up Make sure the charger is in pairing mode Accept to join the charger hotspot when the pop up appears Wait for the connection to the charger to be established and all the parameters sent to the charger When the commissioning is complete the app will show a success message 45 ...

Page 47: ... please perform all electrical tests using your Kewtech testing adaptor This equipment recreates charger states Confirm that all electrical tests have been completed by touching the Complete button We will then send a welcome email on behalf of Electric Miles to your customer 46 ...

Page 48: ...For further support contact Electric Miles using the email address or visit the FAQ pages on our website support electricmiles co uk www electricmiles com Installer Miles 47 ...

Page 49: ...ket leading smart charging experience With minimal set up the Electric Miles app will automatically and reliably charge your car during off peak hours saving you money and reducing your carbon footprint With Electric Miles Smart Charging you can Charge Instantly Optimise your charging Smart charge during off peak hours or by setting a spending cap to have your car ready on time View how when and b...

Page 50: ...Electric Miles Smart Charging App We re continuously innovating and improving this app Please scan the QR Code for an up to date version of this document SCAN ME 49 ...

Page 51: ... account and register Adding your Project EV charger Select Project EV from the charger make drop down menu and select your charger model Once prompted enter your serial number which can be found on the side of your charger Electric Miles Smart Charging App Setting up an account 50 ...

Page 52: ...pplier Add your electricity supplier by choosing your supplier and tariff name from the drop down boxes This will allow Electric Miles to optimise your electricity costs utilising smart charging and working out how much your EV charging will cost Electric Miles Smart Charging App Setting up an account 51 ...

Page 53: ... Charge From the 1st of July 2022 the UK is introducing new The Electric Vehicles Smart Charge Points Regulations 2021 This means you can now help balance the grid by applying a random delay of up to 10 minutes at the start of every charge You can check your charging history and view how much your EV charging is costing you Electric Miles Smart Charging App How to charge your car 52 ...

Page 54: ...u to change your car type charger or energy supplier and tariff Getting support with your charging Please email Electric Miles at support electricmiles co uk or visit our FAQ pages from the Electric Miles app to get support with your charging Restricted Charging The Electric Vehicles Smart Charge Points Regulations 2021 restricts the times when you can charge during the weekdays You can customise ...

Page 55: ... of your solar panels Rewards Partnering with sustainability retailers to offer exciting rewards to you Charge Multiple Cars Charge more than one car from the app Flex Charging Earn Benefits by helping the environment and the grid Tariff Switching Easily control and switch your tariff with Electric iles app 54 ...

Page 56: ...For support contact Electric Miles via email below or visit our FAQ pages support electricmiles co uk www electricmiles com Electric Miles Smart Charging App 55 ...

Page 57: ...LED indicator light Each fault is indicated with a sequence of different numbers of LCD blinking A pause of 3 seconds between each sequence indicates the beginning or end of a sequence If multiple faults happen at the same time each sequence of blinking shows in chronological order at an interval of 3 seconds Please see the table below for detailed information 56 ...

Page 58: ...charger is not still connected to phone check firewall problems On the 4G module Red band is the light solid or flashing Solid Check Sim is inserted correctly aerial is correct Slow Flashing Connected to 3G Network may take some time to show available Check 4G APN in charger parameters are correct for the Sim inserted Fast Flashing Connected to 4G Check 4G APN in charger parameters are correct for...

Page 59: ...charging is set charge can only start within the charging allowed time period d Check vehicle settings Cannot unplug the cable from the charging point When charging finishes customer can unlock the car with key and then unplug cable from car and the charging point If the cable cannot be unplugged from the socket outlet of the charging point please check if the charging connector is plugged correct...

Page 60: ... co uk during our opening hours in the bottom right of the page press the chat option One of the team will join the chat and provide any assistance needed This would be the quickest way to get in touch Option 3 Give us a call 0800 599 9582 Choose options Project EV 1 Technical Support 2 In the unlikely event that no one is available to answer immediately you will be placed into a que for 2 minutes...

Page 61: ...in the property Check all cables are installed correctly and are not loose or have been damaged Check power cable to the vehicle Check the manufacturers charging guidelines doors may need to be locked and the vehicle alarmed etc Make sure the vehicle software is the latest version please refer to the manufacturer guidelines Please make sure the charger is online we will not be able to remotely acc...

Page 62: ...ducts from ATESS or its distributor failed to pay the ATESS Products according to the purchase price ATESS is entitled to reject the claim under this warranty based on this provision B Cosmetic change in appearance stemming from the normal wear and tear over time of product materials for example the out casing charger sockets charger plug cables and so on C Installation on mobile or in a marine en...

Page 63: ...r additional ATESS Products F The Limited Warranty does not cover any other costs loss of use loss of profits and loss of production loss of revenues associated with performance or non performance of defective ATESS Products G If the authorized partner should cease to trade the warranty reverts to ATESS standard UK warranty which can be viewed online at www atesspower com The warranty is only vali...

Page 64: ...rikes epidemic unavailability of suitable and sufficient labor material or capacity or technical or yield failures and any unforeseen event beyond its control including without limitation any technological or physical event or condition which is not reasonably known or understood at the time of the sale of the defective Product s or the notification of the relevant warranty claim under this Limite...

Page 65: ...r airports Project EV DC Fast Chargers deliver the fastest EV charging rate currently available The DC Fast Charger is perfect for high traffic commercial locations fleets installations gas stations and at locations along major transportation corridors The DC Fast Charger is classified as a DC 750volt 50amp 3 Phase AC input charging station capable of 37 5 kW charge per hour My Project EV charger ...

Page 66: ...r property Check your signal strength by standing next to your charger and scanning for your home WiFi using a mobile phone or tablet Please check our YouTube channel to watch our tutorials support site or contact the Project EV team directly My Project EV app is showing my charger as Preparing Press Start on the app My Project EV charger is not working and is showing an Amber light Press Start on...

Page 67: ... projectevuk weareprojectev projectev SOCIAL MEDIA FOLLOW US ON 66 ...

Page 68: ...Project EV Unit 1 Lakes Court Lancaster Park Newborough Road Burton On Trent DE13 9PD www projectev co uk enquiries projectev co uk 0800 599 5982 ...

Reviews: