background image

Montageanleitung / 

Installation manual


MBN GmbH 

 Balthasar-Schaller-Str. 3 


86316 Friedberg 

 Germany 

www.proled.com


36 

IMPORTANT! IF YOU FORGET THE CODE, YOU CAN NO LONGER ENTER  ANY 
MENU AND YOU CAN NOT EDIT OR MODIFY PROGRAMMS! IN THIS CASE YOU 
HAVE TO ASK YOUR DISTRIBUTOR TO UNLOCK THE DEVICE! 


INFORMATION 

Some product data can be read in this window. 


Product


– product name 


Factory


– company name who produced the product 


Software


– version number and advertising date 


Hardware


– version number and producing date 


Serial No.


– unique number for each product 

ZONE MODE 

– DMX PATCH 

It  is  very  important  to  select  the  right  type  of  light  mode,  and  also  to  set  its  DMX 
address. 


Touch the color type buttons to select colorful or unicolor modes. 
 
If the UNICOLOR mode is selected, 10 different one color modes can be selected by 
touching the EFFECT button. You can control one effect with 1 to 5 DMX channels or 
select  up  to  5  independent  dimmer  channels.  The  connector  lines  helps  to 
understand which effect corresponds with a specific DMX channel. 
Dimmer is only one channel light. It must not be white, but  it can be any light  color, 
which can be controlled by one DMX channel. 
 
If  the  COLORFUL  mode  is  activated,  then  four  different  modes  can  be  selected: 
RGB, RGBA, RGBW, and RGBAW. 

Summary of Contents for Touch Control LCD RGB DMX

Page 1: ...PROLED Touch Control LCD RGB DMX Bedienungsanleitung User s manual...

Page 2: ...SPLAY 8 ERSCHEINUNGSBILD 9 MEN ANPASSUNG 11 CODE 12 ZUR CKSETZEN AUF DIE WERKSEINSTELLUNGEN 12 INFORMATION 13 ZONE MODUS DMX PATCH 13 REMOTE DEVICE MANAGEMENT 14 INTER MODULE COMMUNICATION 14 UNIVERSA...

Page 3: ...t RDM kompatibel so k nnen RDM Einheiten direkt angesteuert werden und neben den Vorteilen des RDM Standards k nnen auch Sensorwerte von DMX Einheiten ausgelesen werden wie z B Temperatur Spannung und...

Page 4: ...chenden Schraubklemmen Schlie en Sie die Stromversorgungsleitungen an die Eingangsklemmen an Sobald die Versorgungsspannung anliegt beginnt der Controller zu arbeiten Setzen Sie die Vorderseite wieder...

Page 5: ...3 Steuerkan le 3 Ausgangskan le DIMMER 4 4 4 Steuerkan le 4 Ausgangskan le DIMMER 5 5 5 Steuerkan le 5 Ausgangskan le RGB Rot Gr n Blau RGBA Rot Gr n Blau Bernstein RGBW Rot Gr n Blau Wei RGBAW Rot Gr...

Page 6: ...zurufen Der TSC wird dann folgenden Bildschirm anzeigen Zeit und Datum k nnen mit den und Tasten eingestellt werden Das Zeitformat kann durch Ber hren der 12h oder 24h Optionsfelder ausgew hlt werden...

Page 7: ...verschiedenen Farben angezeigt Schwarz Synchronisation nicht aktiviert Rot Synchronisation aktiviert aber kein einkommendes GPS Signal vorhanden Gr n Synchronisation aktiviert und betriebsbereit Sync...

Page 8: ...ird geschlossen und der TSC speichert alle Modifikationen DISPLAY Die Helligkeit des Displays kann in einem Bereich von 5 100 eingestellt werden Es besteht zus tzlich die M glichkeit eine weitere seku...

Page 9: ...O OFF Optionsfeld aktiviert ist k nnen Sie hier die Auto Off Zeit konfigurieren nach deren Ablauf nach dem letzten Tastendruck die sekund re Helligkeit aktiviert wird AUTO OFF BRIGHTNESS Fader ber hre...

Page 10: ...hes Logo ein bzw aus ein eigenes Logo kann ber das MBN USB DMX Interface zum TSC bertragen werden Background Color Hier k nnen Sie eine Hintergrundfarbe selektieren die dann dauerhaft angezeigt wird B...

Page 11: ...ROGRAM BUTTON size Die Gr e der Schaltfl chen im Programmfenster ist variabel Wenn eine Zone nur eine Schaltfl che umfasst kann sie gr er dargestellt werden Sobald Sie weitere Schaltfl chen hinzuf gen...

Page 12: ...t eingegeben werden und wenn beide Codes identisch sind wird die Sperrung aktiviert ACHTUNG FALLS SIE DEN CODE VERGESSEN K NNEN SIE AUF KEIN MEN MEHR ZUGREIFEN ODER PROGRAMME NDERN IN DIESEM FALL M SS...

Page 13: ...mit den Standardfarben berschrieben Programs alle Programme werden gel scht Own Logo das benutzerspezifische Logo wird gel scht INFORMATION In diesem Fenster werden einige Produktdaten angezeigt Prod...

Page 14: ...n einkanaliges Licht Es muss nicht notwendigerweise wei sein sondern kann jede Farbe besitzen die mit einem DMX Kanal gesteuert werden kann Wenn der COLORFUL Modus aktiviert ist k nnen vier verschiede...

Page 15: ...DM Pakete zum Ausgang gesendet Wenn das Netzwerk deaktiviert ist k nnen jedoch weiterhin Software Updates und Daten bertragungen vom PC ber das MBN USB DMX Interface erfolgen Lediglich die Kommunikati...

Page 16: ...bieten Eines dieser Ger te ist das USM Modul Zwei verschiedene Funktionen k nnen in diesem Men Programmiert werden ein Temperatursensor und eine Fernbedienung Temperatursensor Wenn das USM Module mit...

Page 17: ...jede Zone einen RGB Wert einstellen Es kann jeweils nur eine Zone gleichzeitig modifiziert werden Selektieren Sie einfach eine Farbe ber die RGB Palette Die aktuellen RGB Farben am Ausgang werden dan...

Page 18: ...TNESS Fader k nnen Sie die gew nschte Helligkeit der Farbe von 0 bis 100 einstellen Im Fadermodus k nnen Sie jeden Kanalwert der RGB Grundfarben Rot Gr n und Blau ber einen separaten Fader einstellen...

Page 19: ...ben WEISS und BERNSTEIN wobei eine Farbe immer 100 ist Mit dem BRIGHTNESS Fader k nnen Sie die gew nschte Helligkeit der Farbe von 0 bis 100 einstellen Im Fadermodus k nnen Sie jeden Kanalwert der RGB...

Page 20: ...ngezeigt Sie k nnen die Zonennamen ndern indem Sie das Namensfeld gedr ckt halten bis das Texteingabe Fenster erscheint MASTER FADER Wenn der Master Fader im Programmfenster Men eingeschaltet ist wird...

Page 21: ...Programm pro Zone gleichzeitig ausgef hrt werden Wenn sich mehrere Programmschaltfl chen in einer Zone befinden und bereits ein Programm ausgef hrt wird bewirkt das Starten eines zweiten Programms aut...

Page 22: ...as Wait Speed Fenster erscheint Auf der linken Seite k nnen Sie die WAIT Zeit mit den und Tasten einstellen Auf der rechten Seite k nnen Sie die SPEED Zeit mit den und Tasten einstellen In der Mitte k...

Page 23: ...funktion des USM Moduls kombiniert werden Dies bedeutet dass das Programm nur gestartet wird wenn Uhrzeit und Datum mit der im Kalender programmierten Start Stop Zeit bereinstimmt und zus tzlich der s...

Page 24: ...schlossen sind k nnen Sie zur Selektierung der Programmschaltfl chen verwendet werden Jedes USM Ger t verf gt ber 8 Kontakteing nge F r jedes USM Modul kann ein Namen eigegeben werden um die Identifiz...

Page 25: ...er Ger te erleichtert Sobald der Netzwerkmodus aktiviert ist und weitere Ger te an die IMC Leitung angeschlossen werden wird die Netzwerkverbindung automatisch erkannt und ist sofort betriebsbereit Da...

Page 26: ...ETTING 30 MAIN MENU 31 LANGUAGE 31 DISPLAY 32 APPEARANCE 33 PROGRAM WINDOW 34 CODE 29 FACTORY DEFAULT 35 INFORMATION 35 ZONE MODE DMX PATCH 36 REMOTE DEVICE MANAGEMENT 37 INTER MODULE COMMUNICATION 37...

Page 27: ...C zones The DMX output of the TSC is RDM compliant so it can control RDM compatible devices and besides all the advantages of RDM it is also able to check sensor values of DMX devices such as temperat...

Page 28: ...corresponding screw terminals Connect the voltage supply cable to the power input terminals the controller now has power and will start operating Put the front part on the back part by passing the po...

Page 29: ...3 output channels DIMMER 1 4 1 control channel 4 output channels DIMMER 1 5 1 control channel 5 output channels DIMMER 2 2 2 control channels 2 output channels DIMMER 3 3 3 control channels 3 output...

Page 30: ...ate time synchron if this option is enabled and and an USM module with GPS receiver or DCF77 receiver is connected via IMC line then date and time will be automatically synchronized In this case also...

Page 31: ...one of them will have to send its DATE TIME data and the other devices are synchronized automatically MAIN MENU Touch the MENU text on the header line of the screen and the MENU window will open Actua...

Page 32: ...he brightness of the display can be adjusted in a range from 5 100 There is also a secondary brightness level which is activated after a configurable time from the last user entry This secondary brigh...

Page 33: ...about the appearance of the screen and working mode of the TSC IMC DMX RDM Icon on header communication icons appear or disappear in the header line of the display Background logo switch background l...

Page 34: ...d off PROGRAM BUTTON size The button size in the program window is variable If one zone has only one button then there is more space in the zone area and the button can also be bigger If you add more...

Page 35: ...restore language to English brightness zone names appearances menu parameters program window menu parameters Preset colors preset colors will be overwritten with default colors Programs all programs w...

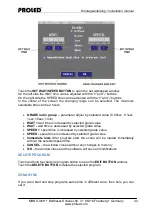
Page 36: ...for each product ZONE MODE DMX PATCH It is very important to select the right type of light mode and also to set its DMX address Touch the color type buttons to select colorful or unicolor modes If t...

Page 37: ...TSC is used the network communication can be disabled DMX RDM transmit DMX output switch on and off if switched off then no DMX signal will send on the output RDM sensor check RDM communication switc...

Page 38: ...ferent features can be programmed in this menu a temperature sensor and a remote controller Temperature sensor If the USM module is used with temperature sensors then each of them can be assigned to o...

Page 39: ...be set Only one zone color can be changed at a time The actual changeable zone color is for the selected zone The current RGB colors can be seen on the upper side of the screen in four rectangular fi...

Page 40: ...em is always 100 To regulate the selected color to 0 you can do it by BRIGHTNESS slider In slider mode you can set the channel value with the sliders separately To change between palette mode and slid...

Page 41: ...color on the palette consist of all the 3 primary colors RED GREEN BLUE and two additional color WHITE and AMBER and one of them is always 100 To regulate the selected color to 0 you can do it by BRIG...

Page 42: ...der will be displayed These sliders reduce the current output brightness If this master slider is not enabled then there is no reduction of the output values and only the programmed colors can be seen...

Page 43: ...of program S number of program step ADD NEW SCENE TO AN EXISTING PROGRAM Touch and hold touched one program button to open the EDIT BUTTON window Touch the ADD SCENE button to go to manual mode Select...

Page 44: ...sec 10sec 1min WAIT wait time is increased by selected grade value WAIT wait time is decreased by selected grade value SPEED speed time is increased by selected grade value SPEED speed time is increas...

Page 45: ...the building with built in LED s We want to switch on the LED s when night is falling it is in summer later in winter earlier and switch off at 22 00 Switch on again at 4 00 in the morning and switch...

Page 46: ...vice provides 8 input contacts You can enter and edit a name for each USM module This makes it easier to identify different devices The contact type can be switch or push The program which is controll...

Page 47: ...r each zone It will help to identify the zones on the other device screens If the network mode is enabled and more devices are connected to the IMC line then the network connection will be automatical...

Reviews: